Scratch-N-Stamp
Search

Checkout

Keep up with Sales, New Products and other events at Scrap `n Stamp. Sign up for our newsletter now!

What's New

Hot Deals


Stencils

Tuesday with Tara {take 55}

Happy Tuesday!  I’ve got a quick & easy card for you today- a one layer lovely, which are very rare for me, but I saw a card that inspired it and it just didn’t seem to need anything else 🙂

love you one layer

All I’ve used for this card is a sentiment and the little flower bit stamps from the Avery Elle Oh Happy Day set I’ve been loving on lately, a selection of Distress Inks and a heart stencil (this one is by Dina Wakely).  It’s all stamped on an ivory card.  I used washi tape to adhere the stencil to my card front, then I started with the largest flower stamp and moved on from there to fill in the heart shape.  The rough texture you see here is a look you may be familiar with if you are using clear stamps without ‘priming’ them, but I kinda liked the look for this card.  (You’ll get a much crisper image if you ink your stamps in Archival black ink first, before stamping with water based ink.)

It’s a very simple card that you could really play around with a variety of color and stencil shapes as well 🙂

Hope you have a creative week!

Inky hugs,

Tara

Tuesday with Tara {take 55} Read More »

Tuesday with Tara {take 52}

Happy Tuesday!  Week 52 of my Tuesday blog posts means that it’s been a full year that I’ve been sharing with y’all!  So I figured I’d take a chance and share something completely different, since it’s what I felt inspired to create this past week 🙂  I went into my studio to create a card and ended up painting a big 16×20 inch canvas!  Not exactly what I started planning, but I had ideas for an empty spot on my mantle and a blank canvas, so I decided to go for it!

While this is completely different than what I normally create, the materials I used are not- I’ve used acrylic paints by Ranger (mostly Dina Wakely, with a few of my older Studio line paints in the mix), patterned paper, a stencil and some texture paste.  Here’s the finished product:

big sunflower (2)

I started with an idea and a blank canvas- looked up to see how other people had done similar flowers on pinterest and let it go from there… I started by sketching my basic shape with a pencil on the canvas.  Then I used gel medium to add some torn patterned paper (a simple music pattern) and applied texture paste through a stencil over that.  I also used a spatula to apply some additional texture paste on the petals for a bit of extra dimension.

big sunflower (6)

Once all that was dry, I started painting my basic flower shape.  Here’s the only progress photo I took- it shows the basic flower before I added the background and final details, it also gives a bit of a better look at the textured base I started with!

Here’s some different close up and other angels of my canvas.  It’s a sunny addition to my mantle, perfect for summer!

big sunflower (5)

big sunflower (4)

big sunflower (3)

big sunflower (1)

The dots were created using the end of my paintbrush.  I used a couple different sizes and amounts of paint to get the variety of sizes.  This was a fun project, a whole lot larger than I usually tackle but I really found it relaxing!  It’s a simple enough shape to draw free hand, and the pencil sketch at the start makes it very forgiving as well!  I’ve got another home decor project to share with you in an upcoming post, but I’ll be back next week with a card!

Have a creative week,

Inky hugs,

Tara

Tuesday with Tara {take 52} Read More »

Tuesday with Tara {take 48b}

***last week’s post had a few glitches we don’t quite understand, so we’re trying a ‘b’ take of it, hopefully this time images will be visible on mobile devices***

Happy Tuesday!  Today I’ve got a couple tags I created, doing a bit of experimenting to see which end result I liked best Often I share just the end result, but the process is really the fun part, so I thought I’d show both and tell you a bit about what I did to get these results.

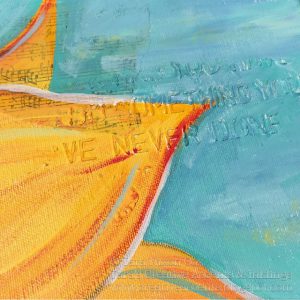
I started with two kraft tags, which I had primed with white gesso.  I wanted to use the baby wipe technique for my background, so decided to tape them together temporarily (washi tape on the back side) to give myself a larger work surface. This is not a new technique, but I hadn’t done it for a while!  Here’s a brief video from a few years back of Dina Wakley showing this technique, if you’re not familiar with it.  I applied paint with my fingers in smaller spots and overlapped colors as I moved across the tags.  I kept it simple working with 3 colors and stencils, and for some reason the bees really popped out for me.  Here’s the finished background.

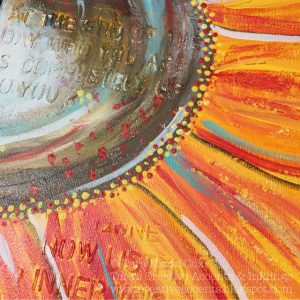
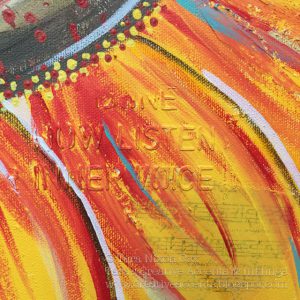
I got to visit the store in Granville Island last week and this sentiment stamp from Impression Obsession jumped out at me, so it inspired me to finish the tags with a focus on bees.  I first stamped the sentiment on each tag so that I wouldn’t smear texture paste by stamping later.  I wanted to draw attention to the yellow bee that was on the bottom of this tag, so lined up the stencil over it and applied transluscent texture paste, then some glitter flakes over it.  I repeated this closer to the sentiment on the tag.  Here’s how it came out.

For the second tag my eye was drawn to the large red heart, so I decided to add a large yellow bee.  In mixed paste before, I’ve found they tend to lighten to pastel shades, I wanted bright so brought out the big guns and added both paint and Color Burst to a little bit of opaque white paste.  It turned out amazing!  As before, I applied paste through the stencil and added a bit of glitter after (a smaller chunky glitter this time).

Thanks for stopping by- I hope you’ve been inspired to take the leap and experiment with your supplies!  Who knows, maybe you’ll fly…

Inky hugs,

Tara


Tuesday with Tara {take 48b} Read More »

Free Shipping Anywhere In Canada