Scratch-N-Stamp
Search

Checkout

Keep up with Sales, New Products and other events at Scrap `n Stamp. Sign up for our newsletter now!

What's New

Hot Deals


Tuesday with Tara

Tuesday with Tara {take 4}


Happy Tuesday! Today I’ve got a blue “Christmas in July” card to share with ya’ll! I don’t know about you, but I always plan to start my Christmas cards in the summer (when all those Christmas in July sales start happening 😉 and when people start sharing how many weeks until Christmas countdowns on facebook…), but never really get around to making actual progress! Maybe this will be my year? LOL

Anyways, I have learned over all my years of card making that if I actually want to send out cards to people, I need to keep them simple! My favorite way to do this is to stick with a simple layout but find fun ways to add texture and bits of bling (it’s for the holidays, after all!) so today’s card showcases a fun way to keep it simple, but definitely not boring!

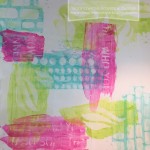
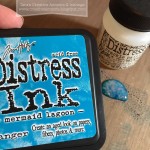
I created some fabulous texture for my card by applying texture paste through a background stencil (isn’t this one by Memory Box gorgeous?!) onto a shimmery cardstock.  I could have used plain white cardstock, but was really curious how the Distress Stains Spray I planned on using would react to both the cardstock and the texture paste… I think it came out pretty neat!  I’ve used Peacock Feathers, which is such a happy shade that really works in ALL seasons!  I did deliberately rough edges with my texture paste, to keep the background really interesting.


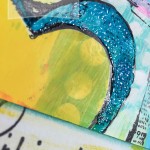
I’m in the middle of a crisis with my Vagabond machine, so I opted to embellish the card with a chipboard snowflake from my stash instead of a die cut chipboard shape as I was intending to do.  This was painted with two shades of teal/turquoise paint and then topped with some Rock Candy Distress Stickles for some shimmer.

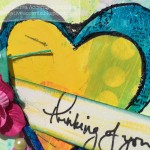
Once everything was dry, I tied on some ribbon and twine and attached it all to the card, tying on a pewter Christmas charm to add some pop.  A bit of bling scattered across the card finishes everything off!


supplies used:

a2 card in blue

pearl white card stock (4×5.25″)

merry christmas stencil by Memory Box

ranger texture paste

distress spray stain in peacock feathers

snowflake chipboard shape by Maya Road (or cut your own!)

merry christmas “tidings tokens” by Tim Holtz idea-ology

turquoise paint by Dina Wakley

classic teal paint by Claidine Hellmuth Studio

clear rock Candy Distress Stickles

ribbon & twine

bling (Hero Arts?)

Tuesday with Tara {take 4} Read More »

Tuesday with Tara {take 3}

Happy Tuesday!  I’m back with another tag to share with you today, featuring some fab products & techniques by Tim Holtz.

This tag highlights a fun watercolor background technique done by printing/stamping with Distress Inks on a stencil.  Simply wipe a selection of Distress Ink onto a stencil (I find lots of solid space works best!), spritz with water and then press your stencil ink side down onto some watercolor paper.  Use a rag or paper towel to add pressure and make an even impression, then lift your stencil and check out your watercolor background!  It can take some practice playing with the correct amounts of ink & water, but you’ll have pretty backgrounds regardless 🙂

I finished off my tag with some yummy crinkle ribbon in the same colors as my background and a hot air balloon stamp colored with Distress Markers in the same colors.

Here’s a card I made featuring the same technique, but this time I layered some butterflies over the background:

If the stencil you’re using for your background has a ‘right’ side, be sure to ink it up on the OTHER side so it’s going the right direction when you print it 🙂

Hope you have a fabulous Tuesday and find some time to get creative today!


Tuesday with Tara {take 3} Read More »

Tuesday with Tara {take 2}

Happy Tuesday! Today I’m sharing with you a card I made featuring fabulous products from Ranger designed by the amazing Dina Wakley!

I created a background on a gesso-prepared piece of cardstock with paint & stencils by Dina and baby wipes. I’m still learning WordPress and haven’t fully figured out how to add photos where I want them except in a gallery form- but in this gallery you will see my background 🙂 Be sure to click through to see the full card and all my close ups! I used Dina’s Handwritten Heart Collage Stamp set as the main image for my card, which I stamped in Black Archival over the prepared background. Once that dried, I painted inside the heart with yellow paint.

The fun texture on this card is made with Distress Crackle Paint in Clear Rock Candy (I believe Ranger discontinued all the colors, but CLEAR is still available, and in a larger tub.) This stuff ROCKS and you will find lots of uses for it! You’ll see a photo in the gallery that shows how easy it is to tint and add a punch of color- I simply wiped some Mermaid Lagoon Distress Ink on my craft sheet and poured a bit of crackle on it, mixed them together and painted it with a small paintbrush. Be sure to clean up your brush right away when you are done, then walk away and let it dry and work it’s magic! I let this sit for about 20 minutes before continuing with my card… it might have been done sooner than that, but I wasn’t around to check 🙂


The rest of the card is pretty simple assembly… my sentiment was stamped on a strip of paper the same width as my card, which I added a bit of yellow paint and Mermaid Lagoon ink to. I cut a slit in the edge of the heart to slide it through and raised the front portion with foam squares. A bit of jute and flowers & a few pearls (all from my stash by Prima) finish off this simple card! Hope you like it!

Tuesday with Tara {take 2} Read More »

Free Shipping Anywhere In Canada