Scratch-N-Stamp
Search

Checkout

Keep up with Sales, New Products and other events at Scrap `n Stamp. Sign up for our newsletter now!

What's New

Hot Deals


Stencils

Tuesday with Tara (take 81)

Happy Tuesday!

Today I`ve got something different to share with you… it`s by no means a new type of project, but it`s something I haven`t created for years and I`ve never shared any with you before- today I have a few ATC`s to share!

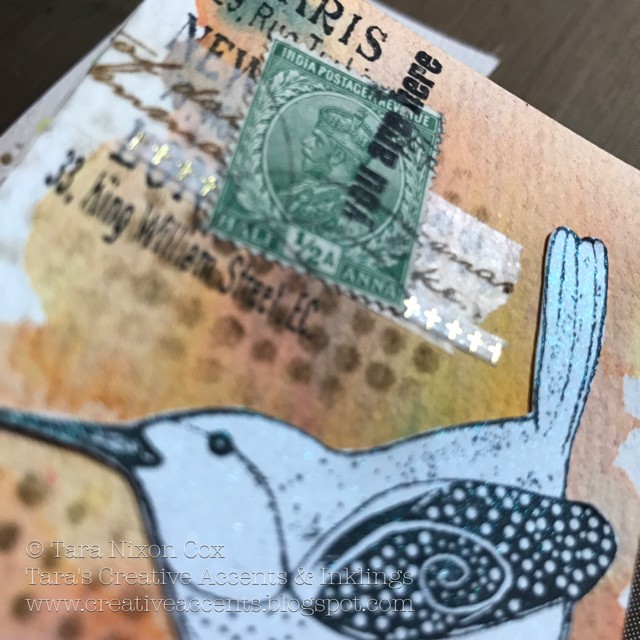
An ATC is an Artist Trading Card and it`s a mini piece of art (2.5×3.5 inches) designed to be traded.  I recently reconnected with some stamping friends I met online probably 15 years ago, and one of them had the great idea to host an ATC swap. The only guideline we were given was to use postage stamps as our inspiration… Here are a few of the ATCs that I`ve made so far for our swap.  I selected a couple rubber stamps to be my focal point- these funky birds are by Magenta, and I thought they would look great in black & white with a bold watercolored background.  I want each card to be unique though, so I`ve played around with a variety of colors, all created on Watercolor paper with Color Burst.

birdATCs (2)

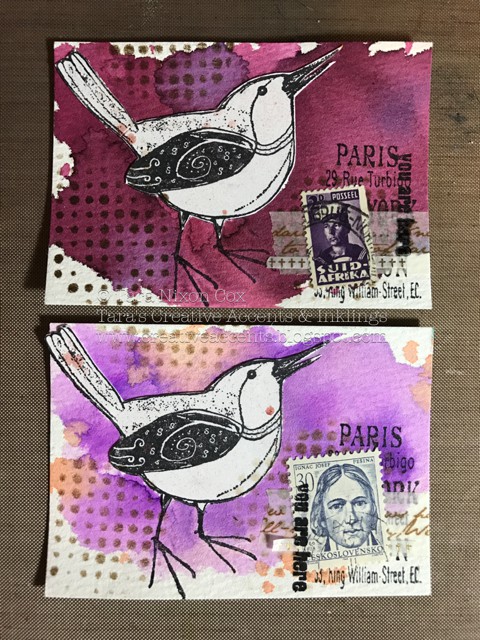
Since these are so small, there wasn`t much room to add details or embellishments!  I added a bit of Distress Ink through a stencil and a simple text stamp under some washi tape to frame the vintage postage stamp I finished them off with.

birdATCs (3)

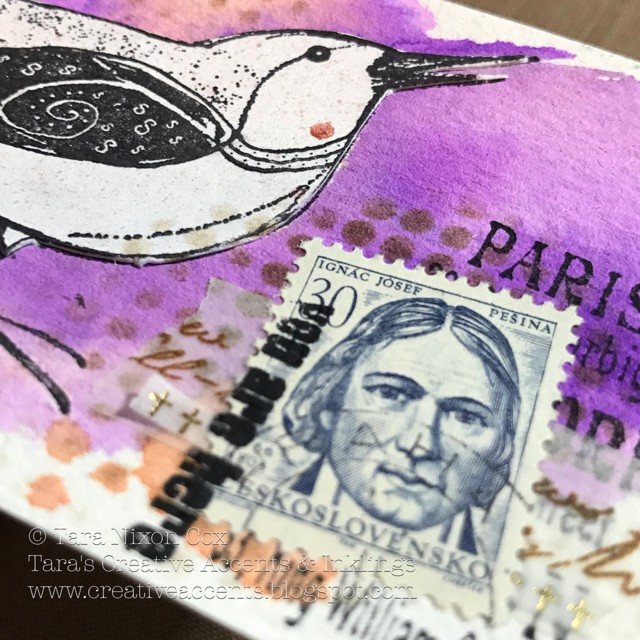
It was hard to capture it, but the birds have a light shimmer from Perfect Pearl Mist.

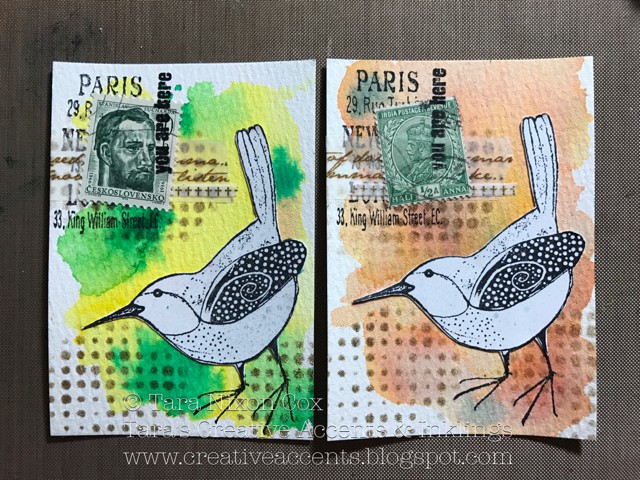
Here`s two more ATC`s I made with the same supplies.

birdATCs (4)

My close up shot of these shows off the Perfect Pearl shimmer a bit better…

birdATCs (1)

These were fun, and I`m looking forward to creating the rest of my set to swap… it`s great to be doing something NEW for 2017 and I can`t lie, it`ll be great to get some happy mail!

Now a side note… have you been keeping up with all the sneak peeks of new products coming out at the Creativation trade show (formerly CHA)- there is a bunch of fabulous new products, and I`ve been having a ball watching Tim Holtz share his on Facebook live.  I`ve shared a few links on our Facebook page, so check it out!

Here`s hoping you have a fantastic, creative week.

Inky hugs,

Tara

Tuesday with Tara (take 81) Read More »

TBT with Shari T – Roses and Hearts Candle


HELLO THERE & HAPPY NEW YEAR!!  Thanks for joining me today as we continue the Throwback Thursday feature at the Scrap’N Stamp Blog!  As the ‘Season of Love’ is creeping into view, we’re going to share Love and Valentine’s themed projects for the next several TBTs to get ya’ll in the mood!!  Today, we’re going back to a project I created two years ago for the Eclectic Ellapu DT that I was on….

DSC05848

DSC05702

I gathered up my supplies that I’ll need for this project–let’s see, a 6″ pillar candle, some Distress Paints, some tissue paper & color Core’dinations stock, my Hearts layering stencil and my Tattered Pinecones die.

DSC05703

I stenciled pink & red hearts onto my tissue paper using little finger dabbers for each paint color.

DSC05742

I applied a light layer of matte gel to my candle and gently placed the tissue paper down and rolled the candle to let the tissue paper naturally fall onto the surface of the candle.  There were a few wrinkles, but I was able to smooth those down (for the most part) with an additional layer of matte gel brushed over the tissue paper.

DSC05826

I formed a bunch of paper roses with my Tattered Pinecone die and I’ve found a chipboard heart in my stash that I painted with a coat of gesso.

I applied a piece of stamped tissue paper to my gesso’d chipboard heart with matte gel and heat dried. Then I rubbed Worn Lipstick & Barn Door Distress Stains over the surface with my finger and heat dried, then I finished this heart with a layer of Clear Rock Candy Distress Crackle Paint, and let air dry.

DSC05837

Isn’t that crackly surface divine?  Before I adhered it to my candle, I rubbed Black Soot Distress Ink over the surface and edges to highlight those cracks!

I stamped the sentiment, from the TH/SA Simple Sayings set, onto tissue paper with Jet Black Archival ink and applied the ripped pieces to the candle with matte gel.

DSC05840

I wrapped the candle with some funky yarn, adhered the crackly heart with foam squares and hot glued the roses in place.  TA-DA!  That’s all she wrote!!  Pretty easy, right?  With just a few products and items, you can embellish a plain candle any way you need and you’ve got yourself a lovely new piece of home décor, or a unique gift to give.  Don’t be surprised if you see other seasonally decorated candles in the coming year! 🙂

Thanks so much for stopping by & Until next time–Stay Artsy Fartsy!!

DSC04507

SUPPLIES I USED:

  • 6″ Unscented Pillar Candle
  • Distress Paints & Ink (Tim Holtz/Ranger); Archival Ink (Ranger)
  • Tissue Paper; Color Core Stock (Tim Holtz/Core’dinations); Chipboard (cereal box)
  • Tattered Pinecone Die (Tim Holtz/Sizzix); Big Shot Machine (Sizzix); Heart #5 Sizzlet Die (Sizzix)
  • Funky Yarn; Clear Rhinestones
  • Heat Tool; Craft Sheet (Ranger); Matte Gel (Liquitex); Foam Squares; Hot Glue Gun; Round Toothpicks

TBT with Shari T – Roses and Hearts Candle Read More »

My Pumpkins – Halloween Bonus Project

HAPPY HALLOWEEN!!  Hi There, It’s me Shari from Ain’t That Artsy Fartsy and I’m so happy to be here today to share a fun little décor piece I made for Halloween.  With so much Halloween inspiration out there, and with a little apropos change to a song lyric, I came up with…..

dsc00308

…wait for it……

dsc00319

While you’re all laughing and chair dancing, I’ll tell you a little bit of what I did to make this altered wooden house.

dsc00291

I cut my house out of a piece of unfinished poplar.  This house measures 9″ x 4″ x 1″ and I covered the front and back with pieces of Tim Holtz Regions Beyond Paper Stash that I had stitched together with my sewing machine.

dsc00292

I roughed up the edges with my paper distresser and inked with Black Soot DI then adhered to the front and back surfaces with matte Decou-Page.  I added smears of black gesso with my fingers and adhered a long piece of Design Tape to the outside edge.

dsc00310

I added stenciling to the front and back sides of the house with Tim’s Gothic Layering Stencil and black modeling paste.  While the paste was still wet, I sprinkled Shabby Shutters Distress Glitter over it, tapped off the excess and let air dry.  While that was drying, I spritzed pieces of cheese cloth with a combo of Hickory Smoke and Black Soot DSS and heat set.

dsc00327

The tree and fence are older Sizzix dies that I treated with crackle paint and rusting powder respectively.  When the crackle paint dried on the tree, I rubbed it with antiquing cream to accentuate all of the neat texture, then I started to adhere the pieces onto the house.

dsc00309

This little foursome of cutie-pies is from Tim’s Found Relatives-Occasions.  I fussy cut them from their card and colored their Jack ‘o Lanterns with my Pumpkin Spice DM.  I die cut a bunch of leaves and roses from the Tiny Tattered Florals die from a mixture of Kraft Core, Color Core and Regions Beyond Paper Stash.  I stained the Pumpkin Pieces with Hickory Smoke DSS and gave all of the roses and leaves a spritzing of Pewter Perfect Pearls Mist.

dsc00321

The song lyrics were printed onto white card stock and cut into bands.  I sealed with matte Decou-Page and then coated with clear crackle glaze.  When the crackle glaze was dry, I rubbed with Hickory Smoke DI and adhered onto the house with matte Decou-page.

dsc00322

I outlined the word bands with Black Soot DI and my water brush, then brushed a wash of translucent white paint around the edge of the house, spritzed with water and let the watery paint drip down.

dsc00327

To finish the house, I attached a Typed Token and applied one final splatter of off-white paint to the front and back sides of the house.

I hope you’ve enjoyed my little Halloween house today and will come back later in the week for our Throwback Thursday feature.

Until next time–Stay Artsy Fartsy!! XOXO-Shari

My Pumpkins – Halloween Bonus Project Read More »

Free Shipping Anywhere In Canada