Hi everyone! Thank you for stopping by today for our Tuesday Tutorial.
Today I am going to show you how to use Dreamweaver Crackle embossing paste. It has been a while since I did the first tutorial on using Crackle Embossing paste and this is the Dreamweaver technique that we get the most emails and questions about so I thought it was time to update it as I have learned a few more tricks and done some new samples that I wanted to share with you.
This is a really fantastic technique and once you master it you will be able to create stunning images for your cards, scrapbook pages and altered projects. There are a few steps in this technique and some drying time between coats of paste but your patience will be rewarded when you see the final piece.
I should warn you now, this is a really long tutorial. You may want to grab a cup of your favorite beverage and a snack before you start reading. LOL!
The first thing you need to do is gather your supplies and prepare your work surface.

You are going to need:
- a plastic work surface to protect your table (I use a clear desk mat from Ikea)
- a tub of warm, soapy water and a soft cleaning brush
- blue painters tape (NOT masking tape – that’s too sticky and will rip your paper when you remove it) or Scotch Removable Tape
- paper towels
- Dreamweaver Offset Palette Knife
- 1/4″ & 1/8″ Dreamweaver Stencil Brushes (if you care going to add color over the crackle paste)
- heavy cardstock or watercolor paper
- Dreamweaver Matte Black & Crackle Embossing Pastes (you can use any dark colored embossing paste as your base – Glossy Black, Glossy Red or regular paste that you have tinted yourself as long as it is very dark)
- Dreamweaver stencils – any design that you think would look good with this type of effect – I used the Horses LL559 in the step-by-step pics
- a variety of colors of pigments inks that would suit your image – I used VersaMagic Chalk Inks because I like the way they can be worked and blended together.
STEP 1 – The Base Layer:
Cut a piece of cardstock that is big enough for your design with at least a 1/2 inch border on all sides. I recommend watercolour paper or a heavy cardstock because there is a lot of moisture in the embossing paste so if you were to use a light weight paper it will warp when you put the paste on it and then the paste can seep under the stencil.

Lay your cardstock or watercolor paper onto your plastic mat and put a little piece of tape on the top and bottom edges to hold it in place. Now place your stencil on top and apply your first strip of tape so that you cover the top edge of your stencil and the top of the watercolour paper. Be careful not to cover any of the image that you are going to be embossing. This first piece of tape is called a ‘hinge’ and is very important later on when you are removing the stencil.

 Put tape on both sides of the stencil and then the bottom. Your stencil will now be held firmly in place and the edges of your paper are protected.
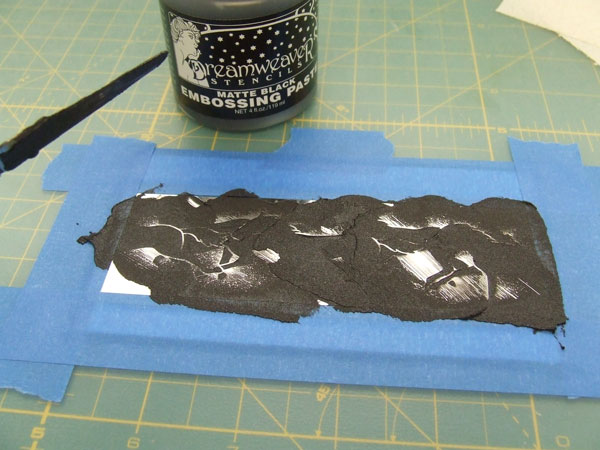
Now the real fun begins! Using your Offset Palette knife give the black embossing paste a little stir and then scoop up a generous amount on the bottom of the knife. (The new palette knife that we carry doesn’t have a pointy end so it is much easier to pick up a generous amount of paste and cover your stencil with fewer strokes)

Keeping the knife at a 45 degree angle gently run it over the stencil so that you get paste into all the open areas. If you need more paste just pick up more from the jar and keep spreading it until the stencil is completely covered. It’s just like icing a cake but there are a couple of things that you want to remember. First, don’t avoid overworking the paste or going back over the same area too many times as this will cause the paste to seep under the edges of the stencil and second, if you have to go back over an area with your knife go over it in the opposite direction.

So that you have a nice, smooth surface to put the crackle paste onto you now need to gently run the edge of your pallette knife over the whole surface to remove any excess paste (you can put it back into the jar). Be careful not to make any lines or remove any of the paste from the image – just smooth out the surface. When you have removed all the excess paste from your image be sure to clean your pallette knife right away with paper towels or by washing it in the tub of soapy water. If the paste dries on your knife if can sometimes be difficult to get off later. Your pasted image should look something like this…

Remove the tape from the bottom and sides of the stencil and then gently lift up on the bottom of the stencil towards the hinge (the piece of tape on the top of the stencil).


This hinge is SOOOO important. If you remove all the tape and then try and remove your stencil you may jiggle things a little or drop the stencil back down and then you just have a big miss. Trust me on this one, I learned the hard way. Make sure you lift up your stencil towards the hinge and then remove the stencil and the last piece of tape carefully. Wash off the black embossing paste in your tub of soapy water right away and then carefully pat it dry on a flat surface so that you don’t bend it.
The black paste will take anywhere from an hour to four hours to dry (sometimes longer depending on the humidity in your area) before you can do the next step. To check if it’s dry just touch it and it should feel firm and none of the paste should come off on your finger. If it feels at all damp just give it a little longer.
Step 2 – The Crackle Layer:

Once the black embossing paste is completely dry reposition your stencil over your image making sure to offset it a little so that the stencil now sits a little bit on top of your original image. This gives you enough depth to add your crackle paste. Note: In my previous tutorial I told you to line the stencil up exactly but some of you found that you couldn’t get on enough crackle paste that way so please use these new instructions. Tape the stencil down using the same method and order as you did above.

Apply a layer of the crackle paste over the black paste being careful not to overwork it. You may have to hold the stencil down as you move your pallette knife across the image so that the crackle paste doesn’t leak underneath.
Remove your stencil carefully using the hinge and clean it right away. Some of the paste will get into the spaces between the black paste but you can easily remove this with the tip of a stylus or craft knife.

As you can see from this picture I have some areas of paste thicker than others and it will create some interesting effects as it dries. The crackle effect takes a while to begin to show (1-2 hours). As the paste dries the thinner areas will show cracks first and they are usually finer. Thicker areas will have bigger cracks and can take several hours or overnight to dry. This is what mine turned out like.

When your crackle paste is dry it will be white, have a matte finish and fine lines going through it. The black paste underneath is what makes the cracks more visible so you always want to use a colour of paste under your crackle paste that will give you a lot of contrast.
Step 3 – Adding Color to your Crackled Image:
When the crackle paste is dry you have the perfect for applying and blending pigment inks with your stencil brushes. I love the VersaMagic chalk inks for this because of the fantastic range of soft colours and the matte finish. They blend so easily without leaving lines. Dye based inks can be used but you won’t get the same shading and blending and they sometimes look a little spotty.

For this part of the technique I like to reposition my stencil over my design with the Scotch Removable Tape. Your paper has had painters tape on it twice already and sometimes a third application can cause tearing so just to be on the safe side I use the Scotch Removable Tape that is really easy to remove without any tearing but will still hold your stencil in place.

Select three or four colours of inks that you want to use on your image. You should have a light, medium and dark colour. When applying colours to your designs always start with the lightest shade first. Pick up a little bit of ink by gently rubbing your brush on the pad and then work the ink into the bristles and remove any excess by rubbing it onto a folder paper towel. You want to have a little ink on your brush, but not too much as this will make your design look blotchy. You can always add more colour if you need it but it’s almost impossible to take it off when there is too much, especially if it’s a dark colour.


Starting on the metal part of the stencil move your brush is a circular motion bringing it onto your image where you would like to apply the ink. This technique is called ‘rouging’ and it allows you to add colour a little bit at a time to your design and blend and soften it. By starting on the metal part of the stencil and working onto the paste you are less likely to add too much colour to any one area. If you need more ink on your brush just pick some up from the paper towel or the ink pad.


Next add your medium colour and then your dark colour to add more shape to your image and highlight the crackle. Be careful with the medium and dark colours. A little goes a long way! When you are happy with your image remove the tape and stencil and you are done.

Let the inks on your image dry for a few minutes and then you are ready to put your masterpiece onto your project. Here’s the card that I made with the horses…

This next card shows the same technique used with the Cyrpress Tree LG650

I love irises so I couldn’t resist trying the crackle paste with this Long Stem Iris LL374

Since I was doing up the new samples for this post in November I just had to do a couple of Christmas samples. The first one I did was the Poinsettia LG700 and instead of using pigment inks to color in the flower I used Tim Holtz Distress inks (Victorian Velvet, Fired Brick & Spiced Marmalade). These are dye inks so they are a little bit harder to blend because they dry so quickly but I found that by adding a few layers of color I was able to get the shading that I was looking for.

The final sample I am going to share with you today is a simple holly image. This stencil LL3005 Holly Branch has larger open areas so the crackle paste went on a little thicker and I got larger cracks. You will find that this happens whenever you put on more crackle paste. If you enlarge the picture you will see that I offset the stencil quite a bit when I put it back on to apply the crackle paste and this created a black outline along some of the edges which looks like a shadow and gives the finished image even more dimension. Tim Holtz Distress inks (Shabby Shutters, Forest Moss & Fired Brick) were added in layers to build up the color on the leaves.

As you can see, this is a very versatile technique that can be used to create many different looks.
I know this was a REALLY long tutorial and this technique may seem a little complicated at first but the end results are definitely worth the time it takes to complete all the steps. Hope you give it a try.
Thanks for dropping by. See you next month with another fun tutorial.


