Scratch-N-Stamp
Search

Checkout

Keep up with Sales, New Products and other events at Scrap `n Stamp. Sign up for our newsletter now!

What's New

Hot Deals


christmas

Tuesday with Tara {take 107}

Happy Tuesday!

If you follow us on facebook or have been browsing the online store lately, you may have noticed Scrap n’ Stamp is celebrating Christmas in July with a variety of Christmas goodies on sale all month long!  I decided to join in the fun and pull out a few Christmas supplies (bought in after Christmas sales!) that had not yet seen any love… I’m featuring a stamp by Impression Obsession, dies by Tim Holtz/ Sizzix and watercolor painting  with Colorburst.

I stamped the ornament collage image in black Archival ink on watercolor cardstock, then misted water onto my craft sheet and squeezed a small amount of ColorBurst into the puddle. I mixed and painted with a brush, gradually adding more water and color to get the desired look. I’ve used two different shades of blue, plus a touch of green and a mix of sepia (brown) and cooper (metallic).

I wanted to add something extra to the ornaments, so decided to try painting on some transparent texture paste.  It’s a unique look, with very visible brush strokes.  Kinda cool… but I think I’ll stick to good ole Glossy Accents next time 🙂  I do love that copper shimmer in the bows, though!  And it looks fabulous in my splatter spots as well!

The title is a combo of a positive cut of the ‘merry’ die by Memory Box and a negative cut out of ‘Christmas’ by Tim Holtz/Sizzix.  I love these together, and added some torn kraft glassine paper behind them to add some extra dimension.

My card is on a 5×7 kraft card base, which framed this larger stamped image & the die cut words quite nicely.  I don’t normally do larger cards like this, but sometimes it’s best for the design 🙂  I hope you like it and I hope you are checking out all the specials on Christmas goodies in the online store!

Next Tuesday we are hoping to be back with another BLOG HOP for you to check out with more fun Christmas inspiration!  Hope to see you then!

Inky hugs,

Tara


Materials Used:

Holiday Words 2 dies by Tim Holtz/Sizzix

Merry script die by Memory Box

Ornament Collage stamp by Impression Obsession

Black Archival Ink

Watercolor Cardstock

Colorburst (shades of blue & brown/copper from brights & earth tones sets)

Kraft Glassine by Tim Holtz

Transparent Texture Paste

Assorted card stock

Tuesday with Tara {take 107} Read More »

TBT – Christmas But Not a Card

It’s Throwback Thursday and wether your cards are done or not this post is for you!  Although it is ‘Not a card’ it certainly wouldn’t take much to make it one! Enjoy this post from November 2014—

 Told ya’ll I’d be back soon!! Happy Sunday to my friends in the U.S.!!  Happy December 1st to my International friends!!  I’m here today with my first official blog post as an Eclectic Ellapu Design Team Member–WOOT WOOT!!  I’m stoked!!  I’m a member of the EE Purple Team and teammate PurpleCinn (aka Tabatha) chose the December theme and challenges us to create something for Christmas-But not a card!

OK–I’ve got something!!  I was inspired by Wendy Vecchi to try my hand at making my own home-made Christmas ornaments after reading her post at her own blog-Here and over at the Ranger blog, too-Here.  

DSC05332

This is a proto-type ornament, of sorts.  I want to have a creative activity to share with my Mom-in-Law when she visits for Christmas, so I assembled a chipboard ornament and went to Christmas-town on it!!

DSC05287

This is how my ornament started out.  I cut out lots of 3″ circles (this was before I learned, from Wendy herself, that the wooden ornaments are 4″) and fashioned the toppers from a bunch of rectangles that I fussy cut and scalloped punched.  As I am a cheap frugal crafter, I save the boxes from dry cereal and reuse as my ‘chipboard’.  Each ornament has 3 layers of chipboard glued together and the toppers are just two layers.

DSC05289

I’m going to start by rubbing a layer of Picket Fence DP over the front and back of my ornament.

 I really like the whitewash effect the Picket Fence DP gave the chipboard.  It’s a great first layer of color!

DSC05294

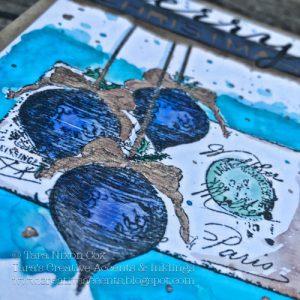
My next layer is Salty Ocean DS that I rubbed onto my craft sheet then finger painted onto the painted chipboard.  I love how the color settled into the painted surface of the ornament.  It’s uneven and rough and super cool!!

DSC05296

I used my Harlequin LS with Chipped Sapphire DI to stencil dark diamonds onto the front of the ornament.  I quickly covered with Sticky EP and applied heat until just shiny.

DSC05297

I quickly covered the melted Sticky EP with Clear Rock Candy Distress Glitter and let cool.

DSC05299

 Aren’t those glittery diamonds fun?  I was hoping they’d be a bit darker so that they’d stand out more, but I can fix that later on.

DSC05327

Here’s the back of the ornament–basically an unembellished version of the front!  But even this looks pretty good on its own😉

DSC05330

For the topper, I rubbed Distress Embossing Ink over the front and back surfaces and then dipped into my little tub of Silver EP and heat set.  DONE!!🙂

Then, I added some stamping through the Harlequin LS and I outlined the diamonds with a fine tip black gel pen.  I did splatter more Picket Fence DP over the surface and you can see in some places, it made the black gel pen run.  I LIKE it!!  I rubbed Chipped Sapphire DI over the edge of the ornament with my ink blending tool and heat set everything.

DSC05331

These layered snowflakes were cut from my Cricut machine with the Christmas Cheer cartridge.  I used a piece of silver embossed card stock and vellum and I layered those with painted rounds of tulle.  They were blinged out with little blue rhinestones and glued to the ornament with matte gel.

DSC05332

I made the word banners from white card stock stamped with a sentiment from my Sunny Holiday Messages set from Hero Arts.  I inked the edges with Chipped Sapphire DI and adhered with matte gel.  I’m making sure nothing is falling off!!

DSC05330

I finished by stringing color coordinated glass beads onto silver cord and tying onto the topper to form a hanger.  Not too bad for my very first, homemade chipboard ornament!  And this is versatile, too–It can serve as a special Christmas gift tag or even as a nice way to send a note, because of the bare backside!  I love my backsides for note writing!!😉

I hope this homemade chipboard ornament has inspired you to make something for Christmas-That’s not a card!  Come on over with whatever you make-that’s not a card for Christmas, and join in with the Eclectic Ellapu Purple Team challenge.  It’s running from December 1st through January 31st.  Our first challenge in 2015 will be introduced on February 1, 2015.

Thank You sooo much for joining me today!!  I hope you enjoyed todays post as much as I enjoyed making this ornament!!  I hope to see you over at Eclectic Ellapu!!  Until next time–Stay Artsy Fartsy!!

DSC04507

SUPPLIES I USED:

  • Surfaces: Chipboard (cereal boxes); White Card Stock (Papertrey Ink); Vellum; Tulle
  • Distress Paint, Stain, Embossing Ink & Ink (Tim Holtz/Ranger); Archival Ink (Ranger); Silver Embossing Powder
  • Stamps: Sunny Holiday Messages (Hero Arts); Background Basics-Text Style (Papertrey Ink)
  • Cricut Machine (Provo Craft); Christmas Cheer Cartridge (Provo Craft)
  • Matte Gel (Liquitex); Foam Dot; Scallop Edge Punch (EK Success); Detail Scissors (Fiskars); Craft Sheet (Ranger); Flat Paint Brush
  • Glass Beads; Blue Rhinestones; Silver Cord

TBT – Christmas But Not a Card Read More »

TBT- Making Spirits Bright AGAIN

HAPPY DECEMBER!! HOLY MOLY!!  GULP–Christmas is 24 days away!!  Good thing I’ve got today’s Throwback Thursday for the Scrap’n Stamp Blog to take my mind off of how not ready I am!! LOL🙂🙂

Today, we’re going back 2 years to November 24, 2014 and a Christmas card I made–

Making Spirits Bright-Again

Happy Monday!!  Thank you for starting your creative week with me and THANK YOU and Welcome to my new followers!!  I surely appreciate your visits and comments–Thank You soooooo much!!  I love making all of these new creative connections–I have bloggy friends all over the world now!! 🙂

OK–You may be asking, ‘Making Spirits Bright-Again?’  What’s with the “again” part?  Well, I posted a blog with the same title last year (there may be a yearly theme starting here?) and I couldn’t think of another better title for this posting.  But, the card is completely different–kind of–there may be some similarities–but purely by coincidence!!😉

DSC05335

What does make this card a little different this year is, it’s not only a card in the DONE pile of Christmas cards-early!, it’s a challenge card that I made for A Vintage Journey-All Sewn Up.  Another inspiring challenge to get me creating for Christmas!!  Thank goodness for challenges–I Love Them!!

With A Vintage Journey’s theme of All Sewn Up, we’re to use the inspiration of  Tim Holtz and incorporate the theme of sewing or sewing related, into our projects.  Well, I think I may have actually channeled Tim directly when I made this card, because it came together so smoothly and quickly.  I didn’t find myself overthinking it and adding those final touches of stitching really brought that vintagey, Tim Holtz style full-circle, right on my own card!!

DSC05342

I don’t have any step-outs for this card, but there are so few ingredients that went into making this card, it’s the technique’s end results that are the stars!!

My card base is kraft stock, cut and folded as a top-fold card.  The first layer is a piece of red TH Kraft-Core stock that I ran through one of the TH/Sizzix Holiday Knit set texture fades.  I then lightly sanded the embossed design, distressed the edges with my paper distresser and rubbed Walnut Stain DI over the surface and edges with my ink blending tool.  I secured the panel to the card base with double-back tape, then ran through my sewing machine to stitch the border.

DSC05336

Isn’t this lantern image fun?  It’s from Tim’s Christmas Blueprint 5 set and here, I’ve heat embossed it onto multi-media paper that I had first inked with Chipped Sapphire & Squeezed Lemonade DIs and my ink blending tools.  I then water colored the lantern with my water brush and DMs in Barn Door, Squeezed Lemonade & Pumice Stone.  The blue paint splatters in the background is Bolivian Blue Twinkling H2Os and the water spots are my own concoction of Walnut Stain re-inker in a spray bottle that I spritzed & flicked over the panel.  I finished with painting a thin layer of Diamond Glaze over the ‘glass’ portion of the lantern image and set aside to dry.

DSC05349

I improvised this little snowflake sticker for this TH/Idea-ology file tab by using a snowflake from the Christmastime Remnant Rubs and a piece of label paper–I rubbed the snowflake onto the label paper, rubbed a little Broken China DI over the top and punched out with a 3/8″ circle punch.  I inked the edges with Walnut Stain and placed into the depression on the file tab and sealed with the acrylic dot.  Ta-Da!!

DSC05340

I made these little banners from a set of Christmas sentiments by Hero Arts called Sunny Holiday Messages (circa 2006).  I stamped the words onto manila stock with Jet Black Archival, cut out and inked the edges with Walnut Stain DI and my mini ink blending tool.  They were stitched into place on the top panel before final assembly.

DSC05335

I’m creating a few cards with this Christmas Blueprint 5 set, so I’ll have-at the least-3 more cards to share in the next week.  That’s fun when the mojo is in full swing and I can create several cards in one sitting!  Especially Christmas cards and especially challenge cards!

 A Vintage Journey-All Sewn Up is running until November 27th (UK time) so get your Tim Holtz mojo in gear and create your own sewing themed creation for the challenge!!  Hope to see you there🙂

Thanks again for stopping by!!  Cheers to a creative week and until next time–Stay Artsy Fartsy!!

DSC04507

SUPPLIES I USED:

  • Surfaces: Mixed-Media Paper (Strathmore); Manila Stock; Kraft Core (Tim Holtz/Core’dinations); Label Paper (Avery); Kraft Stock (Papertrey Ink)
  • Stamps:  Christmas Blueprint 5 (Tim Holtz/Stampers Anonymous); Sunny Holiday Messages (Hero Arts)
  • Distress Inks & Markers (Tim Holtz/Ranger); Colorbox Black Pigment Ink (Clearsnap); Black Embossing Powder (WOW)
  • Holiday Knit Texture Fades (Tim Holtz/Sizzix); Big Shot Machine (Sizzix); Paper Distresser (Tim Holtz/Tonic Studios); Sewing Machine (Kenmore)
  • Remnant Rubs & File Tab (Tim Holtz/Idea-ology)
  • Craft Sheet (Ranger); Embossing Heat Gun; Heat Tool; Double-Back Tape (3M)

TBT- Making Spirits Bright AGAIN Read More »

Free Shipping Anywhere In Canada