Scratch-N-Stamp
Search

Checkout

Keep up with Sales, New Products and other events at Scrap `n Stamp. Sign up for our newsletter now!

What's New

Hot Deals


inspiration

Introducing Party Palooza!

Hello everyone, it’s time to celebrate with our brand new card kit Party Palooza! It’s packed with everything you need to create bunches of birthday and celebration cards.

Here’s a closer look at all the supplies included; we’ve got you covered with stamps, a word die, a stencil and more!

Supplies Included:

  • Heffy Doodle party Palooza Stamp Set

  • Heffy Doodle Numicon Stencil

  • 3 sheets of white card stock
  • Heffy Doodle Celebrate word die

  • 2 sheets of black card stock

  • 8 sheets of 6×6 Echo Park Magical Birthday pattern paper

  • 3 sheets of colour card stock in Canary, Peony and Arctic Blue.

  • 5 card bases

  • 3 envelopes

  • Studio Katia Crystal Rainbow Sequins

  • Inspiration and Instruction Sheet

Check out our latest Facebook Live for kit inspiration!  Plus, there’s a giveaway! How to enter: leave a comment in the Live comment section and be sure to Like the Scrap ‘N Stamp Facebook page. Contest closes 05/02/2021 at 2:00 pm EST

Thanks so much for stopping by!

Crafty hugs,

Jessica

Introducing Party Palooza! Read More »

Retiform Technique with Gina K Designs

Good morning and happy Saturday!! Laurie here with you today to share an older technique with you. It’s called retiform which loosely means, resembling a net.

This is really easy to achieve. Let’s get started! All you need is a scrap piece of paper (can be cardstock or even typing paper), ink bending tool of choice, ink pad of choice, Post It notes and a stamp set. I’ve used the Elegant Asters Stamp Set from Gina K Designs. In fact, the inspiration for this card comes directly from her YouTube channel!!

Take your scrap of paper, lay it on top of your cardstock and ink blend along. You should start with an angle. Lay your paper mask down again and create a sunbeam or ray shape. Turn your card front 180 and do the same thing. You can see many different sections, some small, some large. I took the same Stormy Sky Distress Ink and VERY LIGHTLY blended over the entire card front to tone down the whiteness.

Take your Post It notes or whatever you prefer to mask each section. Painters tape works well, too! Each section is easy to mask. I used almost every image in the stamp set. Sometimes using more than one image per section.

I used Versafine Clair Ink in Nocture to do my stamping as I wanted a very crisp image with a single stamping. I think this is such a unique and pretty look!

The sentiment comes from the Inspiring Poppies Stamp Set, also from Gina K. I stamped it on a small circle die cut and created a frame using a couple of circle dies. The frame I inked up with the same Stormy Sky Ink. I foam mounted the panel as well as the sentiment circle onto a white, top fold card base.

I did not add any sort of embellishments as they would just get lost in that background. I hope you try this technique!

Thanks for dropping by today! Have a great day and see you soon!

Laurie

Retiform Technique with Gina K Designs Read More »

Tuesday with Tara {take 112}

Happy Tuesday!

Did you experience/ watch the eclipse yesterday?  I didn’t realize until too late that I would actually be off work during the eclipse, so I didn’t get my hands on any eclipse glasses or even create a make-shift viewer.  I’m kinda jealous of all the people that did get to actually see it (apart from on tv), and was slightly disappointed since I expected it to be a bit more dramatic where I live with just over 90% coverage.  However, it was pretty wild experiencing what felt like dawn in the middle of the day, though- and the most fascinating thing for me was the moon shadows!  These amazing moon shaped shadows covered my back porch as the partially eclipsed sun shone through the trees… super cool!  I decided to take inspiration from that to bring you today’s card.

Here’s a photo of the moon shadows on my porch:
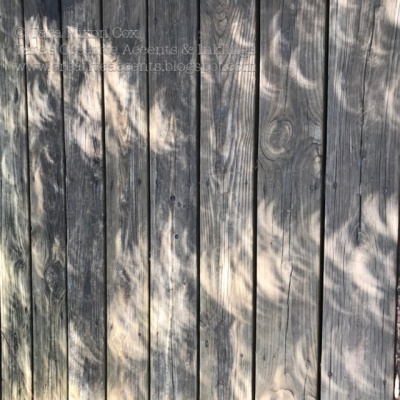
Wild, right?!

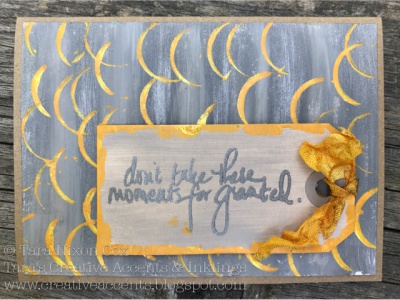
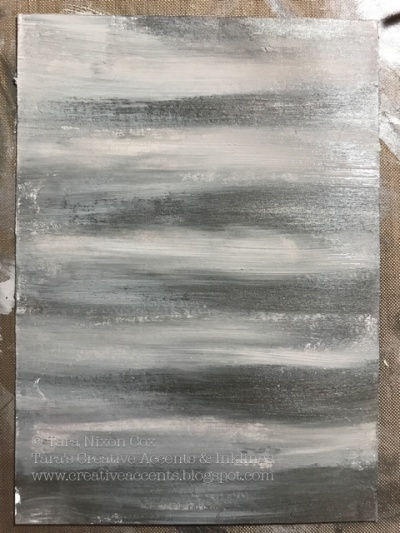
I started with some Dina Wakley Media paints in Elephant & Medieval to create my background.

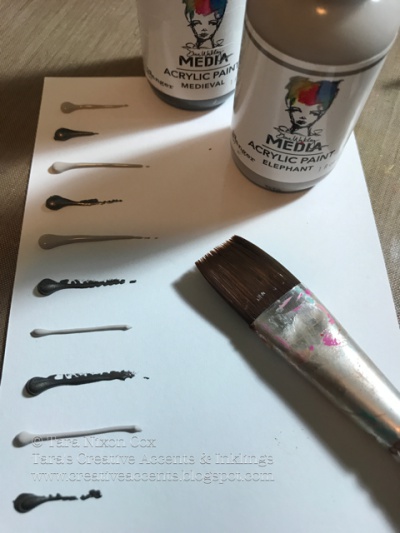
I brushed them onto white card stock with a damp brush, adding more paint as needed to get the coverage I wanted.  The mix of the creamy elephant paint and metallic medieval was a dream to work with…

I set that aside to dry, painted a wash of elephant onto a small tag and started experimenting with my moon shapes… I ended up mixing some Wild Honey Distress Paint with a bit of metallic gold and making marks on my background with the lid from my Distress Paint Dabber.  I stamped the sentiment (also by Dina Wakley) using the Medieval paint as well, applying it to the stamp with a foam ink applicator.  I used a brush to randomly edge the tag with some of my leftover yellow/gold paint mixture.

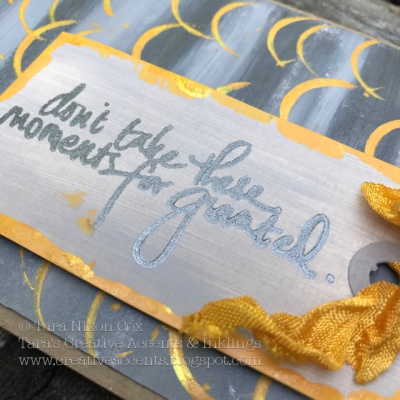
A bit of yellow crinkle ribbon from my stash completed the card.   I chose to keep it all pretty simple, letting the background and the sentiment stand out, celebrating this once in a lifetime event!  I may not have experienced every part of the eclipse as I would have wanted to, but those moon shadows were magical!

Don’t take these moments for granted.

Let them inspire your art!


Have a creative day,

Inky (Painty) hugs,

Tara


Materials Used:

Dina Wakley Media paints in Elephant & Medieval

Distress Paint Dabber in Wild Honey

Gold Paint

Dina Wakley sentiment stamp

kraft cardstock & tag

Crinkle Ribbon

Tuesday with Tara {take 112} Read More »

Free Shipping Anywhere In Canada