Scratch-N-Stamp
Search

Checkout

Keep up with Sales, New Products and other events at Scrap `n Stamp. Sign up for our newsletter now!

What's New

Hot Deals


Cuttlebug

Designer Showcase: Quick & Easy Christmas Cards Using 3D Precut Prints

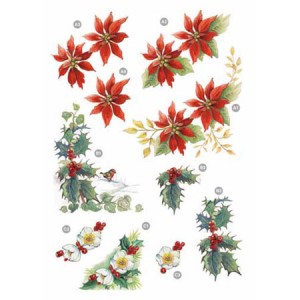
Hi everyone! Today I would like to share with you some quick and easy Christmas cards that were made using the Poinsettia, Holly & Christmas Rose 3D Die Cut sheet. These Die Cut sheets are so easy to use! All you do is pop out the pieces and layer them with foam dots to create gorgeous elements for your cards, gift tags or scrapbook pages. You can use them as they are or add a little glitter, some rhinestones or pearls for a little extra pizzaz.

This sheet will make three separate elements and each element has several layers so you add a lot of dimension to your project when you use them. It is so easy to put them together because each of the pieces is numbered so you know what order to layer them in. Absolutely foolproof!

Here are six different cards all made with this terrific precut sheet and a few extra supplies.

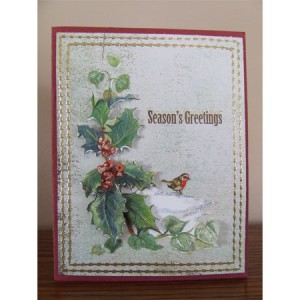
This Holly die cut works beautifully on an A2 card front. Subtle touches of glitter were added to the snow and berries just to highlight them and Decorative Lines Outline stickers were used to frame the card front. Simple & pretty.

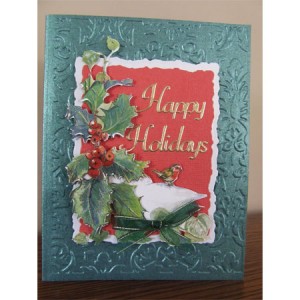
For this next card I used the same image but glammed it up a bit. First I embossed the card front with the Cuttlebug Kassie’s Brocade embossing folder and then I layered the Holly & Bird onto cardstock that had been cut out with Spellbinders Nestabilities Deckled Rectangles. A little bow and an Outline sticker sentiment and it was done.

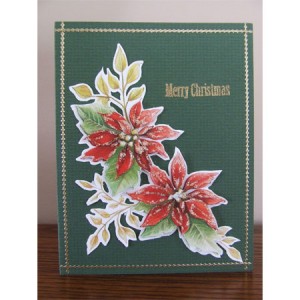
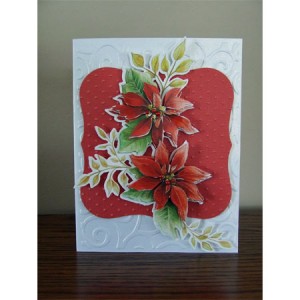
Nothing says Christmas like Poinsettias and these were so easy to use. A simple Outline sticker border and a little bit of Crystal Rainbow glitter was all that was added to this classic card.

Two embossed elements give this card a completely different look. Cuttlebug D’vine Swirl was used to emboss the card front and then the red cardstock was cut out with Spellbinders Labels One and embossed with Cuttlebug  Swiss Dot. Just by changing the colors and the angle of the Poinsettia die cut we were able to get a whole new look.

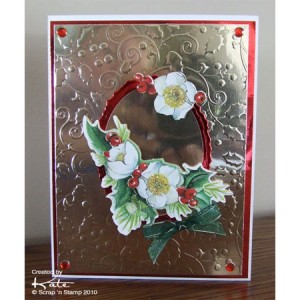
This card was originally featured in our Tuesday Tutorial showing how you can emboss using Dreamweaver Stencils and your Big Shot. The mirrored cardstock  adds an elegant touch.

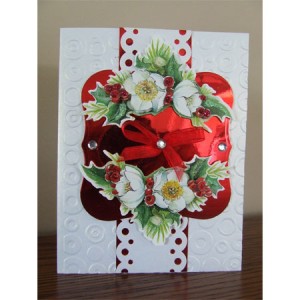
Our last card has it all! Glitter, rhinestones, mirror paper. Everything you need for that wow factor! The card front was embossed with Cuttlebug Spots & Dots and then an EK Success Slim Edger punch with a dotted design was used to create another element that mirrored the circles in the embossing. I love how easy it is to create your own paper ‘lace’ with these border punches. Spellbinders Labels One was used to cut out the large center element from red mirror cardstock and a little Crystal Rainbow glitter was added to the holly and berries for some sparkle. Instead of the little bow you could use an outline sticker sentiment in the center and get a different look.

We have lots of 3D Prints & Precuts in the store so be sure to check them out. They are so easy to work with and as you can see they are very versatile.

Thanks for dropping by today. Have a wonderful week.

© Scrap ‘n Stamp Canada

Designer Showcase: Quick & Easy Christmas Cards Using 3D Precut Prints Read More »

Tuesday Tutorial – Vellum Stained Glass

Hello, it’s Tuesday Tutorial with Spike today and I’m going to show you how to create stained glass look using vellum.  It’s an easy technique and looks absolutely fab!

VStainedGlass_Spike7For today’s card you’ll need:
Vellum
Black Onyx VersaFine Ink
Clear Detail Embossing Powder
Heat Gun
Memento Dye Markers
Small Circle Nestabilities
Classic Scalloped Circle Nestabilities Large
Renaissance Hearts Pendants Spellbinders
Blossom Nestabilities
Clear Stardust Glitter Pen
Victoria Cuttlebug Folder
Core’dinations Cardstock
Clear Rhinestones
Stardust Stickles
Birthday Cupcake Stamp Set

1. Stamp the image on the vellum using pigment ink, VersaFine is perfect for this.

VStainedGlass_Spike1

2. Add embossing powder and heat.

VStainedGlass_Spike2

Here’s the embossed image.

VStainedGlass_Spike3

3. Flip the image over and then colour as desired with Memento makers.

VStainedGlass_Spike4

For this image, I used grape jelly, lilac posies, rose bud, sweet plum and lulu lavender.

VStainedGlass_Spike8

I then cut out a circle on the base of the card and the embossed layer, using circle Nestabilities. This will give the card a window to display the image.

Here’s the finished card.

VStainedGlass_Spike6

With the vellum “window”, here’s what it looks like with a bit of light behind it.

VStainedGlass_Spike5

How yummy is that?!

The possibilities are endless! Can you imagine using this technique for Christmas cards? Thank you for dropping in and checking out this weeks Tuesday Tutorial.  I’d love to see what you do with it!  Stay tuned as there’s a lot of exciting things in the works.  I’m so excited I can’t wait!  As always, we thank you so much for your readership and appreciate your comments.

Happy stamping!

Love,

Tuesday Tutorial – Vellum Stained Glass Read More »

Tuesday Tutorial – Getting to Know Your Nesties for Mother’s Day

Welcome to another Tuesday Tutorial!  This week I’ll show you how to use Spellbinders Nestabilities as it’s one of the most common questions we receive.  I will be using the Big Shot since that is the machine I have but I have included info on how to use your Cuttlebug too!

If you already know your Nesties pretty well, scroll down to the Peony card below.

Before we start, let’s look at a Nestability up close. In case you’re wondering which Nestability I’m using it’s one of the new Spring 2009 releases, the Peony. All Nestabilities work the same way, the only difference between them is their shape and size.

One side of the die is flat (Ridge Side Down)

nestienocutside2

Now flip it over and you’ll see a ridge in the center of the die.  It’s this ridge, although it doesn’t feel sharp, that does the cutting.  To see it better, click the image to magnify.

nestiecutside

What’s great is that in every package of Nestabilties is an instructional card.  Keep this as your reference as it lists the ‘stack’ or ‘sandwich’ that works in several different die-cutting and embossing machines.
Now you may see that I’ve listed a sandwich stack that is different from what is written in the package.  Not to worry, there are different ways of stacking depending on your machine (there are slight differences in machines even within the same manufacturer).
Just remember, NEVER force anything through your machine.  It’s always better to err on the thin side and run it again with a shim (cereal box thickness cardstock) than to ruin the machine.
Once you’ve figured out what sandwich stack works the best for your machine, be sure to make note of it for future reference.

Cutting with Nestabilities

Be sure to pick up an extra set of Cutting Pads for the Big Shot or B Plates for the Cuttlebug. This way you can keep one set nice and flat for “embossing” and the other for “cutting”.  Below is a picture of a well used cutting plate.

dscf3296

Cutting Sandwiches:
Big Shot – Multipurpose Platform on Tab 2, Cutting Pad, Spellbinders Nestie (ridge side up), cardstock to cut, “cutting” cutting Pad
Cuttlebug – A Plate, C Plate, Spellbinders Nestie (ridge side up), cardstock to cut, “cutting” B Plate

1. Place the Nestie ridge side down (using the largest size Nestie) on the piece of cardstock (Core’dinations Cardstock for this project) you wish to cut.
cuttingoutnestie

2. As I don’t want the Nestie to slide off the cardstock, I need to temporarily secure it in place and that’s where I bring out a Post-It or sticky note. **Since I put this tutorial together I’ve found a great tape that Kate carries – Scotch Removable tape – that you can use to hold your Nesties in place and it doesn’t ruin your paper at all when you remove it. Works even better than Post-It notes because you can see through it if you are trying to place your die in a specific place on patterned paper.
cuttingoutnestie2

3. Now flip it, so the cardstock is on top and the Nestie is on the bottom
cuttingoutnestie3

4. Place your “cutting” plate on top and run it through your machine

cuttingoutnestie4

After you’ve run it through the machine, do NOT pop out your cut cardstock from the die.

Embossing with Nestabilities

Embossing Sandwiches:
Big Shot – Multipurpose Platform on Tab 1, 2 shims, Cutting Pad, Spellbinders Nestie with already cut cardstock in it (ridge side up), Spellbinders Tan Embossing mat, “embossing” cutting Pad
Cuttlebug – A Plate + shim + B Plate + Spellbinders Nestie (ridge side up), cardstock to emboss, Spellbinder’s Tan Embossing Mat + “embossing” B Plate

6. Set up your embossing sandwich as above
embossingnestie

7. Don’t forget your shims! Then run it through.

embossingnestie2

8. Check out your work!  Tada! You have a cut and embossed Nestie shape!  Easy hey?

embossingnestie3

Mother’s Day Peony Card

For this Mother’s Day Peony card, the materials I’ve used are:

Spellbinders Nestabilties Peony
S.E.I. Designer Collection Pack – Bridgeport (base floral pattern paper cut to 5 1/4×5 1/4″)
Core’dinations Cardstock (card stock base cut to 5 1/2×11″)
Peggy’s Pretties (coming soon!! to Scrap n’ Stamp)
Glue Dots

1. After you’ve cut and embossed your Peony Nestie from above. Sand it.
peonycard

2. Cut down one inch at all the arrows.
peonycard1

so that it looks like this: (sorry for the blurry photo!)
peonycard2

3. Then grab 3 pencils and place them around one petal section as shown
peonycard3

4. Curl the ends around the pencils as shown by the arrows, this will give the flower some shape.
peonycard4

5. Repeat steps 1 to 4, for an additional 3 times.  Each time using a smaller size Nestie than the last and using different coordinating papers.

6. Cut out the base floral patterned paper using the largest size Nestie and glue it onto the green card stock base.

peonycard5

7. Assemble your layers, sticking each flower onto the card.  Added some Peggy’s Pretties and voila!

A special card for a special lady! A Peony Card for Mom!

mothers-day-card21

Here’s a close up (click to enlarge it)

mothers-day-card3

The papers from the S.E.I. Bridgeport collection are just so suitable for spring with all it’s florals and bright colours.

Thanks so much for dropping in this week and spending some time with us! If you have any questions or comments, please drop us a line we’d love to hear from you!

Love,

Tuesday Tutorial – Getting to Know Your Nesties for Mother’s Day Read More »

Free Shipping Anywhere In Canada