
Slimline Alcohol Ink Gel Prints
Happy Sunday Funday!
Chala here and I am sharing some fun slimline cards using the Alcohol Ink Gel Print technique.
Today I pulled out several products to play around with including the Lavinia Boblong Printing Press, which is perfect for slimline gel prints, the Lavinia Leaf Mask, Mandala stencil, various Alcohol Inks, Pink Fresh Studio Heartfelt Thanks Stamp Set and various sentiment dies, acrylic white paint and brayers.
This technique is easier to watch than explain, so I have created a video of today’s cards. Go ahead and click HERE to watch and see how I created 6 fun cards!
If you are not into watching the video, I will do my best to explain. You want to drip some alcohol inks onto the gel print and use the brayer to move the ink along the surface. Be mindful of what colours you choose as you do not want to create mud. The important thing to remember is to let the alcohol inks dry between the layers.
Once the ink has dried you can now use a stencil and lay it on top of the gel plate. I like to use my brayer to help lay the stencil flat on the plate. Next add a few more drops of alcohol ink and again, you can use your brayer to help blend the colours. The more ink you use the longer you will have to wait for it to dry before proceeding with the next step. After the ink has dried again, you can now remove the stencil. To clean my stencils I use hand sanitizer, you can also use isopropyl alcohol or ink blending solution.
The next step is to use a small amount of white paint (although you can use other colours and eve add in perfect pearls to add shimmer) and brayer a thin layer overtop of the alcohol inks. Then lay your carstock on top. I like to use an old gift card to smooth over the back of the cardstock to ensure I am lifting as much of the image as possible. Then slowly pull the cardstock back to reveal your masterpiece.
I continued this process with several backgrounds and even used Alcohol Ink Pearls to add a beautiful shimmer to the background.
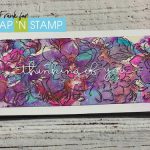
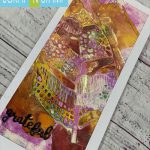
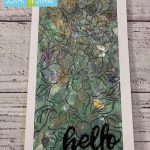
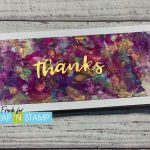
I trimmed the backgrounds down to fit onto a 4″ x 8.5″ slimline card base and adhered with some Art Glitter Glue.
You can finish the backgrounds off by adding stamping or simple die cut sentiments or even fun Tim Holtz Paper dolls. The possibilities are endless! For my die cut sentiments I heat embossed with either gold or clear embossing powder to help the sentiments stand out.
Here is a look at the finished cards.


I hope you enjoyed todays slimline cards and technique and that it has inspired you to give this technique a try!
Thanks for stopping by and enjoy the rest of your day!
~Chala
Slimline Alcohol Ink Gel Prints Read More »
