Anyone can do sunshine & rainbows – but how about a little drama? Of the good kind, of course! It’s Deb here from the Design Team, and I want you to have a dramatic Valentine’s Day, if you do celebrate the day. Personally, I think we should be spreading the love every day, but I guess a yearly reminder isn’t a bad thing!
DRAMA WITH COLOUR
Being a maker, of course drama means doing it with colour! Alcohol inks have been around for years, but sort of hiding in the background, as a ‘hey, try this’ idea. Now, they’re making their way to center stage and taking the spotlight! Tim Holtz and Ranger are, as you know, an amazing collaboration. But even Tim Holtz has just recently realized that there’s a whole new sub-group of artists who have embraced his alcohol inks completely, and are creating amazing works of art with them. Now, I’m not saying that mine are up there with the ‘amazing’ group, but I really enjoy working with these inks. So I have 2 cards to share with you today, using Tim Holtz and Ranger products.
ALCOHOL PEARL AND GOLD MIXATIVE
Doesn’t that sound rich, and dramatic? For this first project, I’ve combined the Deception Alcohol Pearl ink with the Gold Mixative ink onto Ranger Alcohol Ink Black Cardstock. The result? Drama!
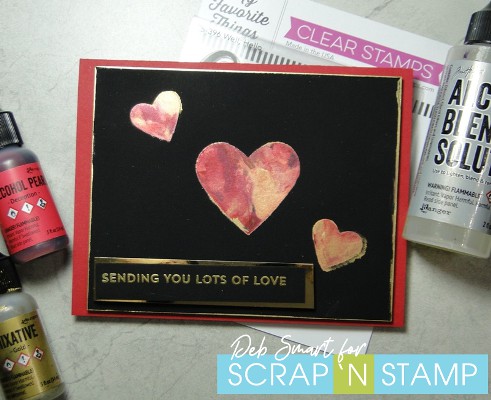
I just love how rich these inks look on this special cardstock. The Alcohol Ink cardstock is specially designed for alcohol inks, but it feels completely different from Yupo. Yupo is a slick, non-porous surface, where this matte cardstock feels like suede, or velvet. This means that you do need quite a bit of alcohol blending solution to get your inks to move. This is typical with the pearls & mixatives (metallics), but even more true on this surface.
HOW TO DO IT
First, create a mask. To do this, use good ol’ Contact paper – the kind you line your shelves with! It comes in rolls, so cut a piece the same size as your panel. Use heart dies and die cut the shapes from your Contact paper. Next, remove the backing from the Contact paper, and attach it to the front of your black panel. Rub firmly in place, to reduce the chance of bleeding through of the ink. Now, working on 1 heart at a time, apply some blending solution, Deception pearl ink a gold mixative in the opening. Use a straw or air puffer (the kind to clean camera lenses) to blow the inks together. Add more red & gold, along with blending solution, until you’re happy with the result, and then repeat the steps with the other 2 hearts. Next, remove the Contact paper from your panel. You can see that I did get a little bit of ink bleed on the bottom right heart – but that’s okay! I decided to embrace the imperfection by picking up some of the gold ink on a small brush, and brushing it around the edges of the black cardstock.
This picture below shows the mask when I removed it from my piece (sorry – forgot to take a picture while it was on!)
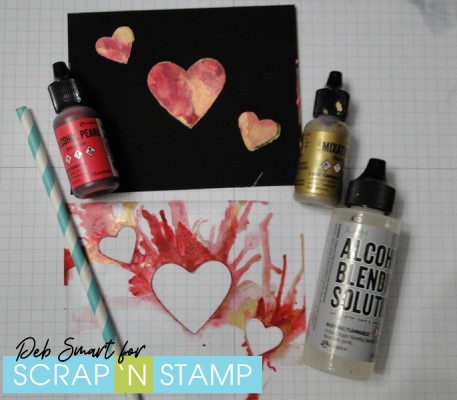
The Contact paper is perfect for masking, because it sticks well, but removes easily without damaging your substrate. It also works great with watercolouring, too! As you can see above, I used a paper straw – keeping the environment in mind! However, if you’re going to be using these inks a lot, remember that they can be toxic, so it’s best to invest in a manual air blower, canned air, or small air compressor.
FAUX PATINA LOOK WITH APPLICATOR
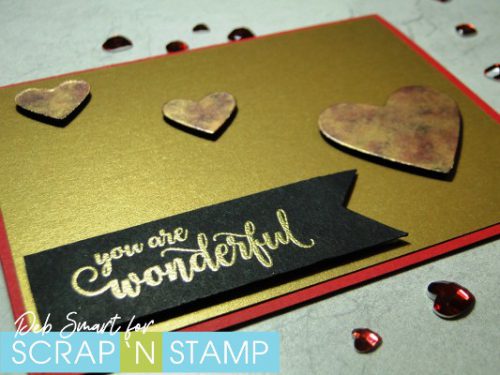
To achieve a totally different look with exactly the same colours, swap out your straw for an alcohol ink felt applicator! For this next card, I die cut 3 hearts from the same Alchol Ink Black Cardstock. Next, attach a felt alcohol ink applicator to the applicator handle – not the foam one used for regular inks. Add several drops of Blending Solution, Deception pearl ink and gold mixative to the felt, and press it onto the die cut hearts in a pouncing motion.
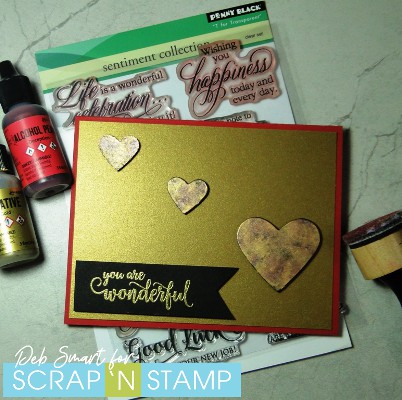
Same inks, blending solution and substrate – totally different look! Just keep applying the inks & blending solution to the applicator, and adding it to the hearts, until you’re happy with the result. To finish off this card, attach the hearts to a panel of Gina K. metallic gold cardstock. On another piece of the alcohol ink black cardstock, stamp the sentiment in Versamark ink. Cover it with gold embossing powder, and heat set. Isn’t it great to know that you can heat emboss on this paper – and no warping!
JOIN THIS TREND, AND HAVE A DRAMATIC VALENTINE’S DAY!
Or any day! You can get all of the products I used (except for the Contact paper – you can get that online or at a department or grocery store) at Scrap ‘N Stamp right now; links are below. If you really want to embrace the trend and get in on the cutting edge, you can PRE-ORDER the NEWEST alcohol inks, Alloys, resin, & more! To see all of the pre-order items, CLICK HERE, and add them to your cart. They’ll be shipping this month!
Thanks for spending some time with me today! I hope that you’ve enjoyed some ‘good’ drama with me, and are inspired to create some of your own.
Affiliate links for products used are supplied below, at no cost to you. When you use my affiliate links, you help support me to purchase new products. Then I can continue sharing new projects with you!


 Once the floral image was colored I cut it out and used small pieces of foam squares on the back to attach it to the card to again add a bit of depth.