Scratch-N-Stamp
Search

Checkout

Keep up with Sales, New Products and other events at Scrap `n Stamp. Sign up for our newsletter now!

What's New

Hot Deals


water-colour

Shaken Not Stirred

  Hello, Happy Sunday,

I am on the blog today with a cute little Cocktail card set.

 I decided to continue with the punny theme we had going on over on our  Scrap’n Stamp challenge page

Here’s a shaken but not stirred card that I hope will inspire

These cards came about as I was asked to do some custom cards for a local shop called the Blending Bar, so I was tasked to create cards playing on their name and logo and they style of their shop. Its an honor to be given this project and challenge.

I have created several designs for them and this is one of my favorites that really played well with the Punny theme we had going on over on the Scrap’n Stamp Challenge page.

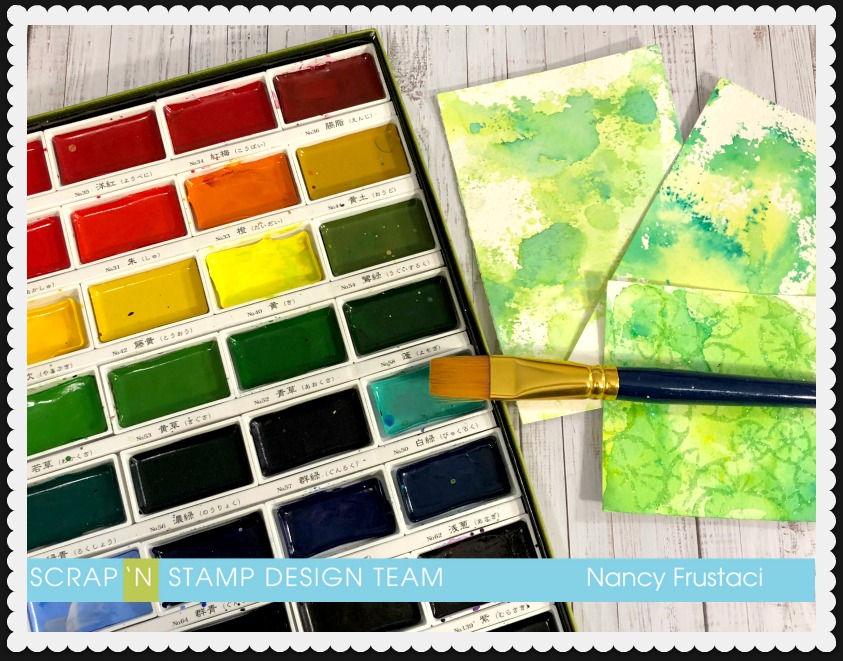
To start of these cards, I pulled out my Gansi Tambi Water colour paints, as well as some distress oxieds, water colour paper and a big paint brush.  I really had no clue what I was doing till I actually had a panel I liked.

I did a couple of different things for these backgrounds.

  I started by adding water to my paper really soaking it and then slapping on some of the greens and yellow paint from the set with no rhyme or reason just adding the colour and seeing how it moved. I wanted it to be reminiscent of the out side and inside of a lime.

 Once the panels were dry I went in with the distress ink, some plastic packaging and some water, to do the smooshing technique  and smoosh more colour on to the panels. I really wanted an intense colour that I wasn’t getting with just the paint.

Once I had the panels the way I liked it and they were dry I ran them through my die cutting machine using the My Favorite things Stitched squares. I then went over the die cut panels using Nuvo Glimmer paste and a stencil from The Crafters Workshop. This citrus stencil was perfect for the blending bar. Its very hard to see in this picture but in person the shimmer coming off is very pretty, subtle and just right.

Whats your favorite form of glitter, loose glitter, glitter pens, glitter paste?

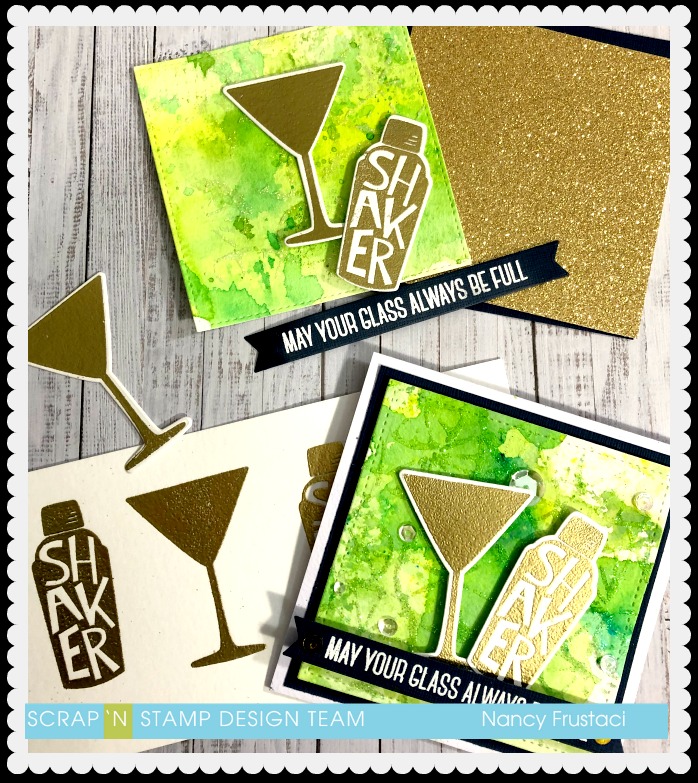
I set all the panels to dry and moved on to the stamping of the Martini glasses, shakers and sentiments. I swore I was going to take a little break from heat embossing just because of the fumes and such but that didn’t last long. I stamped the images with versa mark and heat embossed using fine detailed gold for the glasses and shaker, and detailed fine white for the sentiment.

Once everything was embossed and cooled I finished off all the die cutting, using the coordinating die and sentiment banner die from both My Favorite things.

I think that I am a little obsessed with all thing MFT, if you haven’t noticed haha.

 Do you have any favorite Companies that you use most or hoard?

I cut and scored some heavy weight cardstock to create a  4×4 card base. I then cut down some Sour blueberry Bazzill cardstock to 3 7/8 x 3 7/8  which makes the green pop a lot. I adhered the blue flat to the base of the card, then popped up the main panel with foam tape. I decided to also pop up the martini glass and shaker. I also popped up the sentiment but used two layers of foam tape to really stand out and ground the images.

 For finishing touches I added some gold sequins and some clear sparkly sequins from my stash.

I actually have four more of these cards coming with a little change, I added a layer of gold glitter cardstock and made the green panel slightly smaller then the original. (totally unintentional) Will share those cards on Instagram and facebook when they are all put together.

Thank you for taking the time to read my blog and I hope I inspired you to create if not create then at least have a delicious cocktail before the weekends end.

Nancy 🙂


Shaken Not Stirred Read More »

Your My Super Hero

Hello and Happy Thursday

Hope you are all having a wonderful week. Its been sunny and cold here where I am.

I am on the blog today with circle card inspired my by sons adorable request for a circle Super Hero Card. He is only 3½, I couldn’t say no to his adorable little face, so here it is. I hope you enjoy

I was inspired of course by the one and only Jennifer McGuire and her amazing technique videos, for this background.

I have linked to her page and the particular video that inspired me. In the video she showed how she used plastic wrap to create this affect on water colour. So I had to try it out and well I couldn’t just stop at one background, nope I made several… and kept them in my stash for this card and well you will see future cards using these backgrounds also.

So for the backgrounds I started with some Canson Water colour paper cut in to different sizes, really I was just playing around at first so I wasn’t concerned about sizes. I pulled out my Gansi tambi water colours and went to town. I loaded the paper with water and then added the colours I wanted. Once I was happy I added the plastic wrap on top and scrunched it around. I then but something heavy on top and let it dry.  Once They were dry I pulled off the plastic wrap and you can see the lovely texture you get with this technique.

While I let that dry I stamped out my little guy on to Bristol water colour paper, I stamped him numerous times, this way I could test out colour combinations.  I colored him in using my Zig clean colour real brush markers. I still absolutely love these markers, so so easy to get a fantastic and detailed look with out much effort. I did colour the cutie to look a lot like my son.

  While I was stamping I pulled out my Concord and 9th Stacked city set and stamped out the skyscrapers numerous times, a few times on bristol and then on to black heavy weight cardstock.  I did end up heat embossing the ones on the black. (At this point I wasn’t sure which ones I would use)

Once I had finished up embossing, I moved on to all the die cutting. I pulled out my large nesting circles, the coordinating dies from the city stack stamp and my lawn fawn stitched cloud dies.

I started by die cutting the background with the second largest circle in my stash, then I went on to die cut two more circle out of black cardstock using the largest die. I knew I had to make a completely round card, My son is obsessed with circles, he says its is favorite shape. I then die cut out the skyscrapers and clouds numerous times. I would eventually die cut the clouds again using the circle die so it would layer perfectly.

 I accomplished this using my Gemini Jr. I have to say its my new favorite tool specially for doing so much die cutting. (not paid to say this) It just makes it so much easier. Highly recommend it.

I did have to fussy cut the little super hero boy out as I did not have the coordinating die.

Now the fun part, to make it all come together. I started with the base, I took one of the black circles and created a hinge by scoring a portion of the circle and then adhering the other circle to it. I adhered the background flat to the base and then popped up the city scape, as well as the clouds and the Super Hero, as you can see there is a lot of dimension.


I decided to go back and heat emboss the sentiment to match the city scape, it just added a nice punch. I sat and looked at the card for a good while and it was missing something that’s when I added the action bubbles.  I did have to fussy cut those action bubbles out but it didn’t take long and I think it just adds that little extra something.  I also glued on tiny tiny little star sequins to the night sky, I don’t think I will do that again. lol

For one last finishing touch I added Tonic Aqua shimmer brush to the clouds,  I use that on everything haha.

I hope you like it and found inspiration.

I would love to hear from you so please leave a comment and tell me where you find your inspiration when creating.

Don’t forget to check out the awesome SALES  and out the Scrap’N Stamp Challenge page  we would love to see what you create.

Have a beautiful day and wonderful weekend filled with lots of crafty fun

Nancy


Your My Super Hero Read More »

Free Shipping Anywhere In Canada