Scratch-N-Stamp
Search

Checkout

Keep up with Sales, New Products and other events at Scrap `n Stamp. Sign up for our newsletter now!

What's New

Hot Deals


Christmas

Tuesday with Tara {take 229} Wise Men Wow

Happy Tuesday! Today’s Card is a simple one with some WOW factor, featuring a bold Wise Men die cut over ink blending with copper accents.

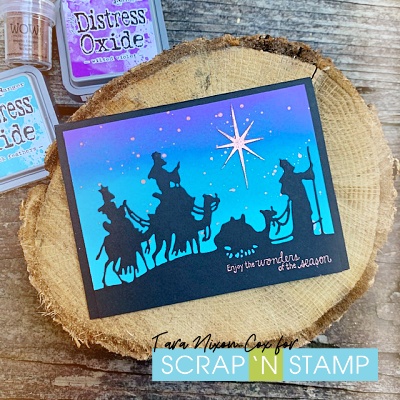
I don’t know about you, but I tend to be drawn to certain themes in decor & stamps at Christmas time. One of my favorites is anything with the 3 Wise Men on it. There’s something so beautiful about that part of the Christmas Story. I will never tire hearing about the journey they took. To me, the Wise Men really symbolize a big part of the wonder of the season! Of course, the Wise Men dies by Tim Holtz were a must have for me! I die cut them simply in black, leaving room at the bottom (the edge is open) for a sentiment I’ve had for years.

Next, I embossed the sentiment with Wow Copper Embossing Powder. I also inked up the star and embossed it in the same copper EP. It gave a nice bit of texture and was easy to do with a pair of tweezers to hold on to it!

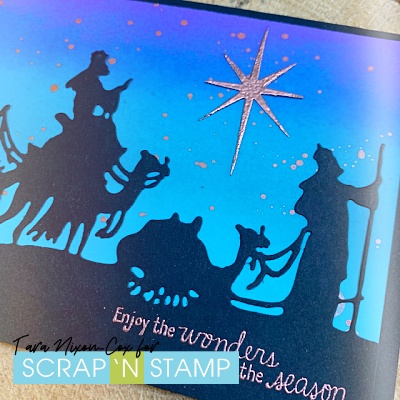
I started with a pale blue panel of cardstock, so only used two colors of ink to blend my night sky. Wilted Violet Distress Oxide is my darkest color, which blends down into Peacock Feathers. I splattered over the panel with some Copper/Bronze Distress Spray Stain for a twist on the typical starry sky.

Like I said, the card itself is really simple! The pairing of the color combination with the bold silhouette of the wise men & the copper accents really does add some WOW. I hope you like it!

Inky hugs,

Tara

Tuesday with Tara {take 229} Wise Men Wow Read More »

NEW VIDEO – SpellBinders Ornament Glimmer Foil Plate

Hi Stamping friends and happy weekend. Brr it’s chilly out there so why not cuddle up to some hot foil?

Today I’m sharing this fun foil and die cut holiday card created with the Spellbinders Ornament Glimmer Foil Plate set. AND, I have a awesome Spellbinders SALE for you – check the bottom of this post.

This set is absolutely fabulous to create with as there is the ornament and two sets of sentiment plates to foil with and six dies to cut out the beautifully detailed poinsettia and greenery.

It’s fun and quick to create these pretty cards and everything you need is included in this one package. Check out the beautiful die cut detail on the flower and leaves in this set.

I started with a white A2 card base and used the Life Changing Brushes (On sale today for 50% off) to add my blended blue background with Distress Oxides in Tumbled Glass, Mermaid Lagoon and Blueprint Sketch.

I heat set the ink to dry and then added a splattering of white paint to the background for some added interest.

I use the Gemini Foil Press Machine and my Gemini Jr Die Cutting machine to add the gold foil for my ornament and sentiment and I show you below in the video just how quick and easy that is to do.

https://youtu.be/7R7c-ry0Gsc

My final embellishments, a sprinkle of gold sequins across the card and three gold pearls in the center of the poinsettia.

Ornament Glimmer Foil Plate

And here’s another card created with this set, but in different colors.

In my video I use the Gemini System from Crafter’s Companion, because I had the Gemini Jr. Die Cutting Machine. Spellbinders also has a great system that works with their die cutting machines. The plates and dies from both companies along with Picket Fence Studios and My Favorite Things work in both machines and the foils from both companies do as well, so feel free to mix and match away.

I’ve shared the links below to the products I have used in today’s card, I hope you will give Hot foil a try, it’s very addictive haha. and I’ll be back on the 15th with another Hot Foil Card to share with you.

WOO HOO – Raya has decided to throw an extra sale today, because it’s the 30th – 30% OFF ALL SPELLBINDER’S PRODUCTS – you can View them all HERE

AND, the BLACK FRI-HE Sale has been extended too – so check out these great deals: SHOP HERE

50% OFF – LIFE changing brushes

50% OFF – Alcohol Pearls

$150. OFF – Gemini Die Cutting machine

$100. OFF – Gemini Junior Die Cutting machine – I use this one in my video and I LOVE IT.

$100 OFF – Gemini Go Machine with go bundle

50% OFF – Foil Quill

50% OFF – Chameleon Color Tone Pencils with 3 sets of color cards

50% OFF – Dreamweaver Occasions Bundle

50% OFF – Dreamweaver Christmas Bundle

50% OFF – Embellishment Bundle

Until then, Happy Stamping and stay warm.

NEW VIDEO – SpellBinders Ornament Glimmer Foil Plate Read More »

Tuesday with Tara {take 228} Merry Birdie

Happy Tuesday! Can you believe it’s officially less than a month until Christmas? I haven’t started decorating yet, but I’m finally getting inspired to make Christmas cards! Today I want to share a couple fun cards I made with Dina Wakley’s set Scribbly Holiday Birdie 2. I was so excited to see this set released in cling this year, as I got it as a limited release in clear a couple years ago and it’s a really fun one! For today’s cards, I worked with just one of the birdies, making two similar cards. I hope they make you smile 🙂

The Basics

On my first card, I used a background I had previously stamped using my Snowflakes Turnabout stamp by Concord & 9th. I chose 2 shades of red and 2 shades of green Distress Oxide to stamp with for a bright & cheery background. I typically don’t work with a lot of red & green (together) on my Christmas cards, so I chose the brighter of the greens to highlight here for a whimsical twist.

This bird is pretty good size- the square watercolor panel I stamped on is 4×4″ and there are three different hats included in the set. I stamped in permanent ink and colored him ‘scribbly’ style with Dina’s Scribble Sticks, then blended with a water brush. The hat was stamped separately and layered over my bird for extra dimension (I added a foam square under the pom-pom).

The Details

This cute sentiment ‘tweet tweet merry merry’ comes with the Holiday Birdie Stamp set. When I pulled it off to use it, I realized I had trimmed it so I could use one of the ‘merry’ words separately. I decided to leave that word off and add a Shadow Script die cut to complete the sentiment. The sentiment & Holly berries were both embossed with Wow Apple Red embossing powder.

I stamped the holly leaves on book print and layered them onto cardstock for a bit more stability. To finish off the card, I added some glitter as well as some fun red & white twine from my stash.

Snow Birdie

My second card has the same birdie with bold, grungy snowflakes (an old Tim Holtz stamp set) in the background!

I love this fun red hat! Together with the red embossed sentiment and red & white twine, it gives some fun pops of colour.

I finished this card off with a little bit more glitter and some bling. Since I smudged some ink on the bottom of my white panel, I also added a wash of color for the birdie to stand on 😉

I hope my Merry Birdie cards make you smile! I’ve still got another hat I colored up, ready to go… so watch for it on an upcoming card!

Inky hugs,

Tara

Tuesday with Tara {take 228} Merry Birdie Read More »

Free Shipping Anywhere In Canada