Happy Tuesday!
Last week I mentioned I had one more autumn card to share with you… but as I try to get my head switched into winter mode for holiday cards, I decided it would be fun to create a second card with similar techniques and layout to share with you! First, here’s my autumn card:
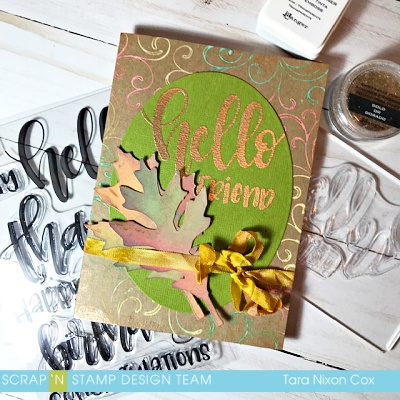
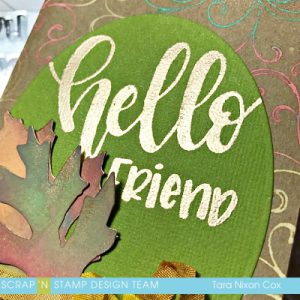
I inked up a background stamp (this is an old retired one by Hero Arts) with a few shades of Distress Oxide Inks, misted them with water to activate the colors and stamped on a kraft card. I wanted to try a card with the Embossing Technique Letter It Kit from Ranger, and selected ‘hello friend’ from the stamp set. I love the bold design and how nicely it embossed in gold on my green cardstock. I die cut some tattered leaves from some paper that I inked up with Distress Oxides and rubbed a bit of metallic Nuvo Mousse in Cosmic Brown– I find this color is a nice neutral that works great with both copper & gold tone accents! I simply picked up color with my fingers and rubbed along the edges of the leaves… then I decided to add some to the corners of my base card as well. I kept the card super simple, just finishing off with some freshly dyed 1/4″ crinkle ribbon!
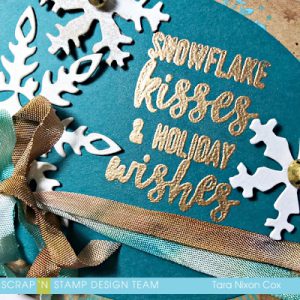
As I mentioned… I took the same basic card layout for my winter card, just turned it sideways to work with the sentiment I chose. I was working with the Concord & 9th Snowflakes Turnabout stamp set for both my background and the embossed sentiment. This was my first time using a turnabout stamp, so I played around with my Tim Holtz Stamp Platform (or you could use your misti or any stamp positioner you happen to have!), watching some youtube tutorials and made a couple backgrounds. (I have a prettier one coming up on a future card!) There was a bit of a learning curve, especially working with a standard size card instead of a square one, but I’m happy with it. I did find myself lacking snowflake dies (Tim’s Paper Snowflakes are next on my wish list!) but used the small Movers & Shapers by Tim Holtz together with a pre-cut snowflake I found locally. Not as fun as making my own, but it’ll do for now and was the size I was looking for to compliment my smaller snowflakes.
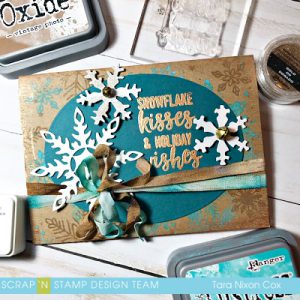
I added two colors of freshly dyed crinkle ribbon (because I couldn’t choose between them!) and a simple, rustic bow finishes it off. I also added a couple gold toned Jingle Brads to my smaller snowflake for some fun details 🙂 The embossing & metallic accents were the same as for my first card, keeping things relatively simple!
I hope you like my transitions cards… this was a fun way for me to move into Christmas crafting, here’s hoping it got my mojo going and I can actually mail some out this year! LOL
Unfortunately my indoor photo shoot didn’t capture all the variety of shimmer & glitter on my card… rainy days are not great for card photos! I need to work on putting together a better indoor studio for that to use through the winter months!
Make a note on your calendar that we’ve got another BLOG HOP coming up this Friday, we’ll be introducing our November Challenge as well! Tune in to our Challenge Facebook page to see some sneak peeks of what is coming up for you!
Inky hugs,
Tara