Happy Wednesday Everyone! I am here today, playing with a die set from Birch Press, showing that you can keep these very busy and intricate designs clean and simple. As an added bonus, if you visit my personal blog on Friday June 28th) you’ll see another card using the leftovers from the card I’m sharing here today.
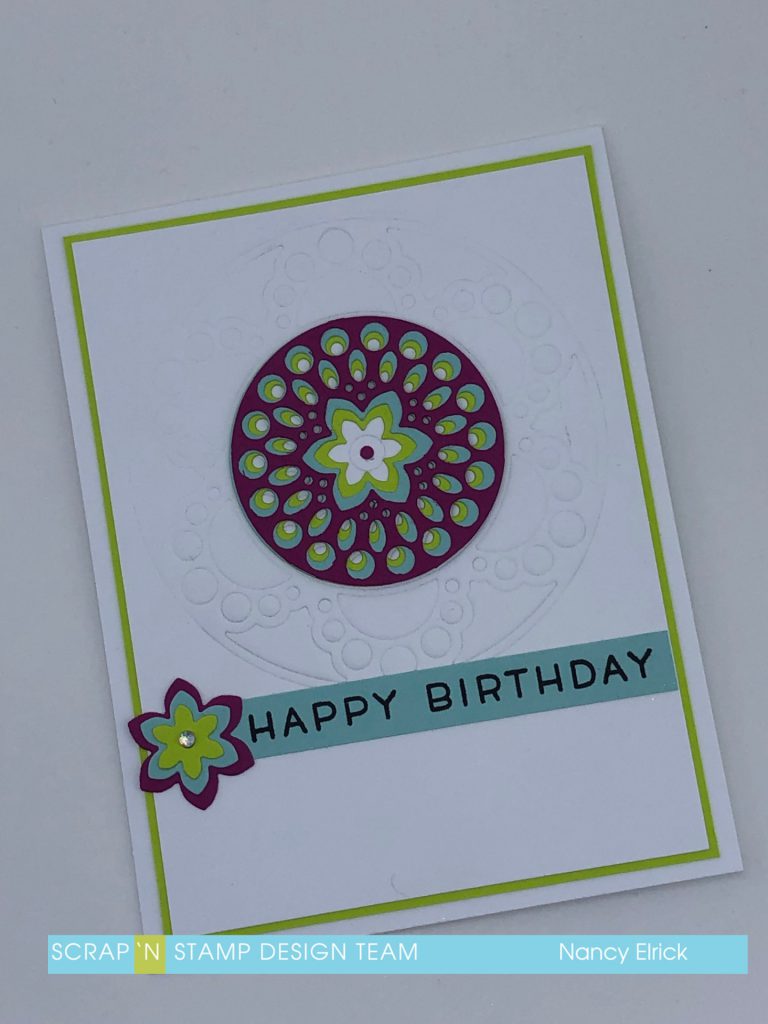
I had some fun trying some different colours to put together for this card… I wanted something bright and fun so I used a deep purple/pink colour, a light blue and a lime green along with black and white.
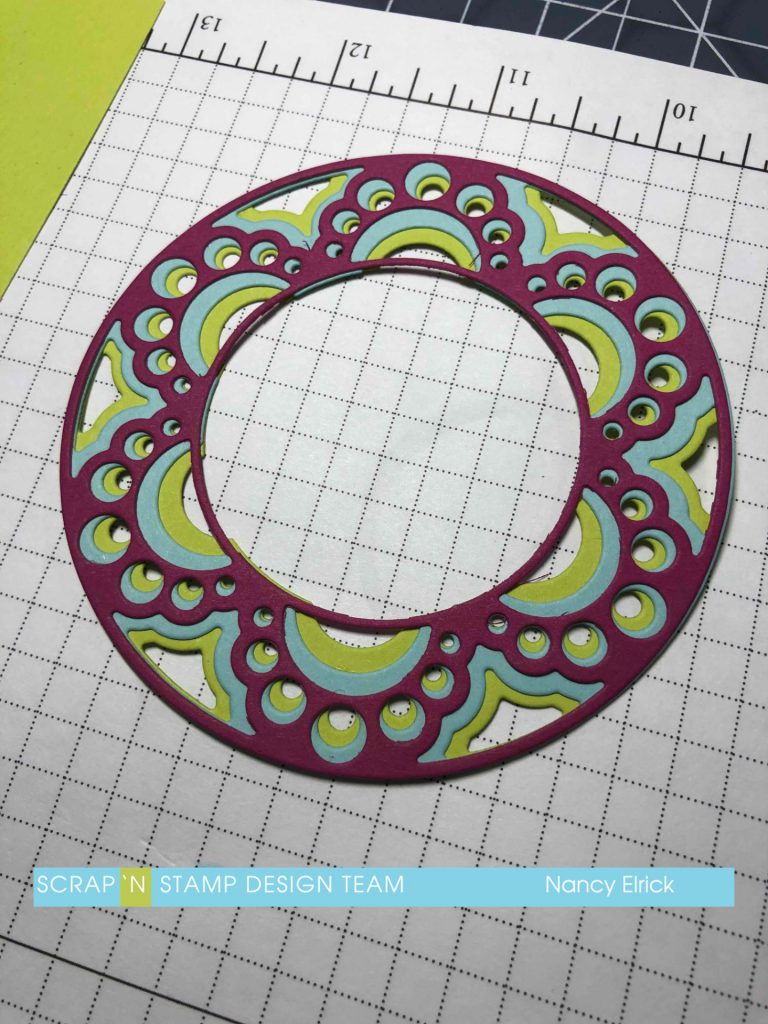
While the Birch Press layering dies seem expensive, you have to remember that there are three dies in each set… and in many cases, the centres are cut free from the outside ring of the design and you can interchange them with other sets. I didn’t do that with this card… I used the entire Bali die, but I only used the cut out portion of the centre ring. I cut each layer out of a different colour of cardstock. I put all of the layers together using liquid glue to allow for a little time to play with the layers before they stuck together completely to ensure I could get the layers as close to perfect as possible.
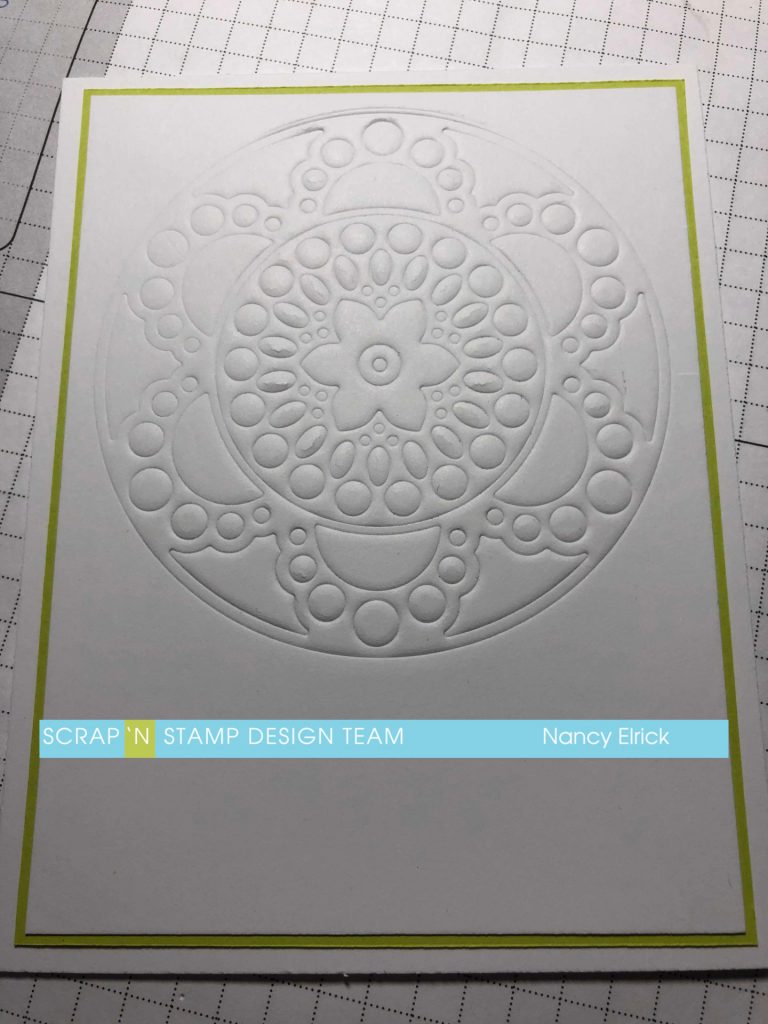
I set aside the colourful ring and grabbed the Bali A die and put it through my die cutting machine with the embossing mat. This embossed the image in to my white panel instead of cutting it out. I then layered a piece of the bright green cardstock behind my white layer leaving a 1/16″ border on all sides and then layered it all on to a top fold white card. I then added the colourful ring to the centre of the design, lining it up as best as I could. I added a small dot of cardstock in to the centre of the design for a little more interest.
To finish off the card, I stamped the Happy Birthday sentiment from Lawn Fawn Simply Sentiments in black VersaFine Claire ink on the blue coloured cardstock and cut it in to a strip. I put it on the front of the card, added flower centres from the Bali die layered together and topped it off with an iridescent gem.
This is a little sneak peek of the card that will be on my blog on Friday… I’ll hope you will pop by to see what I did with it….
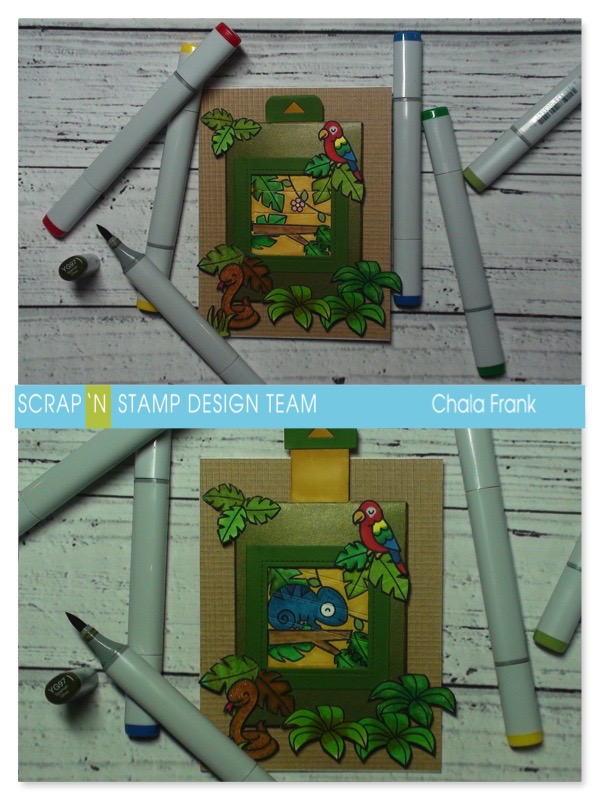
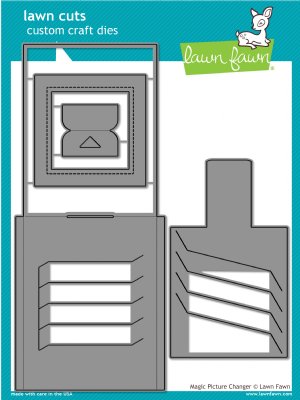
Hello again! Hard to believe we are almost done June! For me, this means my kids are attending a load of birthday parties before the end of the school year and that I am sharing yet another birthday card! My daughter recently attended a very cool birthday party for her friend that had a reptile themed party. What a brave girl! So, of course I had to pull out one of my favourite stamps sets (one that I used in my very first YouTube video), Lawn Fawn – One in a Chameleon and paired it with the Lawn Fawn Picture Changer die set. I will also be using some of the images from the Critters in the Jungle stamp set as well. This picture changer die set is so cool and there are so many possibilities to use it with stamps you already have!
I start out by using the picture changer die and with a pencil I trace out the inner square onto some 110lb white cardstock so that I know where to stamp the images. I need to trace the squares from both dies so that I can ensure I stamp the images in the correct place. Because I want the chameleon to “appear” I will be stamping most of the images twice, trying to get them in the exact same spot inside each square. I will be using Memento Tuxedo Black ink so that I can do some copic colouring. Now, I will warn you that this is a bit of a process to stamp out and there is some masking involved (I like to use the Avery full sheet labels to create my masks), but it is so worth it!! In fact, I did have a few mistakes along the way…but, hoping you won’t notice them in the finished product! Although, if you want to know what they are you can click on the video below and I will let you in on the secret there!
Once everything is stamped out I will colour the images in and then die cut the picture changer pieces out. There are two pieces, the front pocket piece and then the slide that will be sandwiched in between the pocket.
Assembly can be a bit tricky at first. You simply insert the slider piece into the pocket piece (you can watch how this happens in the video below). Then you will push the tabs from the slider portion into the slots of the pocket (Again, much easier if you watch the video!). You will want to make sure you have an anti-static tool or bag and coat both these pieces liberally to help the mechanism slide. I use Be Creative Scor Tape (3mm) to adhere the sides down.
I don’t have the Magic Picture changer Add-on so I improvised by cutting the front portion of the envelope piece from some shimmer green card stock, trimmed out the tabs and adhered that with the same Be Creative Scor Tape (3mm). I then use the smaller frame and the pull tab piece that came with the original die set and cut that from some solid green cardstock. I also coloured the pull tab with a copic maker and touched up any areas that showed white on the sliding mechanism.
I adhered the frame with the Be Creative Scor Tape (3mm) again, making sure that I only applied it to the corners. For the pull tab I used a regal adhesive tape runner.
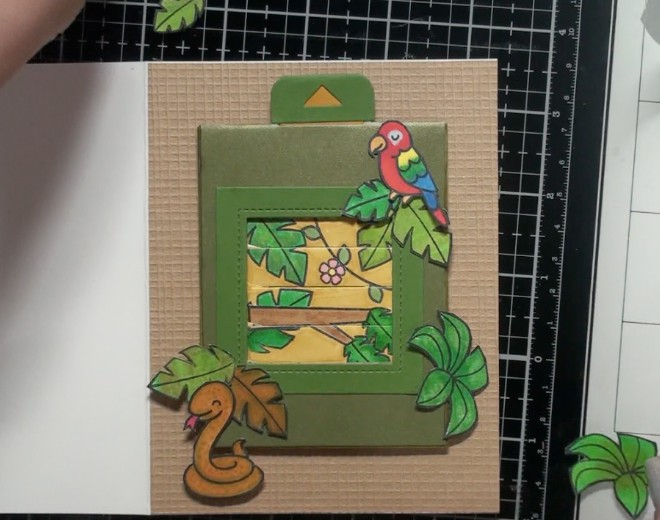
I had some left over textured brown card stock from my last project that I applied to the front of my A2 card and then adhered the magic picture changer onto it with some 3M foam tape. Now it is time to add some foliage and critters!
I stamped out the parrot, snake and some of the leaves and bushes from the Critters in the Jungle stamp set from Lawn Fawn. I again used the Black ink from Memento as I did copic colouring. I love these little critters and think they add the jungle feel to the card nicely. I will fussy cut out the images and arrange them around the frame of the picture changer with some liquid adhesive, being careful that they don’t interfere with the sliding mechanism.
The last thing to do is add a little sparkle to the snake with my clear Wink of Stella and stamp the sentiment “You’re one in a chameleon” on the inside with my new favourite ink for sentiments – Versafine Claire – Nocturne.
I really liked how this card came out and that it can be for a boy or a girl and that it can be used for a variety of occassions.
I hope you enjoyed today’s interactive Picture Changer Card and that it has sparked a creative idea for you to make your own! You can check out the YouTube video here
https://youtu.be/ga-At3ITrw0
Also, remember to check out the current sales and new arrivals by clicking here!
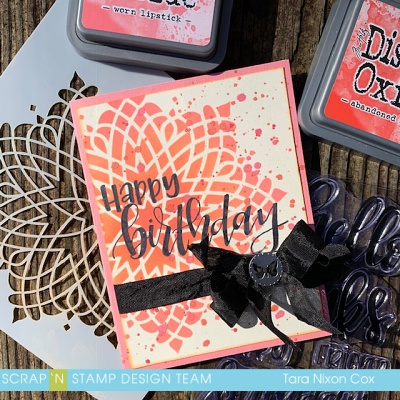
Happy Tuesday! One of my favorite people in the world (my sister!) has a birthday in January and she happens to love PINK! I’m mixing it up a bit with this simple card with a bit of an ombre featuring the Pantone 2019 color of the year “Living Coral” (as you can see I’ve used Abandoned Coral Distress Oxide Ink together with Worn Lipstick). I started the year with a card featuring The Pantone Color of the Year last year and wanted to do it again!
Representing the fusion of modern life, PANTONE Living Coral is a nurturing color that appears in our natural surroundings and at the same time, displays a lively presence within social media.
I did some simple ink blending through this MFT Stencil “Captivating Mandala” on ivory cardstock and it’s such a pretty blend of colors! I also added some shimmery paint splatters in the two colors as well to add some sparkle.
I had a few ideas of what would go on top, but decided to keep it super simple with a bold sentiment (this one from Ranger’s Letter It Embossing Kit) in black ink and some pretty black ribbon to make it all pop.
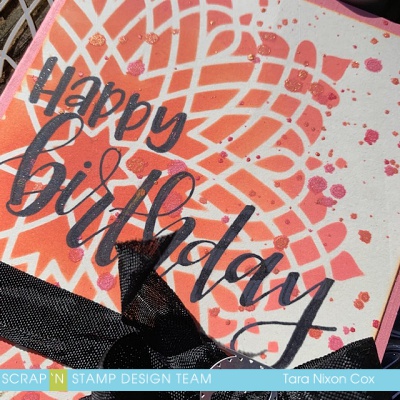
Here’s a closer look at the card… don’t you just love coral? And check out the shimmer in the background and that I added to the sentiment with a Wink of Stella brush pen. So pretty!
Hope you have a great day- be sure to join us right back here on Thursday afternoon for our January Blog Hop! The team has some fantastic projects to share with you!