Scratch-N-Stamp
Search

Checkout

Keep up with Sales, New Products and other events at Scrap `n Stamp. Sign up for our newsletter now!

What's New

Hot Deals


Distress Oxide Inks

Zippy Zebras Fun

Hi crafty friends and welcome back.  Sandi MacIver here and I have some Zippy Zebras Fun to share with you today.  This adorable Zippy Zebra stamp and die combo is from our friends over at My Favorite Things.  Their stamp artwork is always adorable and uplifting and this set is no exception.  Who can resist a Zebra on a scooter?  NOT ME!   haha.

Zippy Zebras Fun

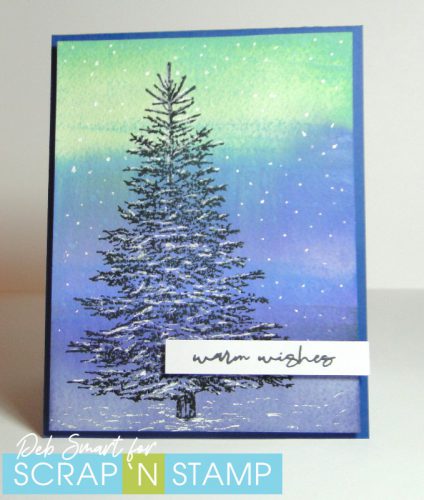
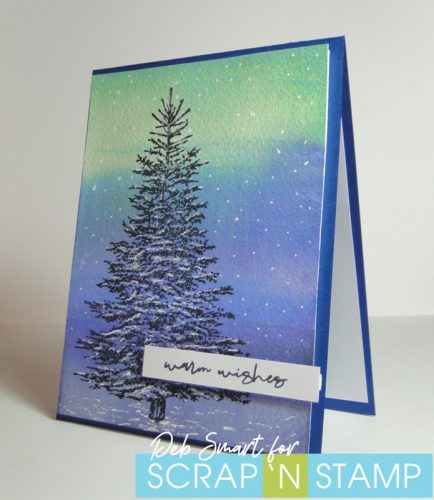
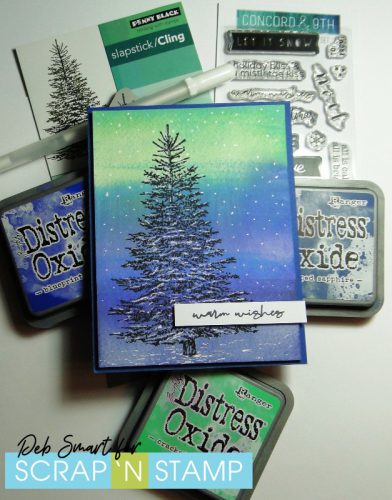
I started by blending the background in Peacock Feather and Cracked Pistachio Distress Oxide Inks for a bright playful look.  Next, I splattered with water for some distressing.

Zippy Zebras Fun

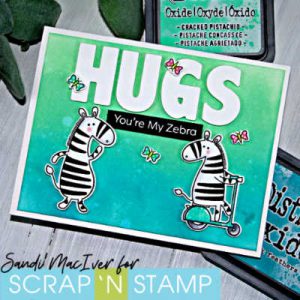
The black and white Zebra stamping is super easy and you can use Copic Markers Co and C1 (light grays) to add a little shadow down the side for depth.

I colored the scooter with Copics in Blues:  BG11, BG13, Bg49 and the tires in C5 and C6 with a bit of White Gel Pen to highlight.

Zippy Zebras Fun

There are sweet butterflies and flowers in the stamp set too, as well as coordinating dies which I have used to cut out my Zippy Zebras (love that name).

Next I cut out my “Hugs” from white card stock using Alpha dies.  The final sentiment is white heat embossed on black.

The large letters and Zebras are mounted to the card with Foam tape to add depth and extra interest to the card front.

This stamp set is fast and fun, would look great with any background and works for all occasions ….a must for your stamping stash.

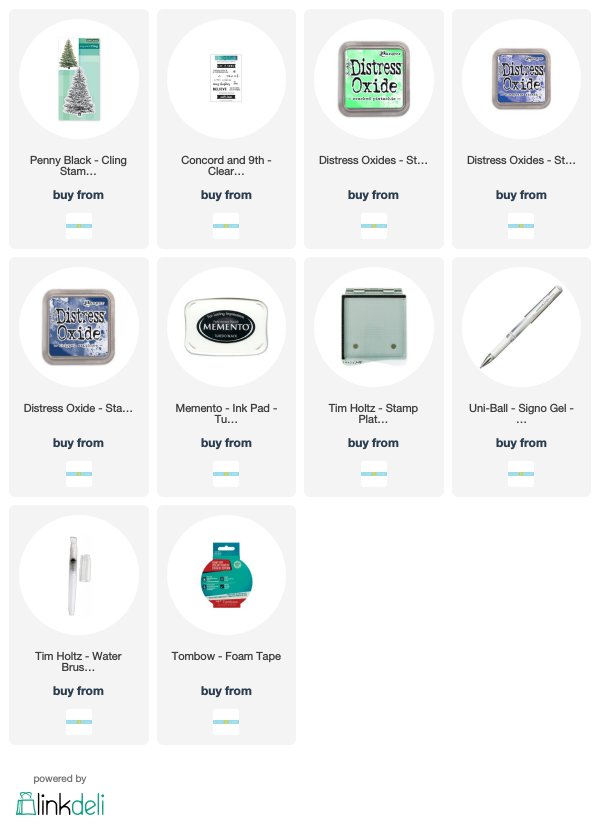
That’s it for me today, Hope you enjoyed the card and here is a list of the supplies I used.  Clicking on them will take you to the Scrap ‘N Stamp Store where you can see a larger image and add them to your shopping cart.

Until next time – Toodles!


Zippy Zebras Fun Read More »

Distress Oxide Christmas Cards

Hi Crafty friends and welcome back. Sandi MacIver here and in keeping with our monthly Distress Oxide Challenge, I created some Christmas cards to share with you today.

Distress Oxide Christmas Cards

I won’t go into too much details as I share a video below walking you through the steps to create these fabulous backgrounds.

Distress Oxide Christmas Cards

I did start by Smooshing Distress Oxide ink onto Watercolor paper. On some backgrounds I added a second layer of colour with the Nuvo Shimmer Powders.

Distress Oxide Christmas Cards

Over that I did a bit of stenciling again using Distress Oxides. Once all the backgrounds were finished, I die cut frames using the Penny Black Leaf Stitched Frames and snowflakes with the My Favourite Things Layered Snowflakes Die-namics.

Distress Oxide Christmas Cards

Finally the sentiments are from Concord and 9th Happy Holidays Label dies above. the “JOY” is from My Favourite Things and the other sentiments are My Favourite Things “Birdie Brown – Greetings Galore.

Distress Oxide Christmas Cards

I used a few jewels and sequins as my final embellishments.

You can watch the video in HD over on my YouTube Channel

That’s it for me today, I hope you enjoyed the cards and will give this fun background technique a try. I have listed the products used for the Distress Oxide Christmas Cards below for you with links to the store.

Distress Oxide Christmas Cards Read More »

Create a Distress Oxide Watercolour Background

Happy Monday! I hope you’re all rested and ready to try something new today! At least, this technique was new to me; perhaps you’ve already tried it & love it. It’s Deb here today, and I’m continuing on with the Scrap ‘N Stamp blog hop theme of Distress Oxide inks for my card today.  I’m here to share with you how to create a Distress Oxide watercolour background.

WINTER TREE

This card is easily done, and doesn’t take long. That meets my criteria for a holiday card that I can mass produce!

The colours I used create an easy ‘northern lights’ effect. You can switch up the colours to create a ‘regular’ night sky, if you prefer.

CARD DETAILS

Start with a panel of watercolour paper. Next, apply the Distress Oxide inks directly to the paper – no blending tool needed! Start with Cracked Pistachio at the top, then Chipped Sapphire in the middle, and finally Blueprint Sketch at the bottom. Spray the entire panel with water, and then spread the colours across the panels, for full coverage. You just want to spread the colour – not work it into the paper. Now, prop your panel up against something, so that it’s at a slant. Allow the piece to dry, so that the water & colours move downwards as it’s drying.

Once your panel is dry, set it  up in your stamping platform, with the Penny Black Winter Tree stamp. Cover the stamp with Memento Tuxedo Black ink, and stamp onto the panel. Because of the texture of the watercolour paper, you’ll probably need to ink & stamp twice – that’s why you’re using your stamp platform!

After stamping, use a white gel pen to add snow to the tree, the ground and snowflakes. Stamp the sentiment from the Concord & 9th Mistletoe Messages stamp set in Tuxedo Black onto a strip of white cardstock, and trim to size.

Layer your stamped panel onto a dark blue card base with foam tape. Finally, attach the sentiment strip across the bottom third of the front, with more foam tape.

I hope that you’ve enjoyed our month of Distress Oxide projects, and are inspired to try out at least some of the different ways to use them. It’s not just stamping anymore! If you need some supplies, I’ve included links below for online shopping.

Have fun stamping – and getting creative!

Affiliate links are provided, at no extra cost to  you.


Create a Distress Oxide Watercolour Background Read More »

Free Shipping Anywhere In Canada