Scratch-N-Stamp
Search

Checkout

Keep up with Sales, New Products and other events at Scrap `n Stamp. Sign up for our newsletter now!

What's New

Hot Deals


Distress Oxide

You’re Swell

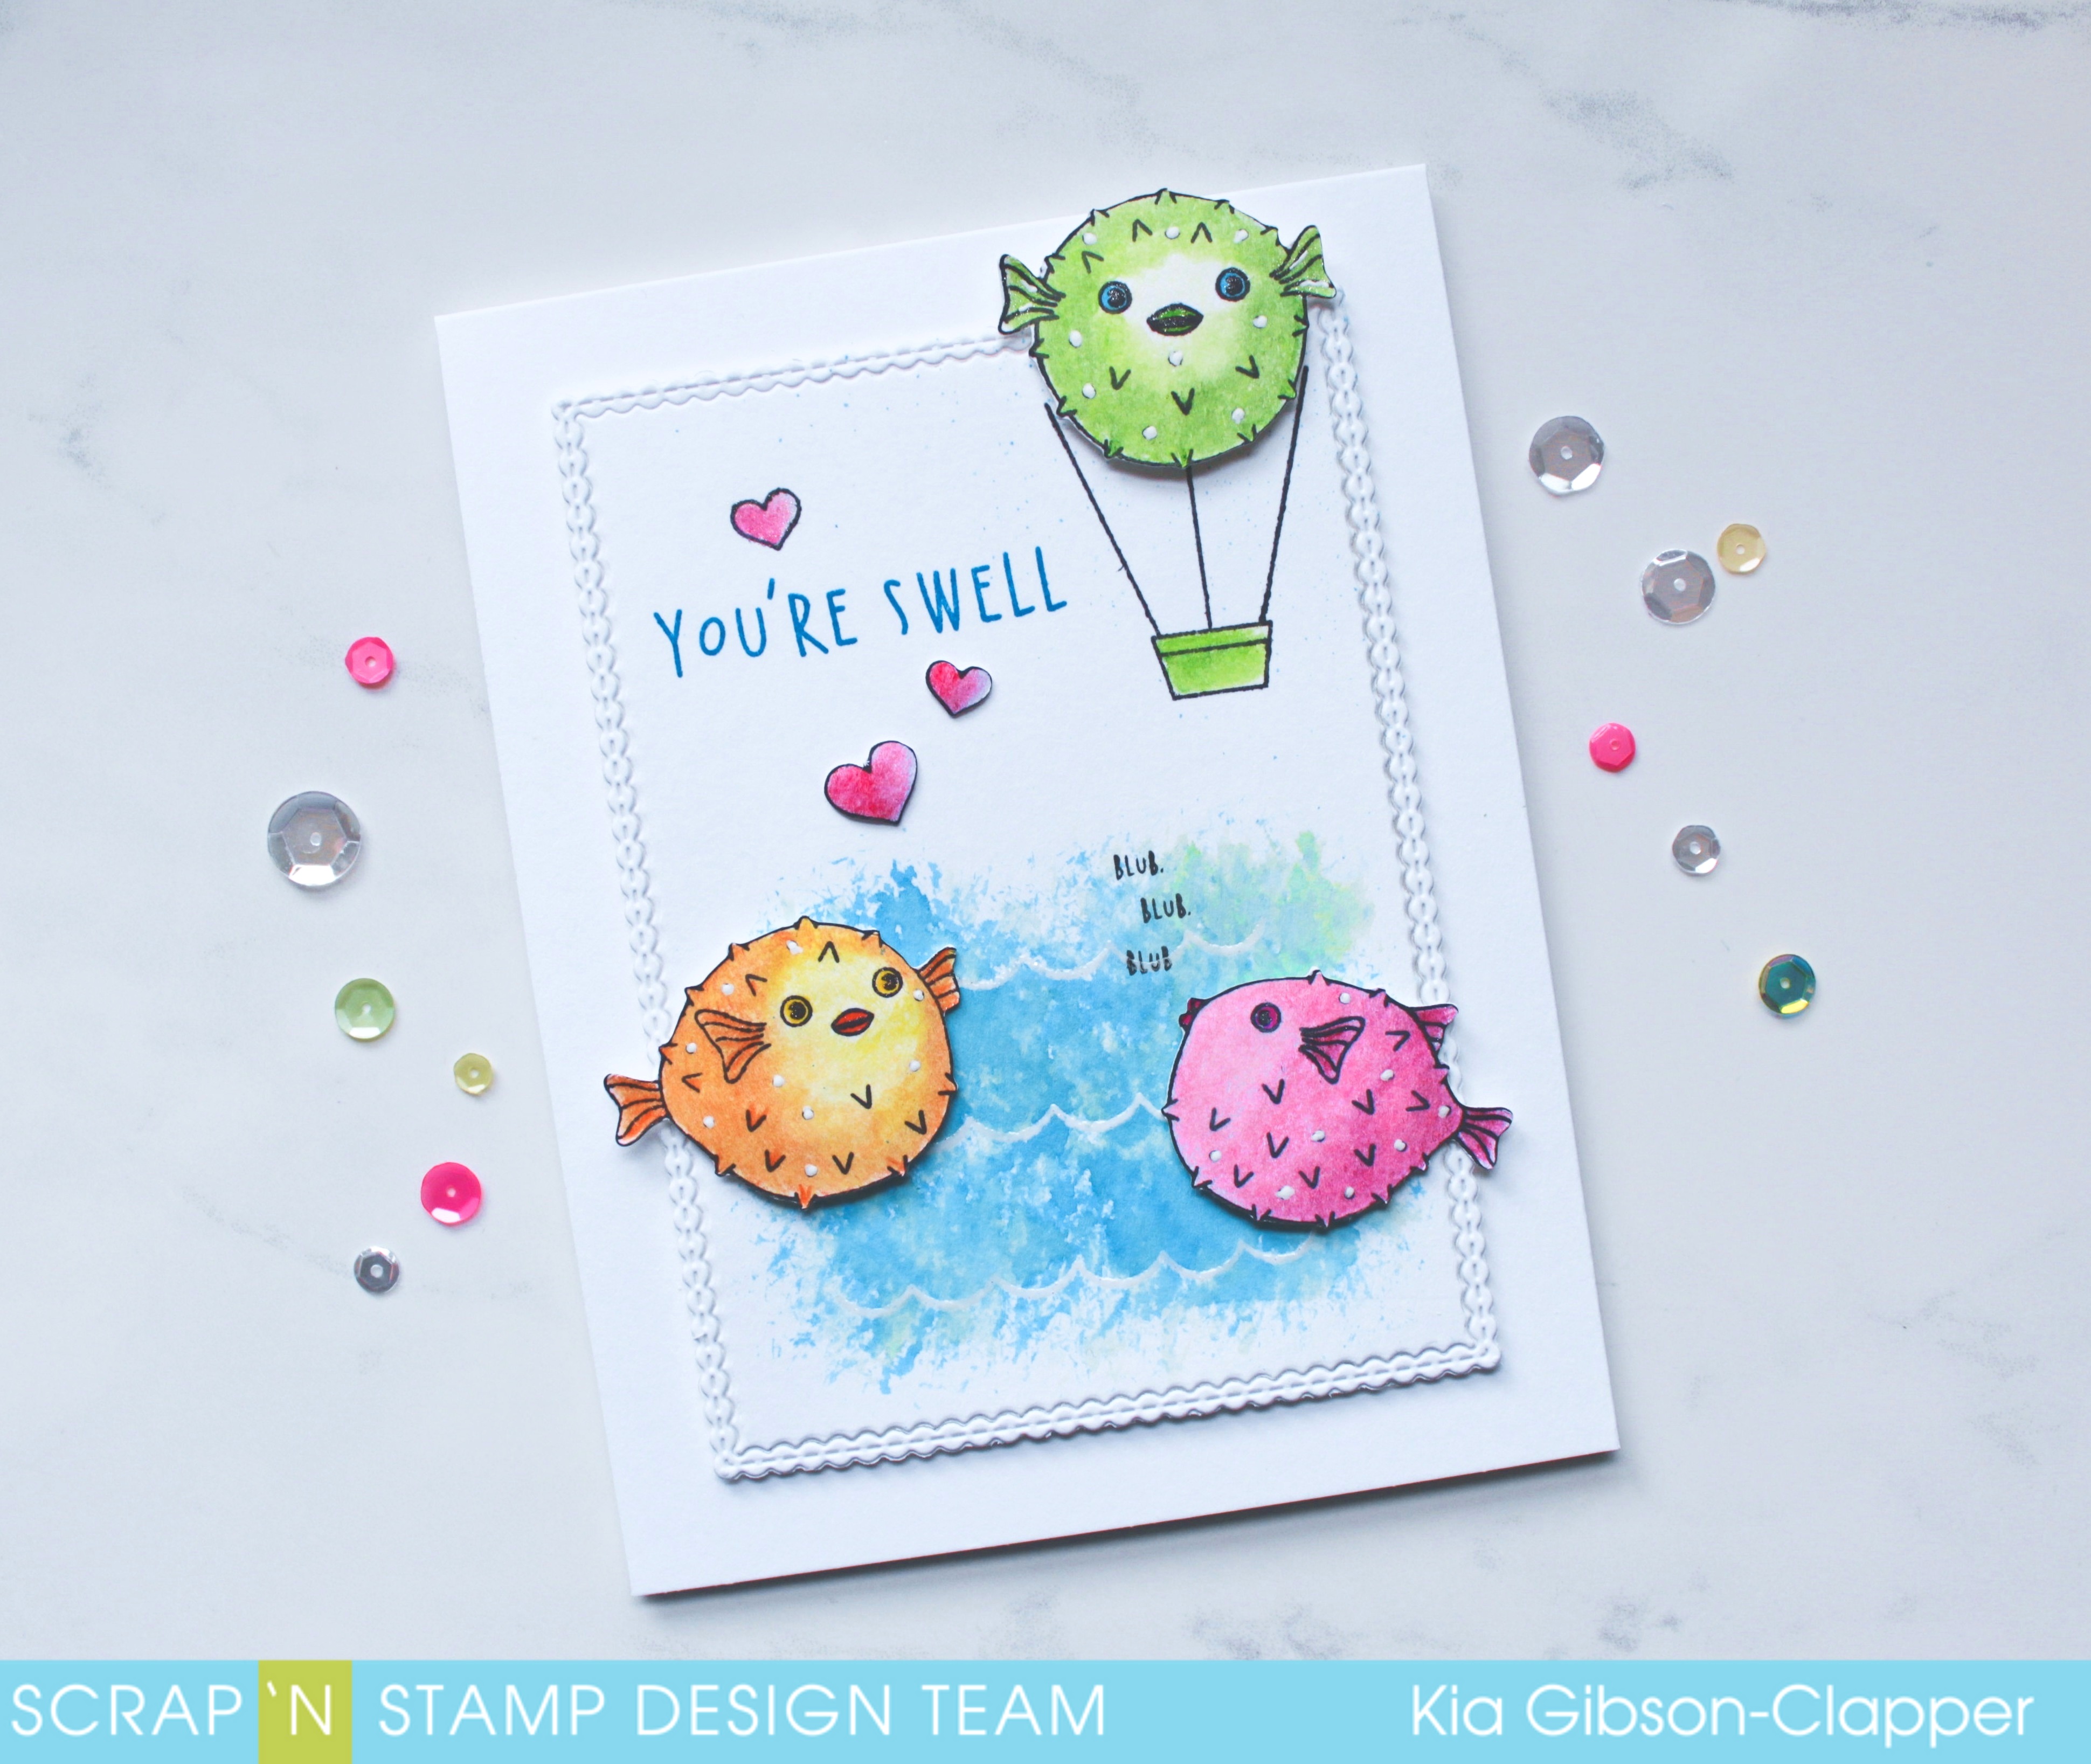
I cannot look at this stamp set and not laugh. How adorable are these puffer’s?
I was going to watercolour, but I thought I would change it up a bit and use my Chameleon Color Tones. I have had them for awhile, yet this is the first time I have used them. I have to say, I enjoyed them very much. They were easy to use and I very much like the colours that are offered. They also come in a great box for storage.

On to my card for today. I am using Hero Arts “I’m A Puffer For You” stamp set.

I first die cut the panel using my Memory Box die, then stamped and heat embossed the waves using Nuvo embossing powder. I mixed up distress oxide inks to colour the water, starting with Salty Ocean, then Cracked Pistachio and finally Broken Glass, drying between each application. I did not want my frame to have colour, so I applied the colour with a rough brush and flicked small amounts of splatter towards to top of the panel representing beads of water falling from the puffer balloon.

I stamped the fish and proceeded to colour with the Chameleon Color Tones, starting with the lightest colour and ending with the lightest colour. What that means is, I start with the lightest colour, go to the medium colour, and once done with that colour I go back over the blending lines with the lighter colour. I go from medium to dark and go back and do the blending area with the medium colour. I colour using small circles as I don’t like to see lines. Needless to say colouring with pencils is time consuming for me, but also very relaxing. Once I am done with my colouring I go over everything with a light covering of Gamsol, or you can use Isopropyl Rubbing Alcohol.

I attached the panel to my card base using foam tape and arranged placement of the fish. I styled each of them and propped them up on foam dots, adding Wink of Stella to the gills, fin, lips and eyes, and white gel pen on each of the fish covering the black circles. I added the hearts with glue, stamped the sentiment using Manganese Blue and the “Blub” sentiment using Jet Black ink.

 Scrap’n Stamp has $10.00 off the Chameleon Color Tones for the next week, so now is a good time to add them to your craft supplies.

I hope you have enjoyed this card today and thank you for visiting the Scrap’N Stamp Blog. I have a close up of my card on my blog which you can find here.

You’re Swell Read More »

Tuesday with Tara {take 158}

Happy Tuesday!  Today I’m sharing a card that started out with inspiration to create a one layer card… which changed into something else.  I did keep a one layer version to share with you as well though 🙂  I’m using some older, but new to me, color layering stamps by Hero Arts.  (check out this awesome sea turtle set which IS available… you could totally create cards with a similar vibe using it!)  As I said, I wanted to create a one layer card, revisiting a torn paper masking technique I really enjoy.  I mixed things up this time, masking off two edges of my card, blending shades of green & blue to create my ocean background, which I wanted to face as I moved away from the masked corner & edges.  I used Distress Oxide in Peacock Feathers & Cracked Pistachio for the base layer…

Then I lightly stenciled over the masked layer with Iced Spruce and a Tim Holtz Doodle Stencil

Here’s how the background looked when I removed the torn paper masks:

This was my second attempt at the background, and the one which ended up remaining a one layer card.  For my first, I masked the top left corner and I found the balance just didn’t feel right… which is why I decided it needed some extra layers added!  For my stamping, I used the same colors of ink, with the addition of Watering Can Archival Ink and Salty Ocean Distress Oxide.  Watering Can didn’t quite give the intensity of color I was looking for, so in some spots I stamped over it with Salty Ocean.

I added some shimmer to the stamped shells with a clear Zig Wink of Luna Pen and a bit of glitter with Nuvo Glitter Drops.  Here’s a look at my finished One Layer Card.

And here’s version 2.0- I added some additional stamped images (another starfish and the large seahorse) and some mesh ribbon and thin jute.  The sentiment was also layered up and additional bubbles were stamped in the Salty Ocean ink to balance the mix of colors.

I saw a quote by Picasso that made me smile considering this card making experience…

“I begin with an idea,

and then it becomes

something else.”

-Pablo Picasso

Works for me!  And I don’t know about you, but for me it happens all the time!  Here’s a close up of the layers on my second card:

Lastly, here’s a look at the two cards together so you can see the differences between them.

Hope you found some inspiration here today… and maybe you’ll try a one layer card this week (and maybe it’ll even stay a one layer card!  ha!)

Inky hugs,

Tara


p.s. see you back here on Saturday when we’re bringing you some Christmas in July with our next BLOG HOP!  Woohoo!

Tuesday with Tara {take 158} Read More »

Tuesday with Tara {take 157}

Today I’ve got another card that uses part of the Mixed Media panel I created for last week’s card.  I stepped outside of my color comfort zone for this one and honestly, I’m still struggling a bit with how much I like how it turned out… but I got to combine some Snarky Tim Holtz Small Talk stickers with some great stamps by Dina Wakley and my fingers got inky in the process so it’s a win in the end, regardless!

I started with a couple smallish manila tags and used the fancy ‘smooshing’ technique to ink them up with some Distress Oxide Inks.  Simply smoosh several shades of ink onto your work surface, mist with a water bottle and dip your tag into it.  I like to dry my tag with a heat gun and dip multiple times until I get the coverage I want.  I also finish it up with an ink applicator tool if there’s too much open space.  It’s fun & simple and you can get some neat layers with the Oxide Inks.

I used a black ink to stamp my chosen gal onto the tag, deliberately taking her slightly off the edge of the tag.  (Since I had two tags, I stamped a different gal on the second one.) I dug into my stash of ribbons and embellishments to finish off the tag, adding a bit of washi tape and some white Nuvo Drops onto it as well.  A layer of black card stock behind my mixed media panel helps draw focus and ties everything together with the black backed snarky sentiment (these are going to be a lot of fun!)  Also take note of how fun it is that the white Nuvo Drops picked up some of the ink color as they dried!  They only did this in spots where the Distress Oxide had not already been activated by water 🙂

Since I had the second tag, I decided to make a little mini card- ready to go on a gift or tuck into a package.  Cute, right?  Here’s the pair together… they are growing on me!  What do you think?

Hope you have a great week!  Continue to check back in here, we’ll be sharing some great projects from the team and we are also gearing up for some Christmas in July fun- our monthly blog hop coming up on the 21st!

Inky hugs,

Tara


Materials Used:

Dina Wakley Stamp Set All the Gals (a discontinued set, but still available in the online store!)

Tim Holtz Small Talk Snarky

Nuvo Glitter Drops Aquatic Mist

Nuvo Crystal Drops Simply White

Ranger Assorted Tags

Assorted Distress Oxide Inks


Tuesday with Tara {take 157} Read More »

Free Shipping Anywhere In Canada