Happy Saturday!
I hope you are in your craft room and ready to create! Today’s prompt word for the Random Acts of Cardness Facebook Challenge is Storybook and I have a fun non-traditional card for you using My Favorite Things Fairy-Tale Friendship.
If you have been crafting and card creating for some time then I am sure you have come across Bookatrix (also known as Open Book Easel Cards). These card make beautiful keepsakes for any occasion. The one thing you will need is a template. The one I can recommend to use is found by clicking HERE. I believe there may be dies / embossing boards…however, I have only ever seen them available in the UK and this girl is not paying for shipping and duty on her craft supplies! Especially when it is just as easy to create the templates yourself! In fact, that is what I did. I created my own cut file for my Silhouette machine, but again, you can use paper/cardstock templates to get the same results.
I cut out three different sizes of the template (you can use as many as you like). I die cut the largest layer from Tonic kraft cardstock. The second layer is a fun patterned cardstock from a Recollections pack that I picked up on a whim. You can use any cardstock that you like to achieve the look you want. The last layer (smallest) is coffee dyed computer printer paper. I make handmade journals and often use these pages in the signatures that I sew in. I thought it would be fun to try to use this in a card to help create the look of a vintage storybook.
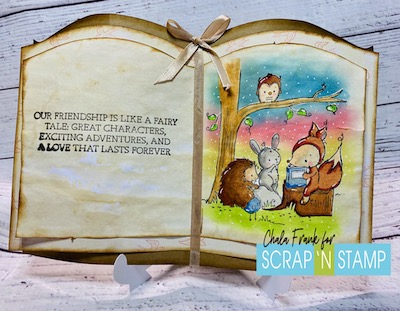
Once I had the layers cut out I then need to decide what stamped image I wanted to be on my book page. This was an easy one for me! I have been wanting to use the My Favorite Things Fairy-Tale Friendship stamp for some time now and this was the perfect project for it!
First I will need to create a mask as I want to do some Distress Ink blending in the background. I was inspired for this layout by Rachel Alverado’s card from the MFT design team. I like the way her image was soft yet striking at the same time. I created my mask out of full page Avery labels. However, you can use products like Gina K’s Masking Magic or other products that work well for you. I fussy cut out the mask trying to keep as much of the detail as possible.
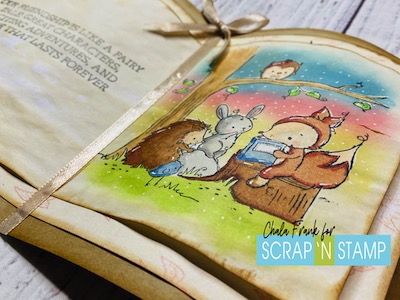
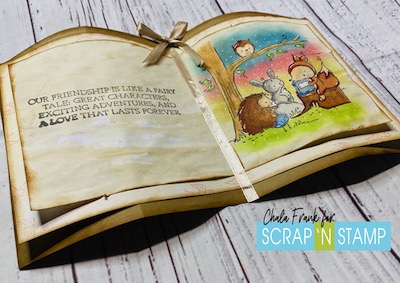
Once I had the mask completed I stamped the image with Memento Tuxedo Black ink and the help of my Stamp Perfect onto the coffee dyed paper. I carefully placed the mask over the stamped image and used my Life Changing Blending Brushes from Picket fence to blend the background using Distress Inks Mermaid Lagoon, Abandoned Coral, Squeezed Lemonade and Twisted Citron.
My favourite part is always lifting up the mask. I did this with the help of my Craft Pick. I then coloured the image in with some Copic markers. This was very much a learning experience for me as the Distress Inks and Copic Markers blend very differently on copy paper and with the added element of the coffee dyeing there was some unpredictability with the colours. However, I am really pleased with the way it all worked out. I stamped the sentiment with VersaClair Morning Mist as I thought a sharp black would be too harsh. I was very pleased with the colour choice! To finish the image off I added some highlights and dots to the background with a White Gel Pen.
To add some extra “vintage feel” to the card (book) I decided to ink up the edges of each layer with some Vintage Photo and my Mini Ink Blending Tool.
Next it is time to assemble the card. Before I put it together I ran the layers over the edge of my desk to help curl the pages a bit to give it a more realistic book look. I adhered the card with a bead of Art Glitter Glue down just the centre to allow for the sender to write their message either on the top or underneath the pages. I added some satin ribbon down the middle and created a bow and adhered it to the top of the pages with some Fabri-Tac.
Some things you may want to keep in mind is that this card is really a gift on its own. So you may want to create a box and a card easel to go along with it and sending it in the mail may flatten it out. This may be a card that you will want to hand deliver or arrange for special packaging.
I am so pleased with the way this turned out and am so happy to give it to a very special friend who is a very important character in my storybook of life. You can check out the corresponding video to watch how this card came together by clicking HERE.
https://youtu.be/MpEVJL3vgCU
I hope this has inspired you to create your own storybook card and I look forward to your take on today’s word prompt!
Enjoy the rest of your weekend and stay crafty!
~Chala, xoxox