Scratch-N-Stamp
Search

Checkout

Keep up with Sales, New Products and other events at Scrap `n Stamp. Sign up for our newsletter now!

What's New

Hot Deals


stencils

Simple Stencils

Welcome Back!

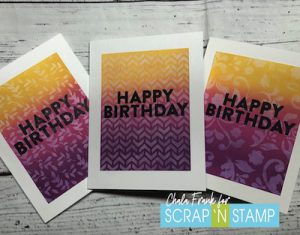
I hope you all had a great weekend and were able to “Stencil Us In” for our latest blog hop!  Today I am continuing to play with some simple stencils to create some fun birthday cards.

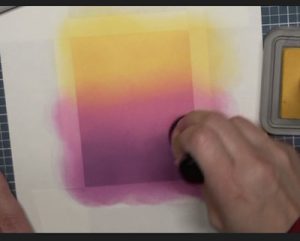
I have also been really enjoying playing with my Distress Oxides lately and creating ink blended backgrounds.  The colours I am using today are Fossilized Amber, Picked Raspberry and Seedless Perseveres.

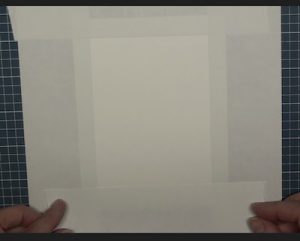
To start I masked out a white border using post it labelling tape that I got from Amazon.  You can use any masking paper that you have on hand, I also recommend Gina K’s Masking Magic.

I blend the Distress Oxide Inks with a foam blending tool, moving back and forth between the colours to get a beautiful transition from one ink to the other.  I love how easily Distress Oxides blend together.

The next part is the hardest, picking which stencil to use!  I chose the Jet Wing by Carta Bella.

Lay the stencil onto your inked background.  You can leave the masking on for the next step, I was a bit absent minded and took mine off.

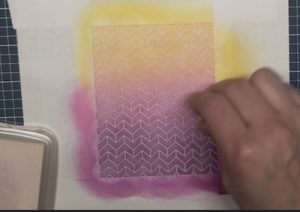
Using a finger dauber I apply a generous layer of Brilliance Pigment ink in Moonlight White.   I will then carefully remove the stencil and the masking paper.  You will need to let this dry completely.  I suggest setting it aside for a couple hours….or, if you are impatient like me, you can use your heat tool.

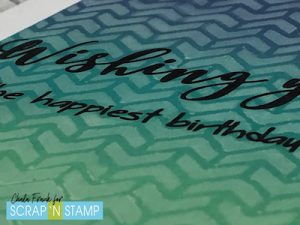
I love the way the stencilling pops off the page and the way the vibrant colours of the Distress Oxides show through.

For the sentiment I used the big and bold Happy Birthday from Hero Arts Snarky Messages stamped in VersaClaire Nocturne Ink.  I recommend using a stamp platform like the Stamp Perfect to ensure you get a good impression of your sentiment.  I played with a few other Carta Bella stencils and love how each card turned out!

I couldn’t resist making one more, this time with in Peacock Feathers, Broken China and Cracked Pistachio.  I think a big bold Thank You sentiment would also look really nice with this background.

Hope you enjoyed today’s cards!

Have a wonderful and crafty week!

~Chala


Simple Stencils Read More »

Laugh ‘Til You Leak!

Hi friends! It’s Deb here today, from the Design Team. I thought I’d continue on with our Scrap ‘N Stamp ‘Snarky New Year’ blog hop theme with today’s card! If you missed the Hop, be sure to check it out! Enjoy the snarky humour – it’s all in good fun, of course! You can start at my post HERE. Today’s card is made with the same sentiment stamp set, called Laugh ‘Til You Leak by Dyan Reavely. The sentiments in this set just cracks me up!

LAUGH ‘TIL YOU LEAK

I had lots of fun creating today’s card. Fun, bright colours, stencils & more were all put to use.

Laugh 'Til You Leak!

You’d definitely have to choose carefully who you send this card to – it’s a special sense of humour  that would appreciate it!

CARD DETAILS

To start, make your ‘extra marbles’, so that they have time to dry. Use small circle dies or punches to create ‘marbles’ in your colour scheme. Create the shine accent with a white gel pen. Next, use Nuvo Crystal Glaze and apply it over the entire circle. Set them aside to dry.

Now, on a piece of white cardstock, use the MFT Confetti Stencil set and apply 3 different colours of ink. My choice of colours is Peacock Feathers, Mustard Seed and Shabby Shutters Distress ink. Use one stencil for the top, and the 2nd stencil for the bottom, to cover the entire panel.  These fun coloured dots are your ‘marbles’!  Next, use the MFT Wonky Stitched Rectangles dies to die cut the stenciled panel, plus 2 more in the same or similar colours to the ink. Create a card base from the 3rd colour.

Use glue or tape to layer the die cut rectangles to the card base, offsetting them on angles. Stamp the sentiment from the Laugh ‘Til You Leak set in Nocturne ink onto white cardstock. Cover with clear embossing powder, and heat set. Next, cut the sentiment apart, and attach the strips to the card front, with fun foam or foam tape.  Once your die cut/punched ‘marbles’ are dry, attach them to the card front – watch out, they’re escaping through the ‘hole’!

Laugh 'Til You Leak!

INSIDE SENTIMENT

Now, with a sentiment like this on the front, you may want to soften the statement with one inside!

Laugh 'Til You Leak!

After die cutting the stenciled panel, I used the leftover frame and attached it to a white panel, on the inside of the card. The sentiment is from the MFT Sassy Pants Best Friends stamp set. No one could be mad at this, right?!

I hope that you’ve enjoyed my card today, and seen how snarky doesn’t have to be mean! It’s all about keeping it in good fun, and knowing your recipient. *wink* The products I’ve used for my card are all in the Scrap ‘N Stamp online store – links are below. Have a fun day! Remember you can join in the snarky fun on the Scrap ‘N Stamp Facebook Challenge page HERE. Create your own snarky card, and add it to the page! One lucky winner will be drawn at the end of the month!

Laugh 'Til You Leak!

Affiliate links for products used are supplied below, at no cost to you. Using my affiliate links, you help support me in purchasing new products, so that I can continue sharing new projects with you!


Laugh ‘Til You Leak! Read More »

Texture Paste with a Twist

Texture Paste with a Twist

Hey Guys! I am so excited to be back sharing my next card that features texture paste with a twist!

Our Design Team absolutely rocked the White Christmas them and I was so inspired by them that I had to create one more to share!

You got a sneak peek a few weeks ago during my Foil Quill video of the Carta Bella/Echo Park Snowflake Fun Stencil. I was so excited to be able to use it for this card as it was perfect to show off the detail that texture paste can give you on a project.

The Technique…

I only have one texture paste and wanted to jazz it up a bit so I decided to mix my own custom paste. To do this I grabbed my Tim Holtz craft mat, palette knife and Ranger opaque matte texture paste and mixed in the Nuvo Glitter Drops in Silver Crystals until I got the amount of sparkle I liked.

The great thing about this technique is if you are short on craft space like me, you can still get the look of all the colours without having to own ALL the colours. I encourage you to try mixing difference mediums to see what custom creations you can come up with! Remember to share your White Christmas theme cards over at the Scrap’N Stamp Facebook Challenge Page!

Spread the texture paste in thin even layers. This will help with speeding up the drying time and keeping your textured image looking even.

Once my piece was dry, I die cut it with the MFT Wonky Stitched Rectangle dies (one of my favourites). I then mounted that onto a 5 1/2″ x 4 1/4″ card panel made from silver mirror cardstock. (Here is a link to a similar cardstock) and adhered that panel to the A2 card base.

Make it Sparkle!

I wanted to up the sparkle factor just a bit and decided to add some Studio Katia sliver crystals.

So as not to detract from all that bling, I kept my sentiment very simple. So, I layered grey cardstock on top of a small piece of shimmer cardstock that I had laying on my desk from the blog hop card I created. I heat embossed the sentiment with some tinsel embossing powder. However, in hindsight I would use an embossing powder like Wow Metallic Embossing Powder Super Fine as the tinsel embossing powder was just a bit too chunky for that small and detailed of a sentiment.

I still liked how it turned out and will be making more of these to give out to friends and family.

The Video Tutorial

Thanks so much for stopping by and I hope you liked today’s card! You can check out the video here.

https://youtu.be/_-noEzdmsuE


Giveaway Reminder!

Remember: if you have not participated in the hop, I encourage you to do so for your chance to win a $50 Scrap’N Stamp Gift Card! You also have until Saturday, December 14th, 2019 to comment, like and subscribe on my White Christmas Blog Hop video for your chance to win a set of Picket Fence Life Changing Blending Brushes. I will announce the winner of that prize on Sunday, December 15th, 2019 on my personal blog and YouTube channel.

Here are some photos of the finished card. Thanks for stopping by!


Texture Paste with a Twist


~Chala

Texture Paste with a Twist Read More »

Free Shipping Anywhere In Canada