Scratch-N-Stamp
Search

Checkout

Keep up with Sales, New Products and other events at Scrap `n Stamp. Sign up for our newsletter now!

What's New

Hot Deals


Distress oxides

Snow Happy

Hello crafters! Kia with you today for day 18 of the Random Act of Cardness, prompt word WINTER.

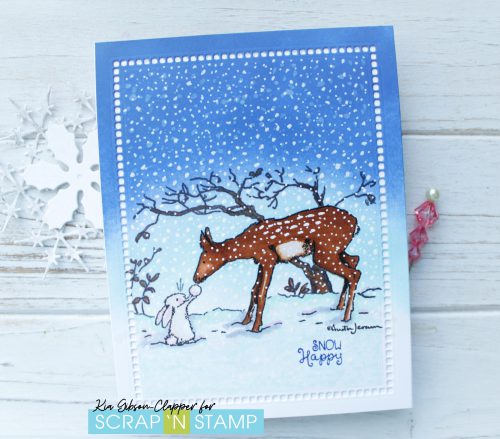
First up I stamped the image on Neenah card using Memento Ink in Tuxedo Black. I then added the black ink only to the deer and bunny, and stamped on the masking paper, then fussy cut it out and applying it over the deer and bunny.

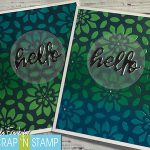
I have only used this stamp set once before where I used my watercolours. So today I have opted for Copic markers and Distress Oxide inks. Starting with the Oxides I applied Prize Ribbon along the top portion of the card, ending with a moon shape, where the ink met up with Tumbled Glass Oxide. I then applied and blended the Tumbled Glass Oxide almost to the land line.

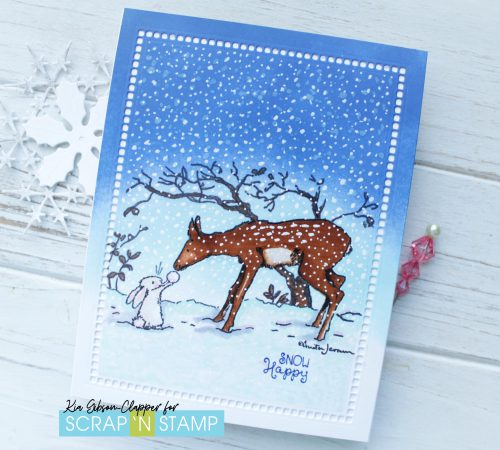
I then coloured the land portion using Copic BG10 and added C3 for shadows around the deer’s hoofs. Along the land line I added in BG11. Once I was done with the inking and the snow, I unmasked the deer and bunny to colour.

For the Deer I used E11, E23, E35, E37 and E49. For the bunny I used E40 and E41 with R81 on the snow, tail and ears.

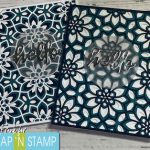
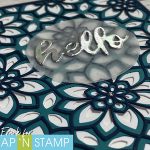
I then ran the piece through my Gemini Jr. using the Spellbinders die. Within the die cut holes is where I added the snow using a gelly roll pen in white. Sore hand after adding all that snow! I normally would use Gouache, but I decided I would keep everything using pens and Copics. When I finally finished the snow I stamped the sentiment using the Blue Belle ink.

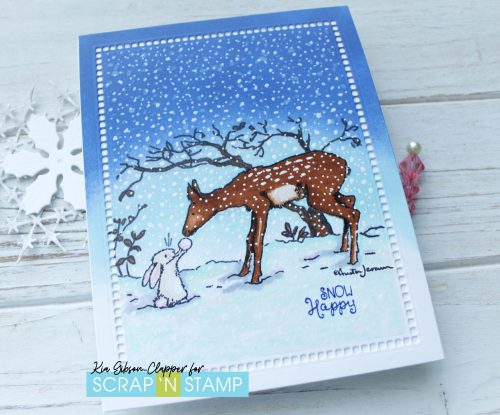
To finish up I glued the panel to my card base using Nuvo adhesive in the middle part and the thin line of my Lawn Fawn glue around the edges. I am pretty happy with how this turned out, even though it was a bit time consuming. It is always worth the time if you like what you see in the end.

Thank you for dropping by. Following are Affiliate links to the Scrap’n Stamp Store, at no extra cost to you.


Snow Happy Read More »

Die Cuts vs. Stencil – Compliment Cards

Hey, Hey! Chala here for your Sunday Funday blog post! Today I am sharing some compliment cards and I thought it would be fun to have a die cut vs. stencil smack down! Lol!

I recently purchased the Birch Press Design Viola Plate die set  and I have to tell you I am in LOVE!  So much so that I wanted to not only use it as the standard die cuts, but I also wanted to create a stencil out of it too!  This set comes with 3 separate steel plate dies that you can use all together like I did today on my first two cards or individually, like I did to create a stencil for my second set of cards.   Although this set has some price, it is well worth it for the versatility!  A great investment piece for any card theme!

Let’s get started with the first two cards.  I pulled out white, teal and navy blue cardstock and cut out two sets of each die plate.  I couldn’t decide if I wanted the navy blue on top or the white cardstock, so I decided to do both.  By using by Gemini Jr. die cutting machine the process went so quick and easy and I got a beautiful cut each time!

One the each layer was die cut I simply adhered them together with some liquid adhesive.  I chose liquid adhesive because of the intricate design of the die cut and to allow me wiggle room to get them into proper position.  I added some crystal gems to the centre of the flowers.  I wanted a simple greeting on the front so I chose a “hello” die sentiment and cut it twice, once from regular white cardstock and one from silver cardstock and layer them together to add dimension.  I then adhere that onto a piece of vellum cut with a stitched circle die and then ran this through my Xyron Creative Station Lite so that you can’t see any adhesive on the back and that with all the layers of cardstock I know that it won’t come off in the mail.

I wanted to send these cards to co-workers as random acts of compliments, so I used MFT’s Hello Beautiful and Anything But Basic – Encouragement stamp sets.

For the next cards I decided to use the B plate from the Birch Press Design Viola Plate die set  to create a stencil.  I simply die cut it from some thick 120lb Cardstock.

I began with some ink blending with Distress Oxide in Cracked Pistachio, Lucky Clover and Peacock Feathers and created three equal blended parts.  I used my heat tool to speed up the drying process and with the stencil I created and dabbed on some Versamark Watermark ink.  I then used clear embossing powder to seal in the Oxide inks.  I then bring out Black Soot distress oxide and blended that over top.  I buffed off the extra ink from onto of the embossing with a microfibre cloth.  Although I liked the look of it, I wanted to deepen it with a bluer tone so I pulled out my Chipped Sapphire Distress ink and went overtop of the Black Soot to deepen the colour.  I liked this look a lot better.  For the next card I skipped the Black Soot and opted to just go overtop of the embossing with the Chipped Sapphire.  I completed the cards in the same way as I did with the first two adding some crystal gems and finishing with the same hello die cut vellum sentiment.  For the inside sentiments I again used a sentiment from the MFT Anything But Basic – Encouragement and a sentiment from the Picket Fence Here is Where I Work stamp set.  Here’s a look at the finished cards.

Thanks for spending your Sunday with me!  Leave a comment down below or over at the YouTube video with which one you think won the smack down  – Die cut or Stencil?

https://youtu.be/NLUzJbXxunw


Happy Crafting Friends!

~Chala, xoxo

Die Cuts vs. Stencil – Compliment Cards Read More »

Do You Wanna Build a Snowman?

I hope everyone is doing well! It has been a beautiful weekend.   It was made better by all the snowfall we have recently gotten…almost 30cm!  The first thing that came to my mind when I saw all the snow was…..Do you wanna build a snowman?  So, that is exactly what we are going to do for today’s card!

I  want to make a car in which the snowman “came together” on the front like you were building it.  I didn’t think I had enough room on a standard A2 size card so I thought I would use a slimline style.  The base for this slimline card measure 7″ x 8 1/2″ and then is scored at 3 1/2″.  I made two bases and I will adhere them together with scor-tape to create a gatefold / trifold type of card.

To create a snowy background I ink blend the two flaps (gate folds) with some Distress Oxide Inks in Faded Jeans, Salty Ocean and I will bring in just a bit of Black Soot to deepen the Faded Jeans around the top.  I use two types of blending brushes.  The standard foam brushes and Picket Fence Blending Brushes.  I like how much ink the standard foam brushes lay down and I love the way the Picket Fence brushes blend the colours together so smoothly.

Once the ink blending is done I add some water droplets with a find mist sprayer and some sparkle with the Hero Arts White Iredescent Shimmer Spray.  This will give the look of snowfall in the background by the water pushing the pigment out.  You can create larger snowflakes by unscrewing the sprayer and tapping the water directly from the straw.

Make sure you let this dry or use a heat gun to speed up the process.  You want to make sure that the ink had dried and set before going on to the next step.

While I let the ink dry I die cut 3 circles in 3 different sizes to create the snowman’s body.  I also used my Silhouette machine and a cut file to create a hat, scarf and nose.  You can fussy cut your own accessories if you don’t have an electronic die cut machine.

Once my inked panels were dry I trim down each gate fold so that they measure 1 3/4″ and that they would close nicely against each other.  I then began to adhere the snowman parts to the card with some Gina K Connect liquid adhesive.  I encountered a bit of a snag in my plan and to find out what that is you will have to watch the video below.

http://youtu.be/QxAPyq7NUZw

The base and head of the snowman are adhered directly to the left panel of the card and the middle of the snowman is adhered down with foam squares to allow clearance for the snowman body to interlace into each other.

Now it’s time to decorate our snowman.  I adhere the hat and scarf with some more liquid adhesive and decided to use Nuvo Drops in Ebony Black for the eyes and buttons.

The card needed a bit of glitter so I used the Nuvo Glacier Paste in Winter White to create puffy snow on the bottom and the Nuvo Glitter Gloss to add some magic to the top hat.  The only thing left to do is to write a message on the inside.

I hope you enjoyed today’s Snowman card!  Remember to post the snowmen you build on the Scrap’N Stamp Facebook Page.


Do You Wanna Build a Snowman? Read More »

Free Shipping Anywhere In Canada