Scratch-N-Stamp
Search

Checkout

Keep up with Sales, New Products and other events at Scrap `n Stamp. Sign up for our newsletter now!

What's New

Hot Deals


ranger

Tuesday with Tara {take 364} Crackle Fun!

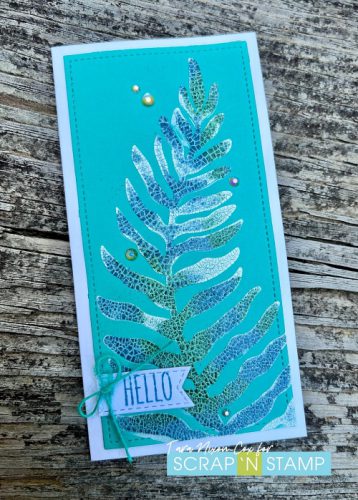
Today I’m sharing two simple mini-slim cards with some fun crackle texture!  For both cards, I used the Curly Frond stencil/mask by Dina Wakley Media, together with Distress Crackle Paste & Distress Embossing Glaze.

It took a bit of trial and error to figure out how to make it all work (crackle paste dries faster than you expect!) but it was worth the mess!  Even the ones that “didn’t work” look pretty cool (I’ll be sharing another one on my Instagram later this week!)

As you can probably tell, the paste I worked with was white.   I applied the paste as thick as I could, while keeping it even, then quickly rinsed the stencil when I lifted it (next time I’ll have a tub of water ready for soaking).  I then sprinkled Distress Embossing Glaze over the design- the ‘hello’ card has Rustic Wilderness & Uncharted Mariner, the ‘thanks’ card has Salvaged Patina instead of the green, since it’s on that bright lime background!

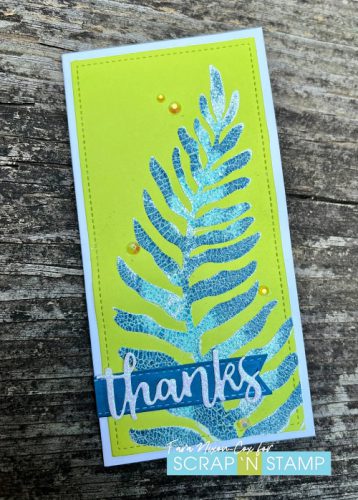
Both were stenciled onto a die cut panel, then once the paste was completely dry I melted the powder that stuck to the crackle using my heat tool.   I’ll be sharing a closer look at both cards on Instagram today, so please check it out!

Plan to check back with us on Thursday this week for our August Inspiration hop… we have some stunning projects to share with you!

Inky hugs,

Tara

Tuesday with Tara {take 364} Crackle Fun! Read More »

Love You Furever


Has spring sprung yet where you live? We’ve had a few chilly days lately where I am, but I’m trying to keep spring in mind with today’s Random Acts of Cardness prompt: GREEN! I could have gone with plants and greenery, but it seemed a while since I’d made a cat card, so…


… green and cats! I made a stencilled background using distress inks: mostly twisted citron and mowed lawn, with a little squeezed lemonade at the top and rustic wilderness at the bottom. That done, I stamped, embossed and Copic-coloured my two cute MFT cats – grey for the current master Duncan, and calico for the now-departed Cricket. 🙂  I also stamped and embossed the sentiment. For the green circle mat, I blended white cardstock to match using mowed lawn ink, and then used twisted citron for the edges of the card base that would show.


Scrap n Stamp’s Facebook challenge page lists all the daily word prompts for April – play a little or a lot for your chance to win a gift code to the store!


Love You Furever Read More »

I Made a Box…


It’s my first January post here on the Scrap ‘n Stamp blog, so happy 2022! I’ve actually been taking a bit of a crafting break to deal with some other *stuff*, and to get back into the groove, I spent some time making something totally different from the usual – I made a Graphic 45 chipboard box!


Scrap ‘n Stamp offers a number of different Graphic 45 kits, and I picked the Ocean Blue Kit, which has everything you need to make this box, as well as a mini-album and decorative matchboxes, with lots of paper and ephemera left over.  The full-colour instructions are detailed and easy to follow. Of course, I had to add my own spin, and switched the papers around so that I could have a blue box with a tan interior, rather than the reverse. I did this both because I prefer blues to neutrals, and so it would fit with the January Random Acts of Cardness prompt, BLUE! 😉

To start, I covered the bottom inside pieces of the box with my chosen papers and adhered them together. I think adhesive choice is important with a project like this, so for paper-to-chipboard I used Nuvo Deluxe Adhesive, and for chipboard-to-chipboard, I used Ranger multi medium matte for extra strength. Here’s the box base:


The box lid comes next, with paper on both sides before adhering it to the bottom using a paper hinge. The lid flap is also attached with a hinge. Extra long strips of paper are adhered around the the box to strengthen the sides. At this point, my box was essentially done apart from a few embellishments:


In keeping with my usual style, I kept my embellishments clean and simple, with a few die cuts on the lid, and a reinforced sticker element as a lid clasp. Here’s another view of my finished project, along with a close up of the lid:


This project was quite the departure for me, but it turned out to be a lot of fun to make! Next up, I plan to make some cards using the kit elements to add to my box. I’m thinking one of the matchboxes would be a perfect addition for holding postage stamps! Thanks for checking in today, and I hope you’re playing along with the Random Acts of Cardness Challenge for your chance to win a $50 gift code to the Scrap ‘n Stamp store!


I Made a Box… Read More »

Free Shipping Anywhere In Canada