Scratch-N-Stamp
Search

Checkout

Keep up with Sales, New Products and other events at Scrap `n Stamp. Sign up for our newsletter now!

What's New

Hot Deals


CAS

*Wreath Builder Galentines Day*

Hello everyone!  Nancy here this morning with a great card….  I pulled out my Gina K Wreath Builder and some colourful inks and had a little fun creating another card with a Galentine’s Day theme to go along with the month long challenge.

To make this card, I started with a 5 1/4″ square piece of white cardstock and placed it in my Misti with the larger of the two Gina K Wreath Builder templates.  For one of the turns in the Wreath Builder, I had to tuck one corner through the hinges to make it all work.  I knew I wanted my wreath more in the corner so I placed my first stamp off-centre, pretty close to the one edge of the square of white cardstock.  I just kept adding layers and colours until I was happy with the outcome.

Once it was all stamped up, I cut down the panel to 3 7/8″ to 5 1/8″, keeping the wreath off centre.  I was inspired by a card I saw by Jennifer McGuire several months ago so my placement and colours are similar to what she did…

The inks I used are ones I had on hand but you can certainly find some great inks at Scrap ‘n Stamp…  like these Colorbox Inks or some of the new GinaK inks or the inks by Lawn Fawn (you can get some great colour groupings in the mini pads!).  While you can use the Tim Holtz inks for stamping I do find that they are better for ink blending than stamping.

Items Used:

*Cardstock:  Neenah Solar White 100lb; Lawn Fawn Cilantro

*Images:  Gina K Wreath Builder

*Ink:  Catherine Pooler Party Dress, Tempting Turquoise, Lime Rickey, Sweet Sixteen; VersaFine Clair Nocturne

*Tools:  Misti; We R Memory Keepers Layers Guides; Gina K Wreath Builder Template

*Embellishments:  Yellow bling

*Wreath Builder Galentines Day* Read More »

Glitter Stripes

Hi all… It’s Nancy E here, back to posting once in a while on the Scrap ‘n Stamp blog.  I’ve been creating, but I haven’t felt up to trying to do the posts for my Design Team duties with the team… so I’m happy I was able to get something done for them in January!  In fact, this is my second post for them this month!

My card is very clean and simple… and honestly I think it needs a little something… but I sat with it for days and had no inspiration….  so that’s the card you get today LOL!

What I want to show you with this card, is how important it is to burnish your glitter if you are using it….  I LOVE the Be Creative Tape with glitter…. and the backing of the tape is perfect for burnishing the project.

To create the stripes, I started with a strip of cardstock and then put a strip of the Be Creative tape, then another strip of cardstock and so on.  I could have done one large strip of the larger Be Creative tape, but then I was worried that my strips of glitter wouldn’t be even.  So I switched it up to use the skinniest tape instead.

This photo was taken after I covered the project with the silver glitter.  It was everywhere!  I should have used my anti-static tool on the cardstock before pulling off the backing of the tape… but I didn’t.  So instead, I used the Be Creative Glitter Magnet to remove the glitter from everything except the tape.

In this photo you can see that I started burnishing the glitter.  What this means is that you rub the glitter with your finger (or in my case, I used a piece of the backing from the tape and my bone folder)… this makes the individual pieces of glitter lay down flat, allowing the most amount of shimmer to show on the card.  If you don’t burnish, your glitter won’t look nearly as shiny and shimmery. In the above photo, the two lines of glitter at the bottom of the photo have been burnished and you can see that they are more shiny than the top two lines.

Items Used:

*Cardstock:  Neenah Solar White 110lb; assorted blues from my stash

*Images (and die):  Hero Arts Eat Cake All Day

*Ink:  Versafine Clair Nocturne

*Etc:  Be Creative TapeBe Creative Glitter Magnetfoam tape; Nuvo Pure Sheen Glitter

*Tools:  bone folder; Gemini Jr

Glitter Stripes Read More »

Tuesday with Tara {take 236} Simply Snarky

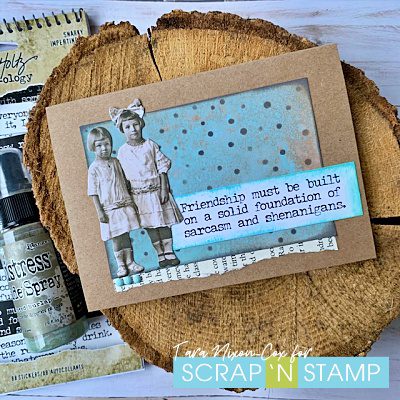
Happy Tuesday! Today I’ve got a couple more snarky cards to share… I originally planned to include these as part of the SNARKY New Year Blog Hop, but had technical difficulties getting my images loaded. Never fear, the issue seems to be resolved and you still get to see my snarky cards!

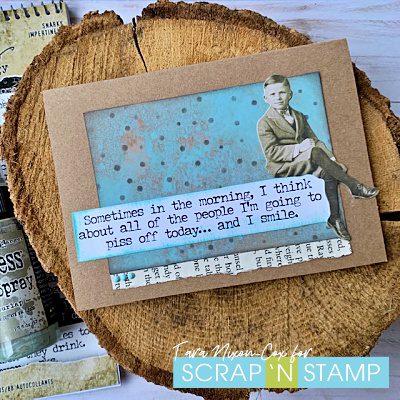
Both cards feature a background made using just ONE Distress Oxide Spray on white card stock- Frayed Burlap. I’m loving the mix of blues & browns from a single ink! Like my other card, I’ve used it with paper dolls and snarky Big Talk stickers. These cards also feature some inking through a stencil. This time I used the Letter It Dancing Dots stencil and some dark brown ink.

My second card really doesn’t need an explanation… just a request to please don’t be offended by the language! With the little smirk on this boy’s face, it seemed like the perfect sentiment to use!

Tuesday with Tara {take 236} Simply Snarky Read More »

Free Shipping Anywhere In Canada