Scratch-N-Stamp
Search

Checkout

Keep up with Sales, New Products and other events at Scrap `n Stamp. Sign up for our newsletter now!

What's New

Hot Deals


Memory Box

Tuesday with Tara {take 321} Looks like snow y’all

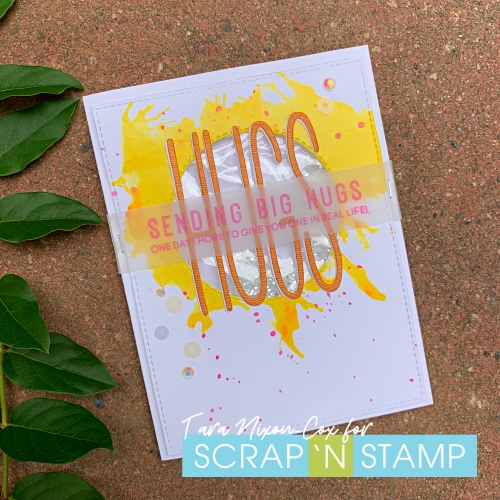
Happy Tuesday!  Today the challenge word that inspired my card was STENCILS and I was excited as I just got some new ones from Vicki Boutin recently.  I’m such a fan of her colorful work and this Wild Soul Stencil from the Storyteller collection is the first product I finally got my hands on… I didn’t even notice it was a set of three! (I also got the 6×8 paper pad for some quick creations!).  I follow Vicki on Facebook and she often does tutorials, so I went looking for a fun stencil technique.  You can find the video I used as my inspiration on October 1- it’s a fun one.

So I started with the technique she shared using Distress Ink, a stencil and a bunch of water on a smaller scale since I was working with cards instead of scrapbook page.  Once it was ready, I trimmed it down to size and then as I was contemplating my card (and the SNOW my hometown in BC got yesterday!) I added a layer of snowflakes using this great stencil by Paper Rose.

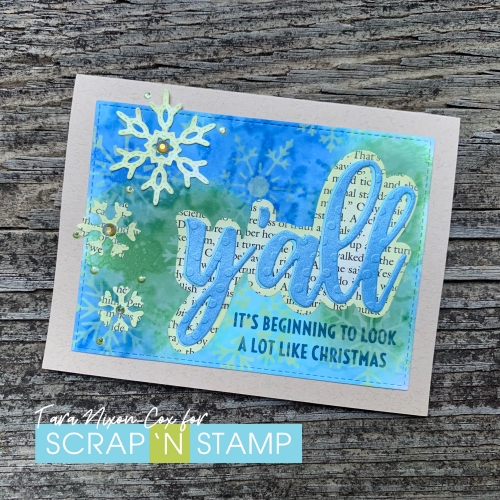
Once I decided I wanted to embrace the snow theme I went digging through my supplies.  I recently got this big y’all die from Picket Fence (which I don’t imaging SNS will have anytime soon, but since I’m living in the south now it’s something I had to have it) so I found a sentiment to pair it with.  These sweet stitched snowflakes are from Memory Box, which I thought was a nice touch with the stitched edge on my background.  A few elements cut from book print adds a really fun touch, and I inked them in the same pale green (shabby shutters) Distress Oxide ink that I used with the stencil over the background.

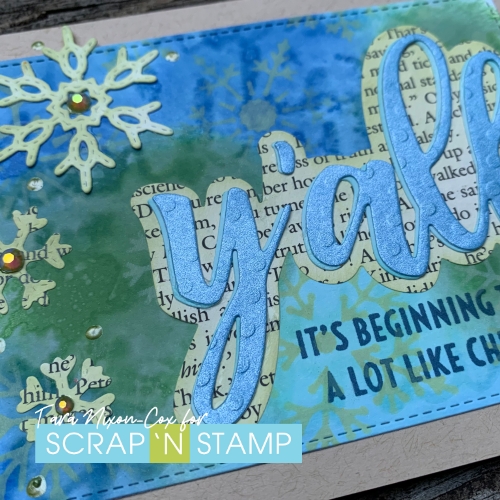
This background has almost a tie-die feel to it… which I’m not sure is something I’ve ever seen with snowflakes before, but I kinda like it!  Hope you do too 🙂

Inky hugs,

Tara

Tuesday with Tara {take 321} Looks like snow y’all Read More »

Welcome to Autumn!

Today’s word prompt for the Scrap ‘N Stamp daily challenge is ‘trees’. It’s Deb here, from the Design Team! I chose that word, as I thought it would be the perfect way to say ‘welcome’ to autumn! As far as colours go, it has to be my favourite time of year. Plus, it’s a good excuse to cozy up with sweaters or blankets, especially with a good book.

COLOURS OF AUTUMN

I’ve been waiting to use this new Penny Black stamp, called Enlightened. It’s more about the leaves that the actual tree, but I figured that was close enough! Plus, it gave me a chance to  pull out my Zig Clean Colour Real Brush Markers, for some watercolour.

Welcome to Autumn!

Don’t you just want to grab your favourite hot beverage, and snuggle on the couch? But wait – finish reading my post, first!

CARD DETAILS

Start with a piece of watercolour paper, set up in your stamp platform. Next, randomly add ink from your Carmine Red, Yellow, and Orange Zig markers, onto the leaves. Lightly spritz with water, and then press firmly onto the paper. Repeat this as many times as you like, until you’re happy with the colours. Next, use the Blue Gray marker for the lines, and the Light Green marker for the stems, and repeat the process.  If you don’t have markers, you could do this process with your Distress Ink pads, as well.

For the sentiment, I chose the Memory Box Harvest Love set. Stamp the sentiment onto vellum paper in Versamark ink. Next, cover the stamping with copper embossing powder, and heat set.  Repeat this with the smallest leaf stamp from this set. Colour the leaf using the same colours you used for the background.  This Harvest Love bundle comes with coordinating dies – use that with your Big Shot to die cut the leaf.  Die cut the sentiment with a stitched oval die, and then glue it onto the watercolour panel.

Layer the front panel onto a piece of copper glimmer paper using foam tape, and then attach these to an orange card base.  Attach the leaf using a foam square, and then glue on some sequins, to finish off your card.

Welcome to Autumn!

The copper embossing powder is so rich and warm!

COME JOIN US!

I hope that you’ll welcome fall too, and join in my word prompt challenge of trees! To play along is easy; join the Scrap ‘N Stamp Facebook group HERE. You’ll find a different word prompt  for each day of the month. Play along as many times as you want! Share a photo of your project in the group, with the hashtag #snschallenge.  At the end of the month, one participant’s name is randomly drawn, and awarded a $50 Gift Certificate to shop at Scrap ‘N Stamp! In the meantime, when you shop at Scrap ‘N Stamp be sure to use my Design Team code 10DEB to receive 10% OFF your total purchase! (regular priced items only).

Welcome to Autumn!

Affiliate links for supplies are provided. If you choose to use my links, you help support me in maintaining my blog, at no extra cost to you. Thanks in advance!


Welcome to Autumn! Read More »

Tuesday with Tara {take 309} blowing hugs

Happy Tuesday!

I know… that’s not how it works, we don’t blow hugs. We blow kisses… but my challenge word today is “BLOW” and my card is sending hugs, so it is what it is.

This card really feels to me like a comedy of errors.  Every step seemed to turn into a hot mess and yet somehow, I cleaned it up a bit and made a card.  All those errors were exhausting though!  LOL.

My mission was to use the Alcohol Ink Air Blower, since it was a new tool in my stash that I hadn’t used yet.  I had aspirations to share some fabulous technique with you and even attempted to record a video… but I hit a few bumps along the way.  The first of those being that I have no idea where my alcohol inks are right now.  Once I gave up on finding them (I’ve got an inner ear infection right now and “looking high & low” just makes me dizzy!) it occurred to me that I could try blowing some of my spray inks!

I selected my Dina Wakley Gloss Sprays since they are less absorbent than some of my others and I knew they would move around on the papers well.  It’s been a while since I played with them, so I had to re-learn a few things (like how they don’t work too well for smooshing two papers together to transfer ink!) but I finally started to figure them out and came up with this.  I’ve also got a whole pile of backgrounds that are ready to be transformed another day!

For this card, I simplified and skipped the color blending- working with just the Lemon Gloss Spray.  I poured a small puddle on a piece of white Cardstock and used the blowing tool to spread it out into a splatter design.  I was planning to use the Twiggy HUGS I had die cut from metallic orange card stock, so I knew yellow was a good choice! Once the paint was partially dried, I added some splatters of the Magenta Gloss Spray on top.  You can see where the colors blended together in some spots giving a bit of orange to the design.  These sprays really pop, and give off more gloss depending how thick they are painted!

I die cut a large stitched rectangle panel so I could mount it onto a white card base.  When I played around with the placement of the word, it just didn’t seem like quite enough (even with the addition of the sentiment duo by Heffy Doodle). Then I remembered the stitched circle from the Picket Fence Slimline die set, and decided to turn it into a shaker card.

This is where I had more of a hot mess… as I’m sure you can see by all the wrinkles (aka texture) in my shaker window!  I wanted to do a simple pocket style shaker, so I reused some packaging from one of my clear stamp sets.  I got the brilliant idea to seal the edges with my hair straightener (since I haven’t been using it on my hair with all the humidity lately!) and if I was a bit more patient it probably would have been a brilliant idea.

  • What I did right: place the plastic pocket between pieces of paper so that the plastic wouldn’t melt onto my straightener.
  • What I did wrong: forget to turn down the heat once it finally warmed up.

I doubt I need to say much more than that… since you can clearly see that things got a little too hot and got all wrinkled up on me!  So much for straightening, eh? LOL

I was pretty tired of the mess I was making at this point, so I decided to just go with it and share my lessons learned with you!  I did manage to keep it together when I stamped my sentiment on vellum and left it overnight to dry.  (I used Picked Raspberry Distress Oxide Ink).  I finished it off with some sequins and a touch of Studio Katia bling, and overall I like it.  Maybe I’ll try it again and work out some of those wrinkles… If nothing else, I hope my hot mess makes you smile!

Inky hugs,

Tara


Tuesday with Tara {take 309} blowing hugs Read More »

Free Shipping Anywhere In Canada