Scratch-N-Stamp
Search

Checkout

Keep up with Sales, New Products and other events at Scrap `n Stamp. Sign up for our newsletter now!

What's New

Hot Deals


Concord and 9th

Tuesday with Tara {take 276} Peace on Earth

Happy Tuesday & Happy December 1!

It feels good to finally be in the advent season, counting down until Christmas (and then to the new year shortly after that).  This year, more than ever, I’ve been drawn to the messages of Christmas- things like peace & joy.  I think we all can use as much as we can get and I love this Peace on Earth stamp set by Concord & 9th.  For today’s card, I’ve paired it with Rustic Wilderness Distress Oxide Ink (I think it’ll be my color of the season!) and some gorgeous WOW embossing powder called Perissa.

This chunky embossing powder is perfect on a bold sentiment like this one, it’s got a fine copper base with chunkier pieces of gold & silver mixed in.  I embossed it on a pale grey card stock, which I die cut with a stitched circle die by Lawn Fawn.

There are several greenery type stamps in this set, so I chose to layer them to create a wreath design for my card.  I used both regular Distress Ink & Distress Oxide, following around the edge of a smaller circle die cut which I set on the card to guide me.  Then I added a final layer of smaller images with Embossing Glaze on them to finish it.  (I also added a few small leaves in another green to fill in a few spots that needed something extra.)The textures from the two different embossing powders really add interest & richness to this very simple looking card.

I finished off the card with what I first considered to be an ‘inside sentiment’ on this set, it just seemed like it fit perfectly at the bottom of my card front.  A thin green bow (inked with Rustic Wilderness Distress Spray Stain) adds a final touch of softness to the card.

Wishing you peace in your home & in your heart this holiday season… and inky hugs too!

Tara

Tuesday with Tara {take 276} Peace on Earth Read More »

Art Journal Page with Laurie

Happy Saturday!! Today’s keyword on the SNS Challenge Facebook page is “Mixed Media”. I’ve only just begun to dive into the world of mixed media and art journaling. It’s always interested me and there’s so many talented art journalers out there! I could spend hours watching videos! So, after a bit of research, ie YouTube, I got a couple of must haves and started my own.

Here is a list of must haves. It’s a short one. You likely have almost everything you need already!

  1. Gesso…paper prep. Acts like primer for your walls. Can also be used as a white paint.
  2. Gel Medium…gluing down papers (collage) and also seals the page
  3. An inexpensive set of brushes…to apply your mediums

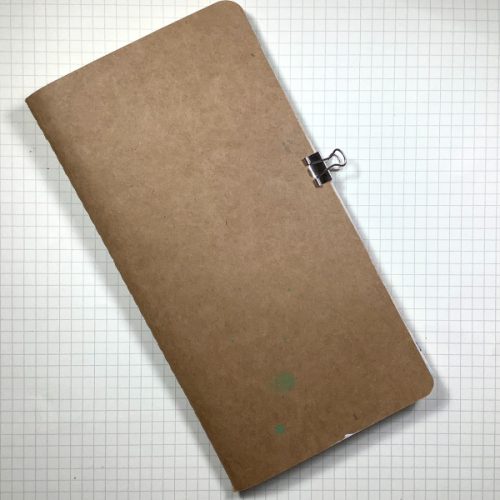
That’s it! You don’t even need an expensive journal! The first page I ever did was in an old book and it worked perfectly. I’ve started working in these traveller’s notebooks from Amazon. They are the perfect size so not too intimidating. Plus, they’re cheap and come in a pack of 3!

To start, I glue to pages together with the Gel Medium. This bulks it up a bit. On this particular layout, I used papers from the Dina Wakley Collage Papers-Backgrounds. This is thin tissue paper. Just rip it up, apply a thin layer of gel medium to your page, stick the paper down and then seal it with a light layer of the gel medium again! Don’t overthink on the placement!!! Make it random and messy. I never have a plan when going into this and as a beginner, I think this is easiest.

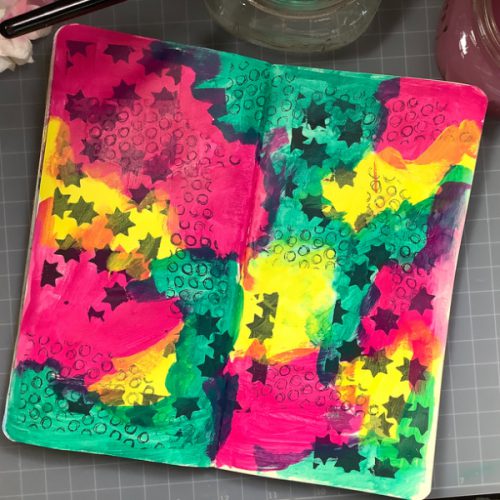
This is after the collage paper were adhered and the paint was applied. Looks awful, right? THat’s ok, just go with it! I used Dylusions Acrylic Paints in the colours Bubblegum Pink, Lemon Zest and Polished Jade. Remember, you don’t need special paints!! Use what you have. Watercolours of any sort work great too!

This is where the gesso comes in handy. Or any white acrylic paint. I used a thin coat of gesso over the entire page to tone down that crazy background. Then it was time to add more stuff. For my focal images I used the Oh, Snap Stamp Set from Concord and 9th. Again, I’m using what’s in my stash.

I used Versafine Onyx Black Ink for the stamping. It’s waterproof so I know I’m safe to add more stuff overtop. Let’s have another look.

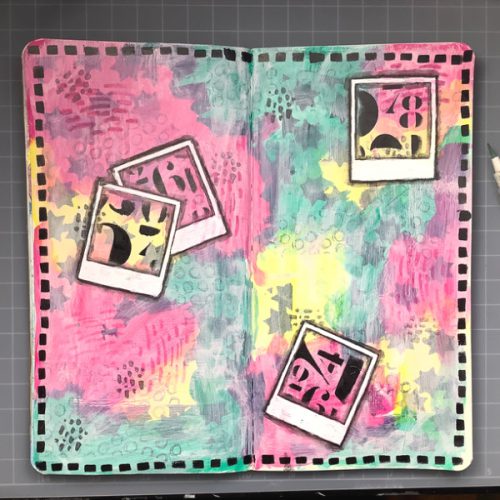
You can see how the gesso tamed things down a bit. I took a random stamp set in my stash that had some random strokes and dots and did some more stamping. I stamped a few of the polaroid images and added a border using Black Marble Paint and the A Stitch in Time Small Stencil. On the inner portion of the frames, I used the Mini Stencil Set #7 from Tim Holtz. I love this stencil set! I didn’t take the time to mask anything off, just carefully blotted the ink with a makeup sponge wedge.

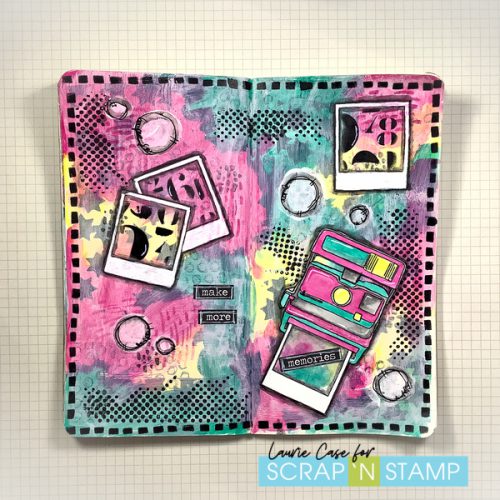
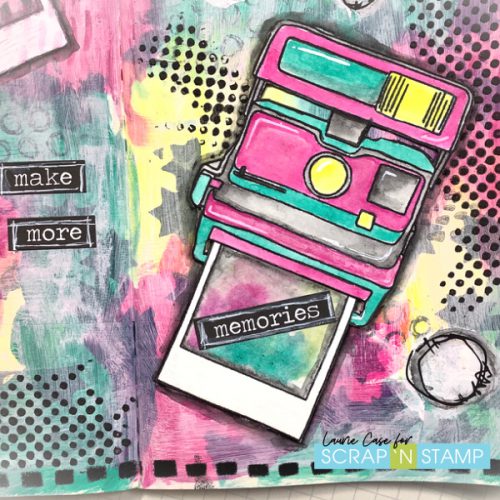
I stamped and fussy cut the camera image and painted it using the same paints as the background. You can see I covered up the lower right frame I originally stamped. I didn’t preplan where the camera was going to go but it worked out in the end!

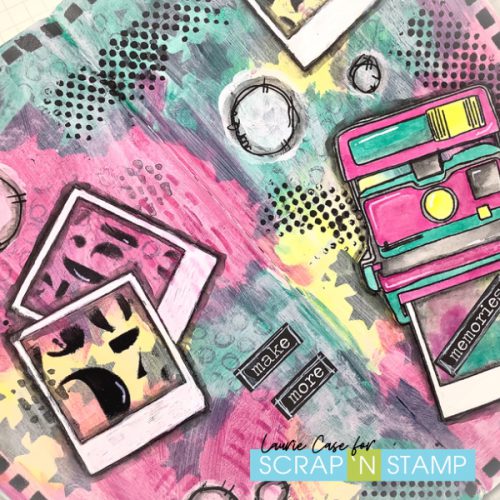
The sentiment strips come from a sticker book similar to this. I use a white pencil, or gel pen to add details throughout the page.

You may also notice that I’ve added some white circles. I again used the gesso for this along with my finger. The page was still a bit too bright for me so by adding more white it helps tame it down but also adds more interest. I outlined each circle with a black pen.

We’re almost done! At the last minute, I decided to add some more stenciling using Black Embossing Paste(Black Gesso would also work for this) and the Halftone Borders Stencil from TCW.

And that wraps it up! What I love about art journaling is that there really aren’t any rules. Just slap stuff down onto your paper and go with it!!

Thanks for sticking around for this rather long post, I hope you enjoyed!

Have a great day!

Laurie

Art Journal Page with Laurie Read More »

TBT – A Little Ray of Sunshine

Chala has created a card using the Shine on Set of stamps and dies from Concord & 9th.  Since sunshine is today’s facebook challenge word  and  it’s Throwback Thursday so I thought what could be better! Enjoy!
A Little Ray of Sunshine – Concord & 9th – Shine On

Hey everyone! I hope you all had a great Christmas! I am not sure I am ready to get back to the hub-bub of life…..but, we are on the brink of a New Year that I am sure will be filled with beautiful memories and amazing opportunities!

Since my creative mojo has been in a bit of a slump, I had my son pick out the stamp set to use. I thought this would give me a creative challenge and hopefully spark some new ideas. I was pleased when he pulled out the Concord & 9th Shine On stamp set as I had’t used this set in a while and I sure could use some sunshine and colour.

To begin, I pulled out my Wendy Vecchi Make Art Stay-tion and ink blended some colourful clouds using the My Favorite Things Cloud stencil onto some Lawn Fawn White Cardstock. I then ink blend using Distress Inks in the colours Shabby Shutters, Tumbled Glass, Victorian Velvet and Shaded Lilac and the Picket Fence Life Changing Blending Brushes.

Next, I position the sunshine die from the Shine on Die Set to appear like it was peaking through from the clouds. I secured it with some Thermo-web Purple tape and ran it through my Gemini Jr. die cutting machine. To make the sunshine die cut pop, I will place a smaller piece of Lawn Fawn Sunflower cardstock behind the sunshine and adhere that with some washi-tape. You can use a glitter cardstock to add some extra sparkle if you like.

I chose the phrase “A Little Ray of Sunshine to Brighten your Day” and using my Stamp Perfect I stamped the sentiment with Versafine Claire Nocturne Ink in the lower right hand corner and adhere the panel down onto my A2 side folding card base.

To take it to the next level I decided to create a coordinating envelope. My goal in the New Year is to create a matching envelope for each card I make.

I hope you enjoyed today’s card and if you like you can see the card come together by clicking the video below.


I wish you all much love and happiness in 2020!

~Chala, xoxox

TBT – A Little Ray of Sunshine Read More »

Free Shipping Anywhere In Canada