Scratch-N-Stamp
Search

Checkout

Keep up with Sales, New Products and other events at Scrap `n Stamp. Sign up for our newsletter now!

What's New

Hot Deals


rubber stamping

Bird Bath

Today’s word prompt for the Scrap ‘N Stamp challenge is ‘wings’. This gave me the perfect opportunity to use some new goodies that I recently ordered! You may recall, our recent Blog Hop was called For the Birds (you can start at my post HERE, if you haven’t seen it yet), so I thought I’d carry on with the theme.
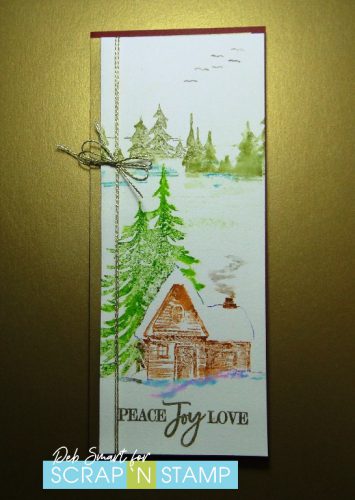
BIRD BATH

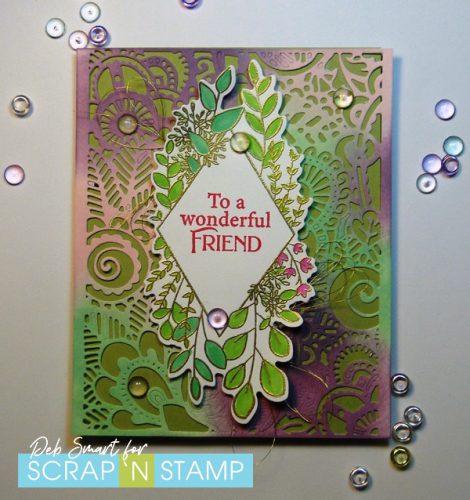
Bird Bath is the name of a new stamp from Impression Obsession. I think it’s adorable; I’m a big bird watching fan – usually just in my backyard! I also wanted to show off the new Poppystamps Art Deco Curve Border die, so I included it in my card.

Bird Bath

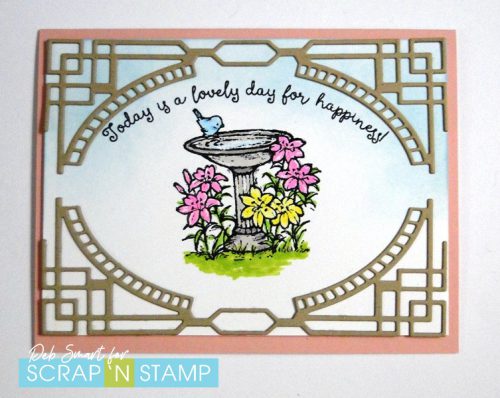
That little blue bird is so cute! And he’s got the bird bath all to himself!

CARD DETAILS

With the ornate Art Deco Curve Border, I wanted to keep the rest of the card quite simple.  Do do this, start with a piece of white cardstock. Blend some Tumbled Glass Distress Oxide ink around the top 2/3rds of the piece. Next, stamp the Bird Bath image in Nocturne ink, in the middle of the card. While the ink is still wet, cover it with clear embossing powder, and then heat set. Now you can choose your medium for colouring the image. I chose a few of my Copic and Spectrum Noir Tri-Blend Markers, and then added a few highlights with a white Gel Pen.

With a light brown cardstock, use your Big Shot with the border die, and die cut a total of 4 borders. Layer and glue 2 together for each of the top and bottom of the card front. Before attaching the die cuts, place the top one on the front panel, and line up the sentiment stamp, from the Colorado Craft Company Whishing Happiness stamp set. Once you’ve got the alignment, remove the die cut, and stamp the sentiment in Nocturne ink. Repeat the heat setting of clear embossing powder over the sentiment. Now, attach the borders to the card front, and then attach it to a light pink card base, using foam tape.

Bird Bath

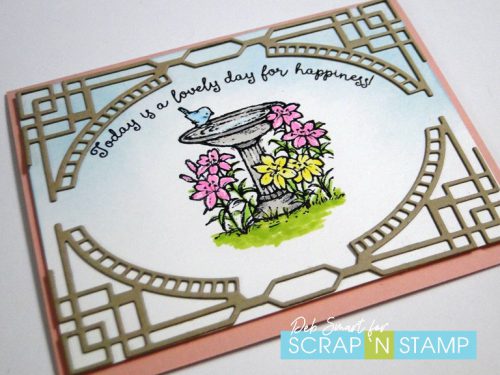
Doesn’t that sentiment just perfectly suit this happy image? You can send this card for just about any occasion.

JOIN THE DAILY CHALLENGE

I hope that you’ll join our challenge, and today’s prompt of ‘wings’. Joining is easy – in the Facebook group HERE you’ll find a list of words, one for each day of the month. Play along with as many as you want! At the end of the month, one name is randomly drawn from all participants. That lucky person will WIN a $50 Gift Certificate to shop Scrap ‘N Stamp!

Bird Bath

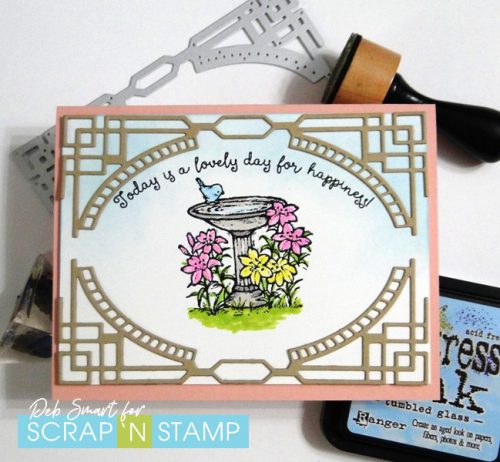
If you’d like to recreate my Bird Bath card, I’ve provided shopping links to the products, below. When you shop Scrap ‘N Stamp, be sure to use my Discount Code 10DEB, for 10% OFF your purchase!


Bird Bath Read More »

Creating A Scene

By creating a scene, I mean in a good way – not a throw yourself on the floor type scene! Boy, that brings back memories… Not of me on the floor, but my eldest, when he was about 4 years old, in the middle of the grocery store! All I could do was try not to laugh – I felt like a meme come to life! Anyway, today’s project is a much nicer scene, with the Penny Black Cozy Cabin stamp set.

COZY CABIN

One of the things I like best about Penny Black stamps is that there are so many scenic stamps. Not only that, but you can combine them with other scenic stamps, or images from other sets.

Creating A Scene

For this card, I combined Cozy Cabin with the trees from the Quietude set, and sentiment from the Peaceful Season set.  Peaceful Season is a few years old, but if you can find it – grab it! I just love the holiday sentiments in this set.

CARD DETAILS

Start with a slimline panel of watercolour paper. Set up your paper and the Cozy Cabin stamp in your stamp platform. I chose to use my Zig Clean Color Real Brush Markers, for a watercolour look to my card. First, colour in the cabin with a brown marker. Before stamping, lightly spritz your card panel with water, and then stamp firmly. Repeat these steps with the trees beside the cabin, the snow outlines and chimney smoke.   Now, clean and remove the Cozy Cabin stamp, and line up the Quietude stamp. You’ll will colour and stamp one set of trees, then clean and reposition the stamp for the 2nd set of trees.   Add in the flying birds, by using a light gray marker to colour them.

Now, line up the sentiment stamp across the bottom of the panel, and stamp in Versamark ink. I suggest re-inking and stamping again, to ensure full ink coverage on the textured paper. Next, cover the ink with gold embossing powder, and heat set.

Creating A Scene

LAYER IT UP

On a dark red card base, I glued a piece of Gina K. gold cardstock to the front. Next, I wrapped some gold cord twice around the left side of the front panel, tying it off in a bow. Finally, attach the card front to the base, using either a piece of fun foam, or foam tape.

Creating A Scene

I think that this makes a lovely holiday card, or even just a seasonal card. Switch up the sentiment to suit your need!

DAILY CHALLENGE

Today’s word prompt for the Random Acts of Cardness/Daily Challenge is ‘scenic’. No coincidence there – I’m the one who chose the word! To play along with the challenge, first join the Scrap ‘N Stamp challenge group on Facebook, HERE. Next, create your card for one (or more) of the word prompts – play along as many days as you like! Then, share a photo of your project to the group & your other social media platforms, using the hashtag #snschallenge.  At the end of each month, one lucky person is randomly chosen, and WINS a $50 Gift Card to shop at Scrap ‘N Stamp!  Each month you’ll see a new list of prompts, so the fun never ends!

SUPPLIES

If you’d like to re-create my card, you’ll find the list of supplies below.

Affiliate links are provided. If you choose to use my links, you help support me in maintaining my blog, at no extra cost to you. Thanks in advance!


Creating A Scene Read More »

Layered Die Cuts

Welcome to the weekend, my friend! It’s Deb here from the Design Team, to share my project for today’s Scrap ‘N Stamp Daily Challenge. Today’s word that I chose is cuts, as in die cuts. So for my project I decided to do a layered die cuts card.

DOODLE ART BACKGROUND

To start, I decided to use the Tim Holtz Doodle Art Thinlit for the background. It’s full sized, so it covers the entire card front. Start with a piece of white cardstock, and blend on some Distress Oxide inks. I chose Cracked Pistachio, Dusty Concord and Spun Sugar.  After blending the inks, lay the Thinlit over the cardstock, and run it through your Big Shot.  With these detailed background dies, I find that I have to run them through several times, to ensure that every area cuts through.

Layered Die Cuts

Next, stamp the Diamond Sentiments stamp from Poppystamps in Versamark ink onto another piece of white cardstock. Cover the ink with gold embossing powder, and heat set. Now you’re ready to colour the leaves and flowers. I used Copic markers in YG25 Celadon Green, YG07 Acid Green, and G03 Meadow.  The pink if from Spectrum Noir Tri-Blend Bright Pink marker. The sentiment is from the same set, stamped in dark pink. I like this Diamond Sentiments set, because it comes with the coordinating Die!

Layered Die Cuts

To finish off the card front, wrap some gold thread and tuck  it in behind the Diamond Sentiment. Glue the die cut background onto a light green card base, and then add the sentiment with foam squares or tape. The final touch is to add some Brutus Monroe Acrylic Bubbles.

JOIN THE CHALLENGE

If you haven’t already, I hope that you’ll join our daily challenge. It’s fun, easy, and there’s a prize to be won! You’ll find a different word prompt for each day of the month. Play along as often as you like! Just share a photo of your project on the Facebook page HERE, and use the hashtag #snschallenge. At the end of each month, one participant is randomly chosen to WIN a $50 Gift Card to shop Scrap ‘N Stamp!

And speaking of shopping – be sure to use my Designer Discount Code 10DEB for 10% OFF your total order (regular priced items only).

Layered Die Cuts

Affiliate shopping links are provided. If you choose to use my links, you help support me in maintaining my blog, at no extra cost to you. Thanks in advance!


Layered Die Cuts Read More »

Free Shipping Anywhere In Canada