Scratch-N-Stamp
Search

Checkout

Keep up with Sales, New Products and other events at Scrap `n Stamp. Sign up for our newsletter now!

What's New

Hot Deals


Author name: Karen Warner

Sending Hugs – Hero Arts Color Layering Koala Bundle

Sending Hugs – Hero Arts Color Layering Koala Bundle

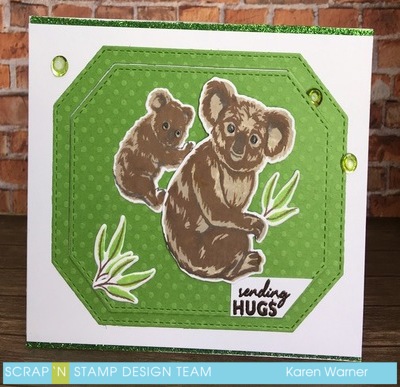
Hello Everyone. Thank you for stopping by. Todays project is a  Sending Hugs Card using  Hero Arts Color Layering Koala Bundle.

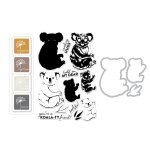
Each bundle  contains a  Color Layering Stamp Set,  co-ordinating dies and the necessary ink to layer the stamps with a successful outcome. In most cases four is the magic number. The four inks in this bundle  are  set AF381 Earth Neutrals Dye Ink  (Charcoal, Cup O’ Joe, Wet Cement and Pumpkin Pie). Green Hills from my stash was added , any green would work.


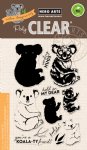
Hero Arts Color Layering Koala Stamp Set and co-ordinating dies are available to purchase separately too.   They are the same stamps and dies available in the combo pack. Hero Arts Color Layering Stamps have clear instructions on how to layer the stamps on the back of the stamp set  packaging . In addition there are photos of each step and the inks used to achieve each step.

Making the Card:

Starting with  the lightest ink and the  solid stamp, working toward  the darkest shade with  the less area to stamp.  The inks were used in this order:  Wet Cement,  Cup O’Joe and finally Charcoal.

The greenery was stamped starting with the branch with  Cup O’ Joe and the greenery in Green Hills. These two stamps were stamped  three times.

Once the ink was dry the images were cut out using the co-ordinating dies.

MFT Die-namics Stitched Tag-Corner Rectangle Stax  cut a frame with Green  Bazzill Premium Card Stock (counting from the smallest die, six and seven were used to make the frame).  Reserving the negative space (centre) for the card. A  1/4 x 5-1/2″ strip  was  also cut and set  aside  for the inside panel.

A white card stock panel was cut to 4 x 5-1/2 ” for the card front . MFT Die-namics Stitched Tag-Corner Rectangle Stax die number six was used to cut the centre of the panel. This will be used later.

Card Assembly:

A white Card Stock card base was cut  to form a side fold landscape card  11 x 4- 1/2 ” and  scored at 5-1/2 ” . Be Creative Tape 5 mm was applied to top and bottom of the card front. Nuvo Pure Sheen Glitter , Green Meadow was burnished into the tape. Removing any excess with a fine brush.

Onto  the card front panel. The  Tag-Corner frame  is adhered to  the outside of the  the die cut centre, essentially framing the centre  of the panel.  The white panel is attached with Be Creative Tape 3mm between the  Pure Sheen Glitter strips. Foam tape is applied to the white card stock centre and placed back  into the front panel. Liquid adhesive is used to  secure  Bazzil Tone on Tone Polkadot frame centre to the popped up centre of the front panel.

Next the images are added to the popped up centre portion. The larger Koala is added to the right hand side with foam tape for added dimension,   the smaller Koala is adhered with Nuvo Deluxe Adhesive  below the ear of the larger Koala. Greenery is tucked into the larger Koala’s Hand. Two Greenery sprigs are attached  to the bottom left hand side of the Bazzill Premium Card Stock.

Sentiment:

Hero Arts Color Layering Koala Stamp Set ” Sending Hugs”  stamp was  inked with VersaMark Watermark Ink and stamp  onto white card stock. Nuvo Embossing Powder, Hot Chocolate was sprinkled over and heat set.   The sentiment strip was trimmed and added just below the larger Koala’s foot (bottom right hand side of the popped up  green card stock centre )

Nuvo Deluxe Adhesive was applied to the bottom   edge of the inside panel. The Bazzill strip that was reserved for later was attached over the  liquid adhesive.  The inside panel was attached to the inside card base.

Finishing Touches:

Beads were added to the eyes of  both Koalas . Nuvo Prickly Pear  Sequins and Sparkling Crystals were layered onto the card front. Nuvo Glitter Gloss was applied to the greenery.

That completes this card. Until Next time – Karen xo


Sending Hugs – Hero Arts Color Layering Koala Bundle Read More »

Happy Birthday to You Stamp Set – Clean and Simple Card

Happy Birthday to You Stamp Set – Clean and Simple Card

Hello everyone. Todays ScrapnStamp.ca   card is a clean and simple card featuring  MFT’s Happy Birthday to You Stamp Set. This stamp is part of the Pure Innocence line, (the matching die was not used ).

mft-pi-264_2333_thumb
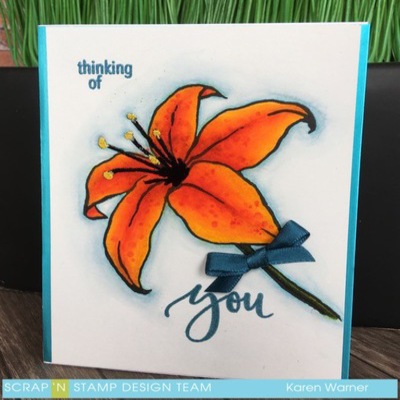
I started by selecting  a paper that would  work well with  oil based colour pencils. My main concern was that ideally,  the paper should  have a bit of tooth.  A panel was cut to 5-1/2 x 4-1/4 “. The largest stamp in the set was applied to a block and inked with Black , Memories Dye Ink Pad. The image was stamped onto the ready made  panel  and  a 3M All-Over Sticky Post-it-Note (to be used as a mask).

Adding Colour:

Starting with the face,  the darkest shade was applied  along the hair line, where cast shadows would be , the fold of the arm and fingers.  The mid tone was added next to  the darker shade and finally the lightest, preserving a section of white ( or where no pigment was added to the surface) .  The  pencils were  blended from dark to light  with a blending stump and Gamsol in a circular motion. Between value changes the tip of the stump was erased on sand paper.

The arm, dress, leg, shoes , package  and bow where coloured in the same fashion. Once the ribbon was complete,  yellow polka dots were added.  A Gelly Roll StarDust pen added over the top of the dots.

A blending brush and Spun Sugar Distress Ink were used to add colour around the top and sides of the image. A MFT  Single Stitched Line Rounded  Rectangle Frame Die was cut with  a Gemini machine from white card stock.

Card Assembly:

A sheet of Lawn Fawn’s 6 x 6 Really Rainbow Paper Pad was cut  into  two  strips (1/2 x 4-1/4″ and 3/8 x 4-1/8″) to fit along the bottom of the card both the card front and inside panel. The wider  of the two strips was used on the card front.

Happy Birthday to You was centred and stamped above  the strip with black Memories Dye Ink Pad.

Be Creative Tape 3mm was added to the back of MFT’s  Single Stitched Line Rounded Rectangle Frame. The release paper was removed all at once from the Be Creative Tape and adhered to the  front panel.  The excess panel  was trimmed around the frame with scissors. Dimensional foam tape was applied to the back and  it was  attached to the white top fold portrait card base, 1/2″ from the score line. This too was centred. Three sequins from my stash were added to the card front. Nuvo  Crystal Drops in Rosewater were layered in the sequin centres.

An inside panel was cut to 4 – 1/8 x 5- 3/8″.  A second stamp from MFT’s Happy Birthday to You Stamp Set, “Spoiling You is so Much Fun ” was centred and  stamped  onto the   inside card panel. This was adhered  to the inside card base with Nuvo Deluxe Adhesive.

The card is now complete.

Here is a video:

https://youtu.be/n-wr1slVgvc


Happy Birthday to You Stamp Set – Clean and Simple Card Read More »

Thinking of You Card – Concord & 9th Lily Stamp Set

Thinking of You Card – Concord & 9th Lily Stamp Set

Today’s card is a Thinking of You card  using Concord & 9ths Lily Stamp Set .  Nothing screams “Thinking of You” quite like Concord & 9th’s Lily Stamp Set.

The lily  stamp   has wonderful  line art,   thereby encouraging  this stamper to go wild (so-to-speak) with my own interpretation of the flower in terms of colour, shading and texture.

I  placed Concord & 9th  Lily Stamp on Tonic’s Tim Holtz Stamp Platform and inked the stamp with  Memories Black Dye Ink Pad.   Pressing the Stamp Platform  on to Strathmore Bristol Smooth Card Stock  for a crisp clear image.

Allow  the impression to  air dry completely before  using Zig Clean Color Real Brush Markers .

Colouring Technique:

I layered the  markers in stripes of colour. The  lightest shade around the petals edges working darker toward the centre of each petal. All five petals were coloured the same way, the only exception was when  a  section of a flower petal   fell behind  a petal that was in front. In order to add depth ,  a darker shade  was added  the the portion behind and a lighter shade to the area  in front. This makes  a cast shadow .

Where the colour stripes  were  side by side , the lighter of the two markers was used to blend the line. Making sure to clean the brush tip frequently. Once this was finished,  the solid image stamp and dotty pattern stamp  (both in the Lily Stamp Set) were inked with Zig Clean Color Real Brush Red Marker and stamped onto the freshly blended flower image.

The flower stem was coloured in the same fashion as the flower by adding stripes of colour , with the darker shades laid on the left hand side. The lighter,   on the right of the stem. The area  between each stripe was blended with the lighter shade of the two, making sure to clean the tip frequently.

The stamped image was outlined very lightly with Zig Clean Color Real Brush Marker in No.036 – Light Blue. This colour was pulled out farther with No. 302 Haze Blue. An aqua brush with a fine tip spread the ink out a smidgeon further , essentially fading the line.

This was set aside to  air dry.

Added Touches:

Once the ink was  dry “Thinking of ” and “You”   stamps were inked with VersaMark Watermark Ink Pad and stamped onto the front panel. Seth Apter Embossing Powder – Deep Sea was dusted over the freshly stamped words and melted with a heat tool. VersaMark Watermark Pen was applied to the flowers Stamens. Stampendous Embossing Powder – Topaz was applied to the flower Stamens  Anther and Nuvo Embossing Powder – Jet Black was applied to the Stamen Filament. A heat tool was used to melt the embossing powders .

A small bow was tied with ribbon from my stash. The ribbon closely matched  the melted  embossed sentiment  colour. The ribbons tails were trimmed and  attached to the stem, just below the flower with a Glue Dot.

Finishing the Card:

Tonic Craft Perfect Mirror Card in Silky Sky was cut to  (14 cm  x 10.8 cm)   5-1/2″ to 4-1/4″ and adhered to a side fold portrait card  front with Be Creative Tape 5mm

The Zig coloured  panel was  trimmed to (14 cm x 10.2 cm)  5 – 1/2″ x 4″ , ensuring   the image  stayed centred. Be Creative Tape 5mm  was applied to the back of the  panel  and  adhered to the mirror card layer on the card front.

A (14 cm x .6 cm  ) 1/4″ x  5 -1/2″  strip of  Tonic Craft Perfect Mirror Card in Silky Sky  was  attached to the  inside card base , vertically to the   right hand  side edge with liquid adhesive.   A white card stock  panel for the inside card base was cut to (14 cm x 10.2 cm)  5-1/2 x 4″ and stamped with Hero Arts Ink. This was  attached flush to the score mark  with Nuvo Deluxe Adhesive.

Zig Clean Color Real Brush Markers Used in Flower:

Petals ( light to dark):

No. 050 – Yellow, No. 052 – Bright Yellow, N0. 070 – Orange, No. 023 – Scarlet Red, No. 020 Red.

Stem (dark to light):

No.044 – Deep Green, No. 043 Olive Green, No. 046 Mid Green, Scant No. 051 – Lemon Yellow.

Shading:

No.036 – Light Blue, No. 302 Haze Blue

This card in now complete.

Here is a video of the colouring process:

https://youtu.be/pDKCcMnEBKQ

Thank you for stopping by. Until Next time – xo Karen

Thinking of You Card – Concord & 9th Lily Stamp Set Read More »

Free Shipping Anywhere In Canada