Scratch-N-Stamp
Search

Checkout

Keep up with Sales, New Products and other events at Scrap `n Stamp. Sign up for our newsletter now!

What's New

Hot Deals


Mixed Media

Getting Fab with Foil BLOG HOP

Thanks for stopping by to check out our ‘Getting Fab with Foil’ Blog Hop!  I’m so glad you came to check out our projects, each of which will feature Shiny Transfer Foil by Ranger!  I know I’m looking forward to see what everyone did with this fabulous product!  I had fun, but look forward to experimenting more with it and the ladies are sure to bring inspiration!  The fun bonus on this hop is that each blog along the way will be giving away a package of foil!  So be sure to leave comments here and at each stop… we’ll be back next Saturday to announce the winners (who will have two weeks to contact the store to claim their prize).  The full list of creative ladies in todays hop is near the end of this post- for now, check out the cards I made…

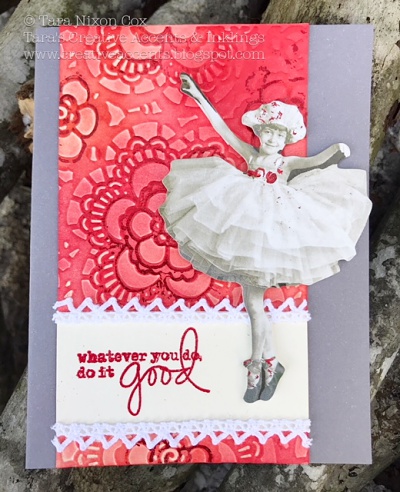
First is my little ballerina card 🙂  I actually started with a large (size 8) manila tag, embossed with a doily pattern by Sizzix/Tim Holtz.  I inked up the tag with assorted shades of red/coral Distress Ink, leaving some spots lighter than others for dimension.  I then embossed a sentiment (Mama Elephant) on a strip of ivory card stock and figured out my placement with the paper doll (Tim Holtz) I selected.  I used a fine tip Sakura Quickie Glue pen to trace some of the design on my background, then placed the foil over it and rubbed over it (I used an old gift card as my tool).  I repeated this in several spots on the tag, experimenting with dry time to see what gave me the best results.  I was looking to get a sort of rough look to it, not a solid foil design, and for the most part that’s what I got.  These foils will work with a variety of tapes and glues, and since this glue pen is a combo temporary/permanent glue it really made a difference how long I waited to apply the foil!

I added a little bit of foil accent to the paper doll as well.  I had to wait a long time for the glue to dry on this surface – and some of the flaky bits you see are simply because there was some adhesive stuck to the foil (instead of the foil sticking to the adhesive).  It’s kinda fun though 🙂  As you can see, I finished it off by adhering my tag to a card and trimming off the tag top. A bit of thin lace from my stash and foam adhesive to place my doll finished off the card quite nicely.  I really like the look of the red foil on the red background.  You could almost say it was subtle if it wasn’t flashy. lol

My second card uses the same elements, but this time I used a black tag that had only been embossed, not inked.  The foil is much more visible on this card, with all it’s imperfections… it gives a tattered lace feel that I love for this one as a wedding, anniversary or Valentine’s Day card.

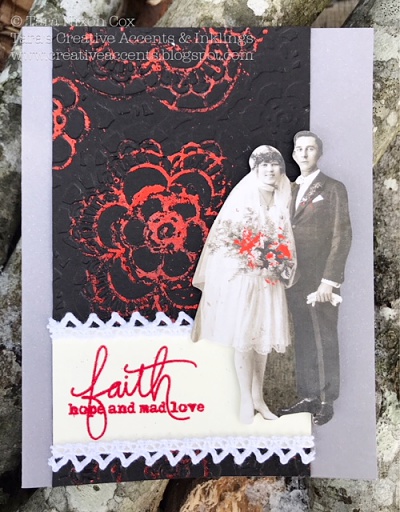
Again, I added a bit of foil to the paper doll… I kept the pieces very abstract as I didn’t want it to overwhelm the image.

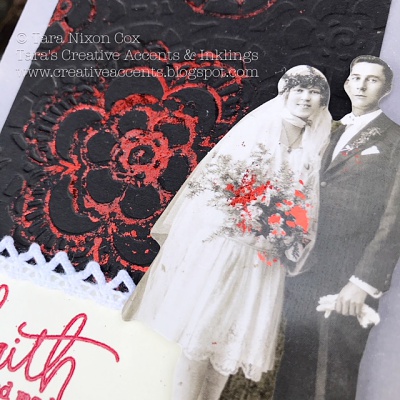
It’s hard to photograph, but it really is shiny 🙂

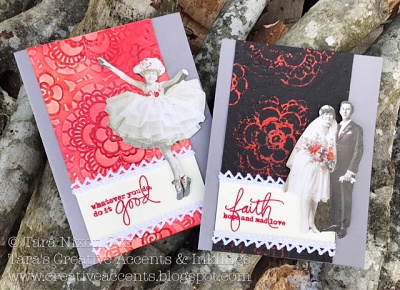
Here’s my two cards together:

Now… have fun checking out the rest of the ‘Getting Fab with Foil’ projects!  And don’t forget to leave comments for a chance to win some foil of your own!


Materials Used:

Ranger Shiny Transfer Foil- Basics

Ranger Shiny Transfer Foil- Holiday

Sakura Quickie Glue Pen

Tim Holtz Embossing Folder

Tim Holtz Paper Dolls

Distress Ink (assorted shades of red & coral)

Lace Trim from my stash

Everyday Sentiments by Mama Elephant

Grey card stock

Manila Tags- black & manila


Getting Fab with Foil BLOG HOP Read More »

Tuesday with Tara {take 125}

Happy Tuesday!

I mentioned last week that I had a piece of my background paper left over that I was playing with… here’s what I came up using it!  It’s a simple Christmas card with a completely different feel than my last card.  Hope you enjoy!


The tree die cut is a negative space design, so after cutting it I trimmed it down to have a narrow border and glued it over the background paper.  Once that was dry, I trimmed again and layered it onto a teal layer of card stock.  I left the top & bottom edges of that piece so it could be trimmed to fit on my finished card.  I played around with several background ideas, looking for a way to add texture and shine without competing with the focal point.  I chose this fabulous snowflake embossing folder and sprayed it with Perfect Pearls mist, then trimmed it down to fit on a card base the same ivory color.

I wanted the sentiment on a round/oval shape die to match the round baubles on the tree, so die cut a lighter green oval and stamped with Distress Oxide in blue to tie it all together.  It’s a very simple layout, but there’s a lot of shine and texture 🙂

And another shot in direct sunlight to catch the shimmer and texture on the ivory background…

Hope this gives you a little inspiration for your Christmas card crafting… there’s a ton of great products in the online store if you need a little something new to give you a kick of inspiration!  Have a great week, and check back with us on Friday when we announce the winners of the blog hop giveaway!

Inky hugs,

Tara


p.s. today is the last day to comment to win on the blog hop posts!


Materials Used:

Sizzix embossing folder, 3D snowflakes

Memory Box Snowflake Tree Die

Oval die (Sizzix)

Merry & Bright stamp by Stampabilities

Turquoise Perfect Pearl Mist (get a similar look with new Mica Sprays!)

Distress Crayons, Gesso, stencil (see technique in last week’s post!)

Distress Oxide in Broken China

Tuesday with Tara {take 125} Read More »

Tuesday with Tara {take 122}

Happy Tuesday & Happy Halloween!

I sat down in my studio determined to create one more halloween project to share with y’all… and since the ideas playing around in my head didn’t seem like they’d fit on a card, I pulled out my Mixed Media journal by Dina Wakley and opened to a spread of kraft pages that had previously been used as a spot to clean off my brushes… a mix of orange, brown & blue brush strokes in the background became the base for these pages.

Initially, I decided I wanted to paint a pumpkin to use together with the raven dies.  As that page started coming together, I added coordinating elements on the left page so they would have some flow between them, even though they could also stand alone (with completely different focal points).  It’s probably a different way to do art journalling… but I’m kinda new to it, and I think it can be whatever you want it to be!  I used some pieces from the ancestors paper dolls again for the left page…

…and the ravens are a great compliment to my pumpkin (I wanted to try again a technique I’d learned for painting pumpkins!).

I went old school and pulled out stickers for my title (colored stickers can easily transform to black with a marker!).  I added a variety of stenciled bits here and there, some washi tape and bits of gold (paint on the pumpkin and a pen for my journaling).

I’m working on being free with my ‘messy’ script for journaling- I love the look of it and am learning that the best thing is not too think too hard about what it looks like!

The left page, especially, is out of my comfort zone… but that’s kinda the point.  I journaled about learning to enjoy the ‘spooky’ aspects of Halloween with my family 🙂

I hope you have a fabulous & fun spook-tacular day!

Inky hugs,

Tara


Materials Used:

Dina’s Media Journal

Assorted Dina Wakley Paints (including gilt, sky, tangerine, cheddar, blackberry & umber)

Distress Oxide Ink in Walnut Stain

Ancestors Paper Dolls (on sale right now!)

Feathers & Ravens die set by Tim Holtz

Assorted stencils (including Tim Holtz dot fade & latticework)

Assorted stickers & washi tape

Tuesday with Tara {take 122} Read More »

Free Shipping Anywhere In Canada