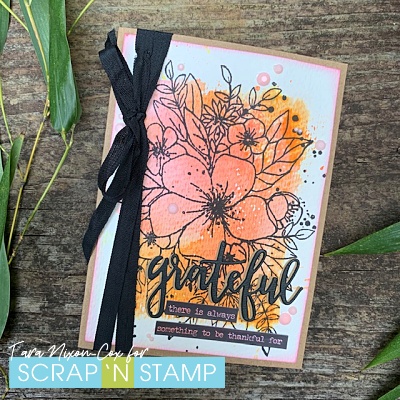
When I did my cards for the blog hop, I used an acrylic block as my palette, applying Distress Inks to the block and picking up the colour with a water brush. Instead of cleaning off my block with a cloth, I misted it with water and ‘stamped’ it onto a piece of watercolor cardstock. The shades of orange/coral on my block made such a pretty print, I knew it would make a great base for another card! I did add a bit more colour to fill in one of the corners, but otherwise loved the rough rectangle it created.
Details
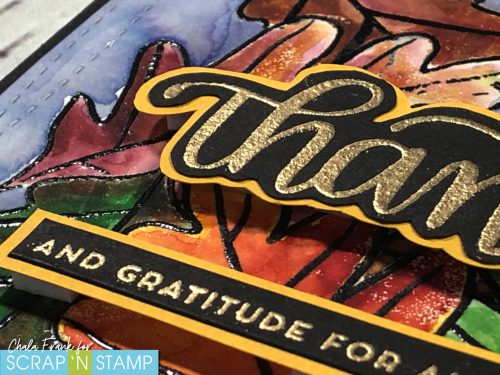
I decided to keep everything else pretty simple… a black ribbon, die cut word and some bling. I inked the letters of some small talk stickers in the same colors as the background for a softer look. A kraft layer of the grateful’ die cut adds a bit of subtle dimension and ties it together with the card base.
Abstract Watercolour
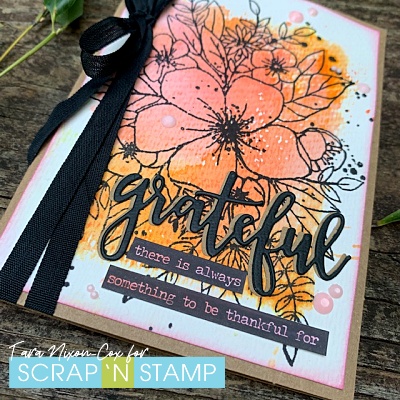
My second card used an even more abstract background that covers almost the entire panel, rather than a block of color. I literally just used the watercolor paper to clean off my acrylic block after painting with the Distress Ink on it. There was not as much ink left on my block, so I stamped off multiple times to cover the panel. I started with just the yellows and oranges, then added the greens from another block to get this pretty mix of colours!
Details
Yellow crinkle ribbon (which I had dyed previously), a word charm and another Small Talk sticker are the little details that finish off this card.
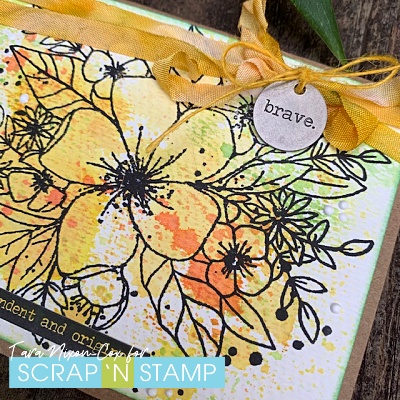
This lovely stamp really is a versatile image, perfect for creating cards to show you are grateful or encourage someone who is doing something brave! I hope you enjoyed this fast & easy technique and will try it out yourself soon!
Happy Tuesday! Today I’m sharing two cards that came from some experimentation with the Retro Repeat die set by Tim Holtz. Since I’m still totally overflowing with inspiration from the girls in our Watercolour Wishes Blog Hop, I’ve also got some watercolor vibes happening in my first card.
Retro Repeat Dies
I started out just experimenting with the repeat dies to see how they worked. They cut out two rows of design, but the die includes a third which lightly embosses the next row so you can easily align the die to cut as many as you wish. It was pretty simple to work with, I just had to do a bit of trimming to my panel when I was done. (Let’s just pretend it was intentional for me to photograph the wrong die alongside my card. LOL. I’m experiencing some significant brain fog these days!)
Details
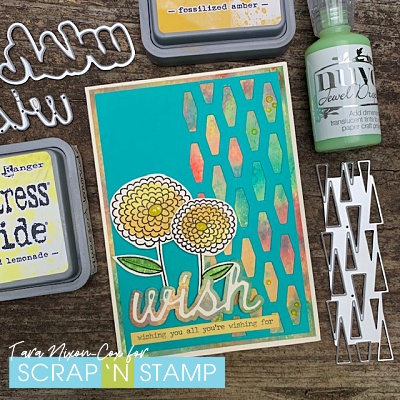
I decided to layer a colorful watercolor background behind my panel, so cut a piece of watercolor paper to the size I wanted and used a smooshing technique with Distress Ink on my craft sheet. I just kinda used the colors I had sitting there and it ended up being something I wasn’t crazy about. Ooops. You can always fix a background though- so I added some shades of yellow Distress Oxide (Squeezed Lemonade & Fossilized Amber) over the background with a blending tool, then used the same colors to smoosh more color onto it. The layer of yellow softened some of the muddy bits and brightened the yellows I already had, as well as increasing the textural look with some oxidization.
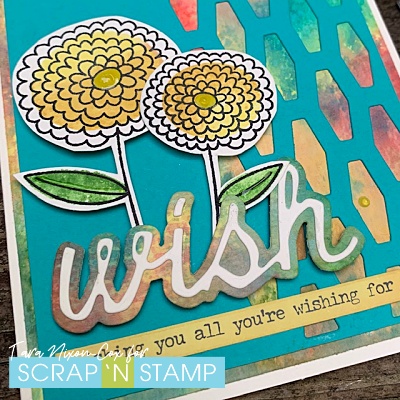
I chose some fun sketchy flowers (which have a two-step design like the stamps I used for the blog hop) by MFT to provide a focal point for this card. Using the same shades of yellow & green which were in my background helps tie it all together. I paired the ‘wish’ die cut from Tim’s Shadow Script #2 set with a sentiment sticker from one of the Small Talk sticker pads. (I have a stash of these, I’ve been collecting for years. They come in handy so often!)
A little tip
As you can see, the die cut opening only reveals part of my background, so I cut the bottom layer of the ‘wish’ die from the portion that would be hidden! I use this technique a lot when I’m working with layers on a card. If you’ve got a layer that won’t be seen, die cut something out of it! In a case like this, it’s a perfect coordinating element. Otherwise, you’ve got a start for your next project…
My final detail to tie everything together was to ink the Small Talk Sticker with the same yellows I stamped with. A few little Nuvo Jewel Drops finished this card off!
More Retro Repeat
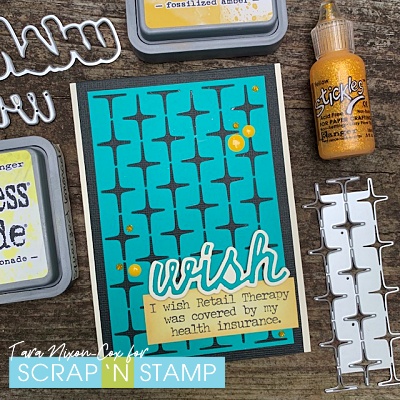
I created a larger die cut with another of the Retro Repeat dies and turned it into another simple card. I came across this snarky sentiment as I was looking for something to go with ‘wish’ Since it was a larger sticker, I decided I’d keep this one simple.
Since my card base & ‘wish’ layer were cream, I chose to ink my white sticker with yellow again. A few enamel dots and some Stickles glitter glue add a bit more yellow to balance everything out.
There’s not much fancy about this card… but I think we can all relate to the sentiment!
I hope your week is off to a great start, and I hope you get some time to get inky & play along with our Watercolour Wishes Challenge on facebook!
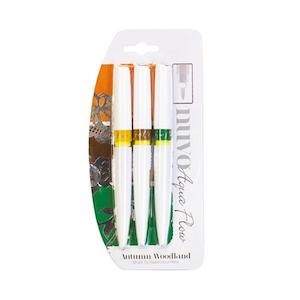
Hello! Chala here for today’s blog and I am excited to share a “new to me” product the Nuvo Aqua Flow Watercolour Pens.
Scrap’N Stamp sent me two packages of the Nuvo Aqua Flow Pens to try and I thought I would share my thoughts and the card I created.
Having used pens similar to this in the past like the Wink of Stella and the Aqua Flow Waterbrushes I thought I had a good idea of how they worked…but, I quickly learned that there were some differences as well!
Let’s start by talking about the sets I received and the colours that are included in each.
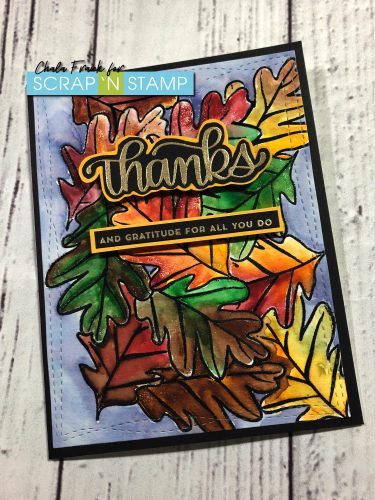
The Festive Season set which included Matador Red, Pressed Olive and Baked Cherry. The Autumn Woodland set and it comes with Spiced Ginger, Rustic Oak and Evergreen Fern. These sets really compliment each other well and were perfect for the fall themed card I had in mind. I did some simple stamping, masking and heat embossing to create a scene and then wanted to watercolour the images in. (Check out the YouTube video to see the card being made) Before I got started though…there was a bit of set up with the pens.
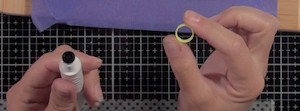
The first thing you need to do is to remove the little yellow washer. To do this you unscrew the pen top from the base. Remove the yellow washer. You can throw this away as you won’t need it anymore. Carefully rethread the top and bottom piece together, being careful not to cross-thready. There should be a “click” once it is together. I recommend taking the lid off the top to do this as it took me a while to figure out I was just turning the lid and not the whole pen top.
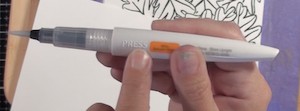
With the two pieces are back together, locate the raised word “press” it should be located next to the colour indicator swatch on the base of the pen. gently squeeze to push the watercolour into the clear reservoir of the pen. Don’t squeeze too hard as you can actually project some of the pigment out. You will want to have a scrap piece of paper handy so that when the colour drips out you can work it into the bristles of the brush. This process can be seen in my YouTube video which is linked below.
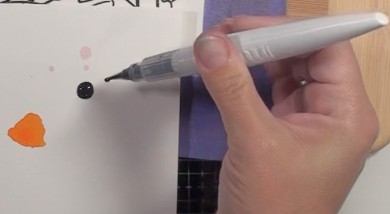
Continue this process with all of your pens. Once they are primed and ready to go….it’s time to play!
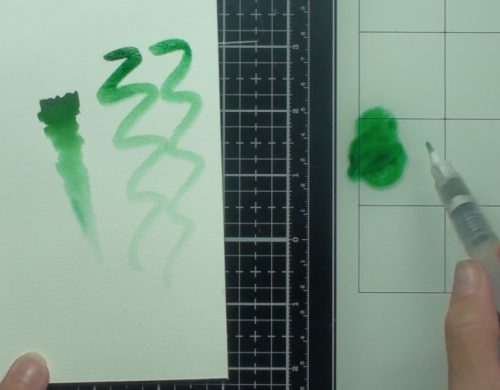
The one thing I noticed was how “juicy” these were and how rich the pigment is! A little goes a long with with these babies! You can use them direct to paper, wet on dry, wet on wet or scribble some onto a smooth media surface like the Tim Holtz Glass mat and then use a brush to pick up the colour. Again, I show all of this in my YouTube video linked below.
These pens would be great if you like to travel with your supplies. It is best to seal them in a bag or container to ensure they do not leak or become crushed. I think the best way to store these would be laying flat on their side or with the brush tip pointing up in a container to avoid leaking.
Please note that on the back of the packaging there is a bright yellow sticker that says “Adult use only. Not suitable for under 14’s”. I am not exactly sure why this would be…but, it must be there for a reason. The only thing I can think of is because the pigments are so rich they might stain! So, if you are using with small children…use at your own risk!
My honest opinion is that I really enjoyed using these and I think if you are looking for alternative to tradition cake/pans of watercolour these might be fun for you to try. Below is the finished card that I created.
I love how rich the colours are, not like your traditional watercolours which can be quite translucent. That’s not to say that you can’t achieve that translucent look by adding more water. Again, I encourage you to check out the YouTube video where I show how I used them. I also will link all the materials I use below and in the YouTube video description.
https://youtu.be/T8oe89dRGQk
Nuvo Aqua Flow Watercolour Brush
I hope that you found this blog and video helpful and it inspires you to try them out! I would love if you share your creations over at the Scrap’N Stamp Facebook Challenge Page!