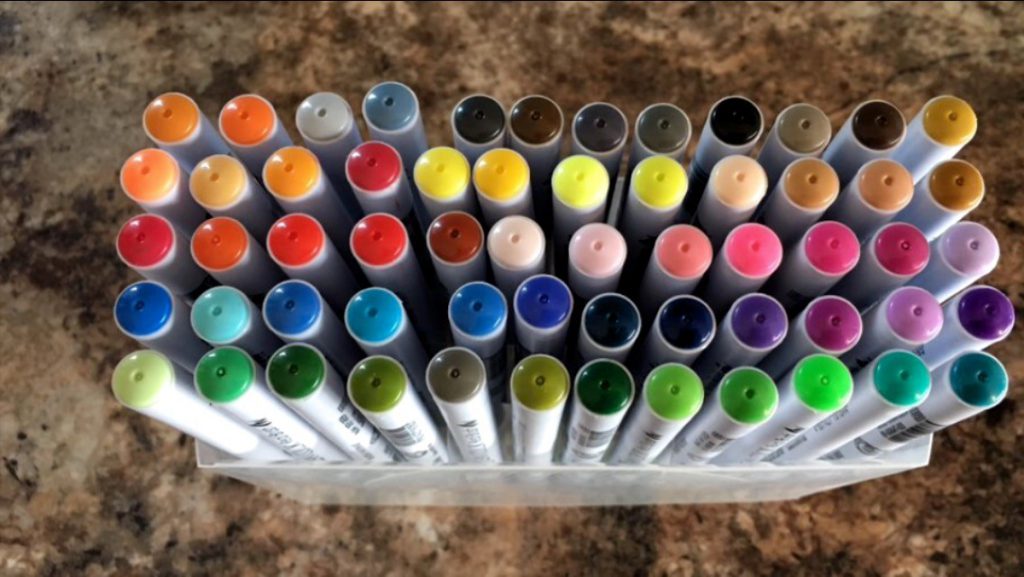
Hi Everyone, it’s Susan with a quick tutorial showing how easy water coloring can be with Zig Clean Color Real Brush Markers. These are a great marker set. They have a lot of fun colors, they have a brush tip and they are really easy to use! This is a set of 60 but you don’t have to dive in to the big pack to start because they come in 4, 6, 12, and 24 packs – lots of choices to start you off.
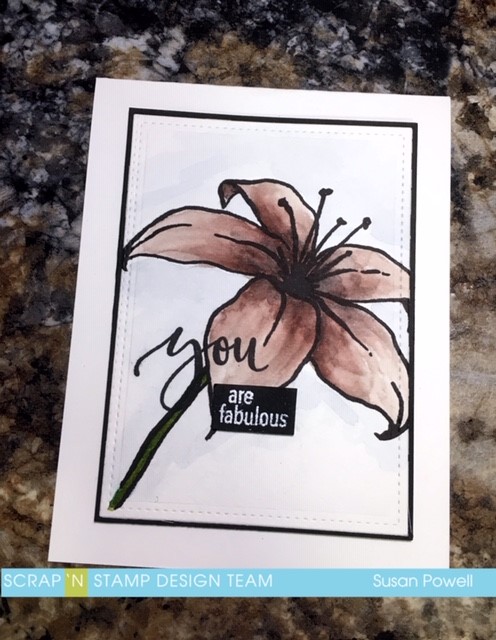
I did promise you that these markers were easy to use and I’m going to show you how I made this card. I’ve even got a video tutorial showing the process.
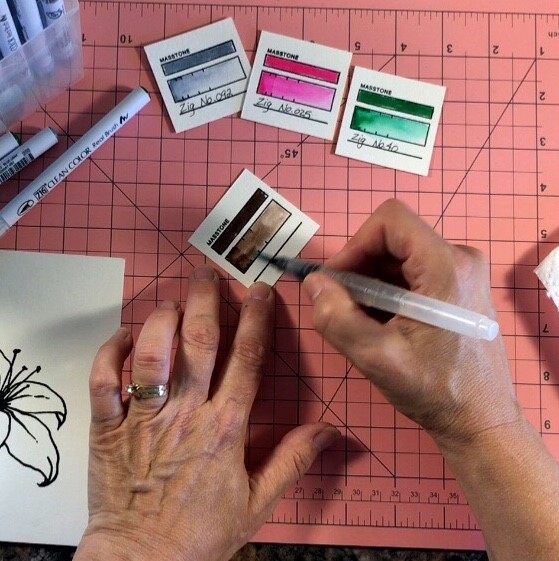
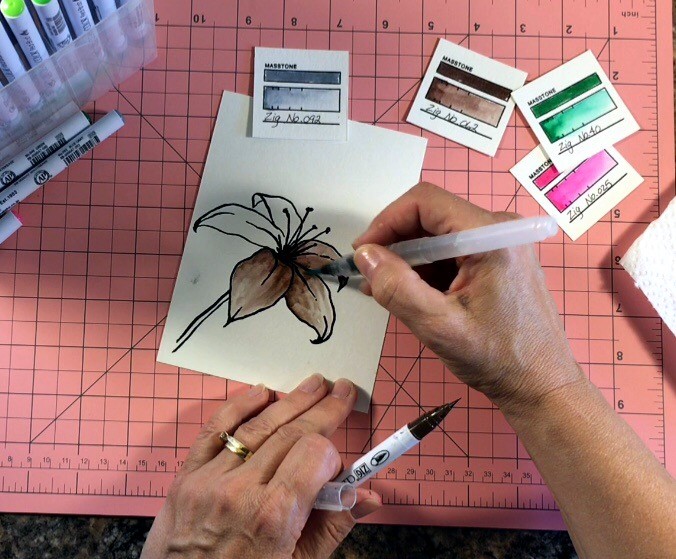
The best tip I can give you, and this tip is good for any medium that you’re working with, is to make color swatches. This is a great way to see the full potential of the inks you’re working with and actually they’re fun to make too.
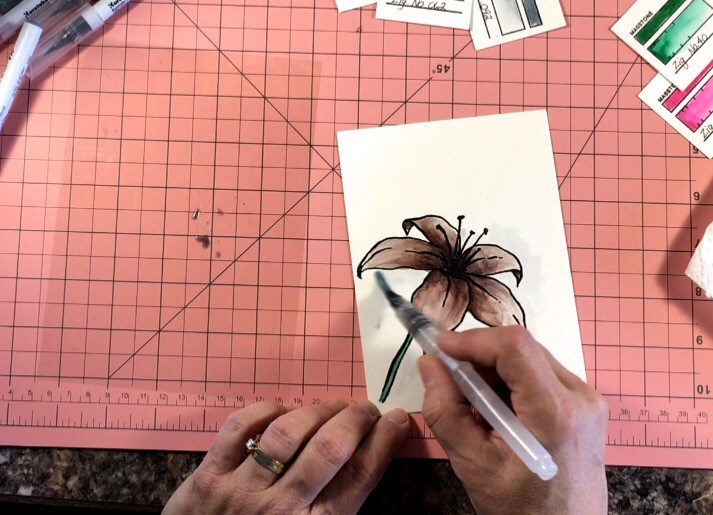
Now, some of you may think that choosing brown for the flower is a little odd, but another tip I want to give you is to not think about that. Think about what you like and go with it.
Start by adding the ink to the where you want it to be the darkest. Then, using your water brush blend the ink out to the outer edges of the petals. When this layer dried I went in with a darker gray color and adding some shading into the center of the flower.
I like to finish off the water coloring by adding a wash of color around the edges of the image. To do this spread some ink onto a stamping block or a sheet of acetate, add some water and then apply it loosely around the edges.
I told you this was easy. I highly recommend these pens no matter what your skill level may be.
I did mention earlier that I made a video showing the whole process. Here it is – if you have any questions at all, please don’t hesitate to ask.
Happy Hump Day! It’s Chala here and today was such a fun day! I got to spend it on a field trip with my daughter at Bar-U Ranch. This ranch has been around since the 1800s and is one of Alberta’s National Historic Sites. I felt right at home and it made me want to get out in my yard to work, especially since we are finally seeing some of our perennials pop up!
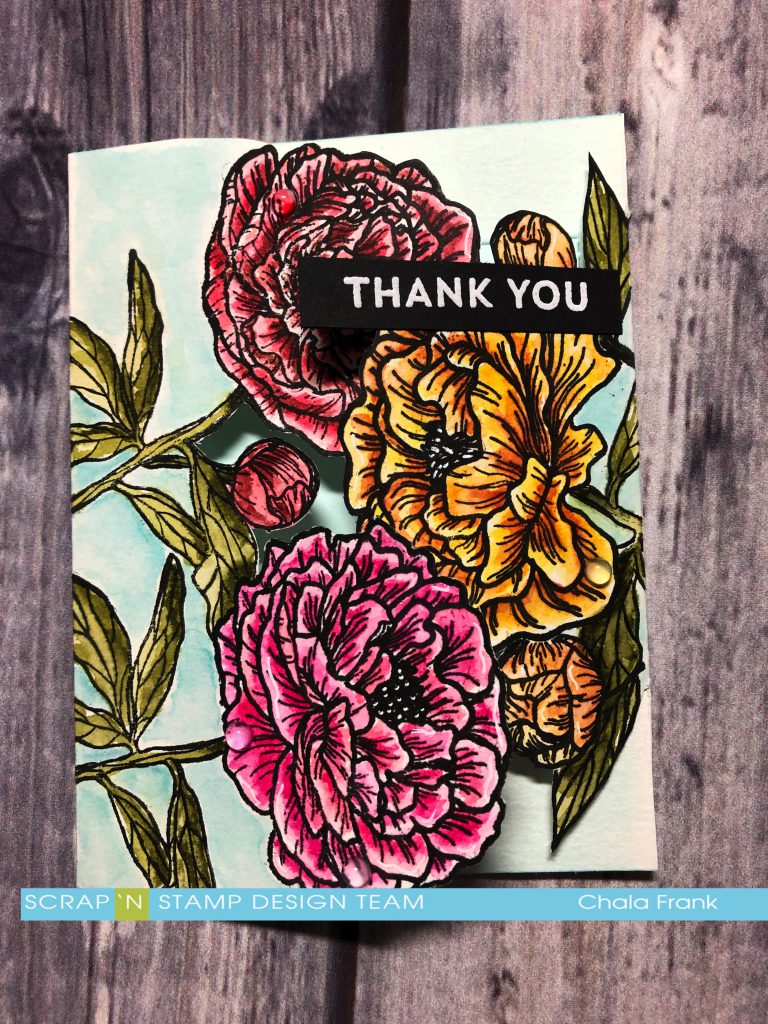
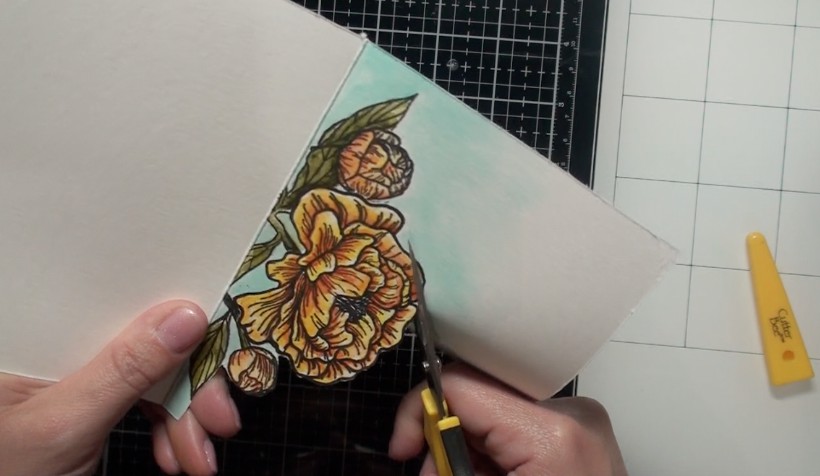
My favourite perennials in my garden are by far my peonies! I love watching the buds come up and all the ants work away to help them open up. Since mine aren’t that far along yet I thought I would pull out this gorgeous stamp set from Picket Fence call Peony Bouquet. Immediately I knew I wanted to layer these flowers and create a gatefold card.
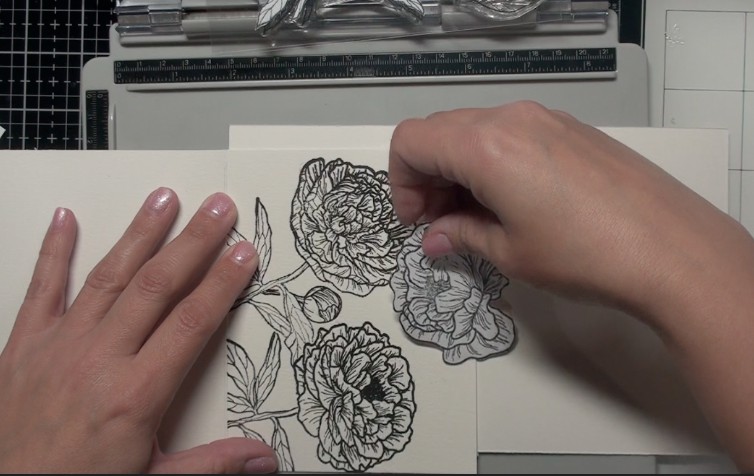
To create this card I will also be using masks and for this I use the Avery full sheet labels, stamp the images I am going to be using and then fussy cut them out. This takes a bit of time but is SO worth it and you can save the masks to use again!
My card bases (there will be two) will be Canson XL cold pressed watercolour paper 140lb. They are standard A2 size. I use my masks to lay out where I want to stamp on each card. The first one I will stamp normally. I am using my Tim Holtz travel stamp platform so that I can multi stamp for a better impression if I need to. I stamp my images with the AMAZING Versafine Clair Nocturne Ink. I say this ink is amazing because it really is. It is my first time using it and the results are spectacular! Great impression with detailed stamps and it is perfect for this project as it is watercolour and water based marker safe. It is my new favourite ink!
The second card I am going to turn it backwards so that it opens from left to right and stamp. I line up the cards so that I can get an idea where to place the flower so that when I cut out the images they will nestle together nicely. This is really hard to explain and I encourage to head over and watch the video for clarification.
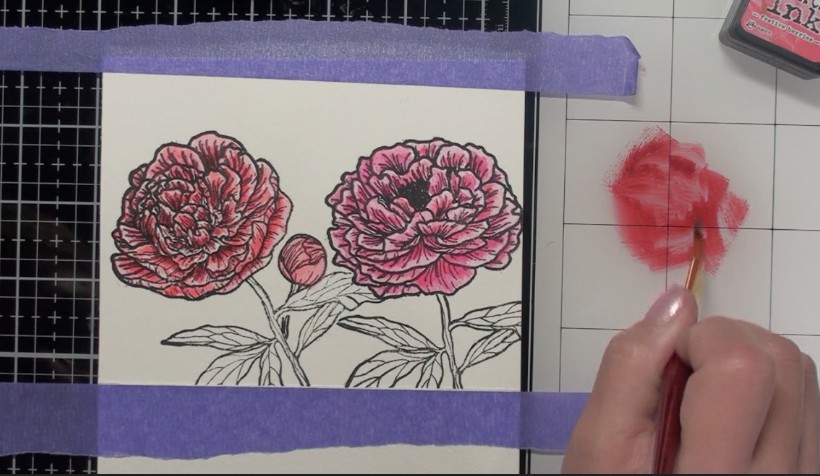
I like to tape my card base down with some Therm-o Web removable purple tape to minimize warping from the watercolouring. My watercolour process is to begin with the lightest colour to give me an idea of where I want the darker shading. I start with wet on dry and layer the colours as I go along. I also like to dry my project in between. Again, you can watch all of this go down by clicking the video linked at the end of this blog.
Once I have everything coloured and dry I give a wash of light blue to the panel. At this point I was not sure what I would be cutting out and wanted a cohesive look. Again, I dried the project completely before staring my fussy cutting.
Once I have the images trimmed out I place the two cards together to ensure everything works. I did have to trim a VERY small amount of on edge of my card in order for the cards to close and lay nice.
Now it is time to adhere the cards together. I am want to use a strong adhesive to make sure the to cards don’t come apart. My go to strong adhesive for this job is the Be creative scoring-tape. I only remove a portion of the backing so that when I am lining up the cards they don’t stick together when and where I don’t want them to. Once everything is line up nicely and I can then remove the backing completely. To see this trick in action….check out the video! 😉
My card was popping up…so, I thought I would run it through my Gemini Jr. to flatten it a bit. It worked…however, it did leave an impression of the flowers on the inside of my card….this didn’t bother me as I added a light blue piece of cardstock to the inside as a guide to where to write the sentiment and it covered most of it up.
I like to go back to my images with a black pen/marker (I am using a Copic multiliner) to darken the images and edges so that it looks neater.
I want the flowers to be the main focal of this card so my sentiment is very simple. I am stamping the Thank you sentiment from the Concord &9th Blooms Fill in set with Versamark Ink and heat emboss with white embossing powder. I will then adhere it with some liquid adhesive on the right flap portion of the card. I think it works perfectly for this card and it was nice and handy from my last blog post! LOL!
The last thing I did was added some highlights with my white gel pen and some Sparkletz water droplets.
Here is a look at the finished card. I am very happy with how this turned out! I think maybe next time I might want to add some twine to wrap around it and tie a bow in front? 🤔 Or maybe not? Let me know your thoughts and what you would change or do differently.
Thank you so much for stopping by. As promised here is the video link!
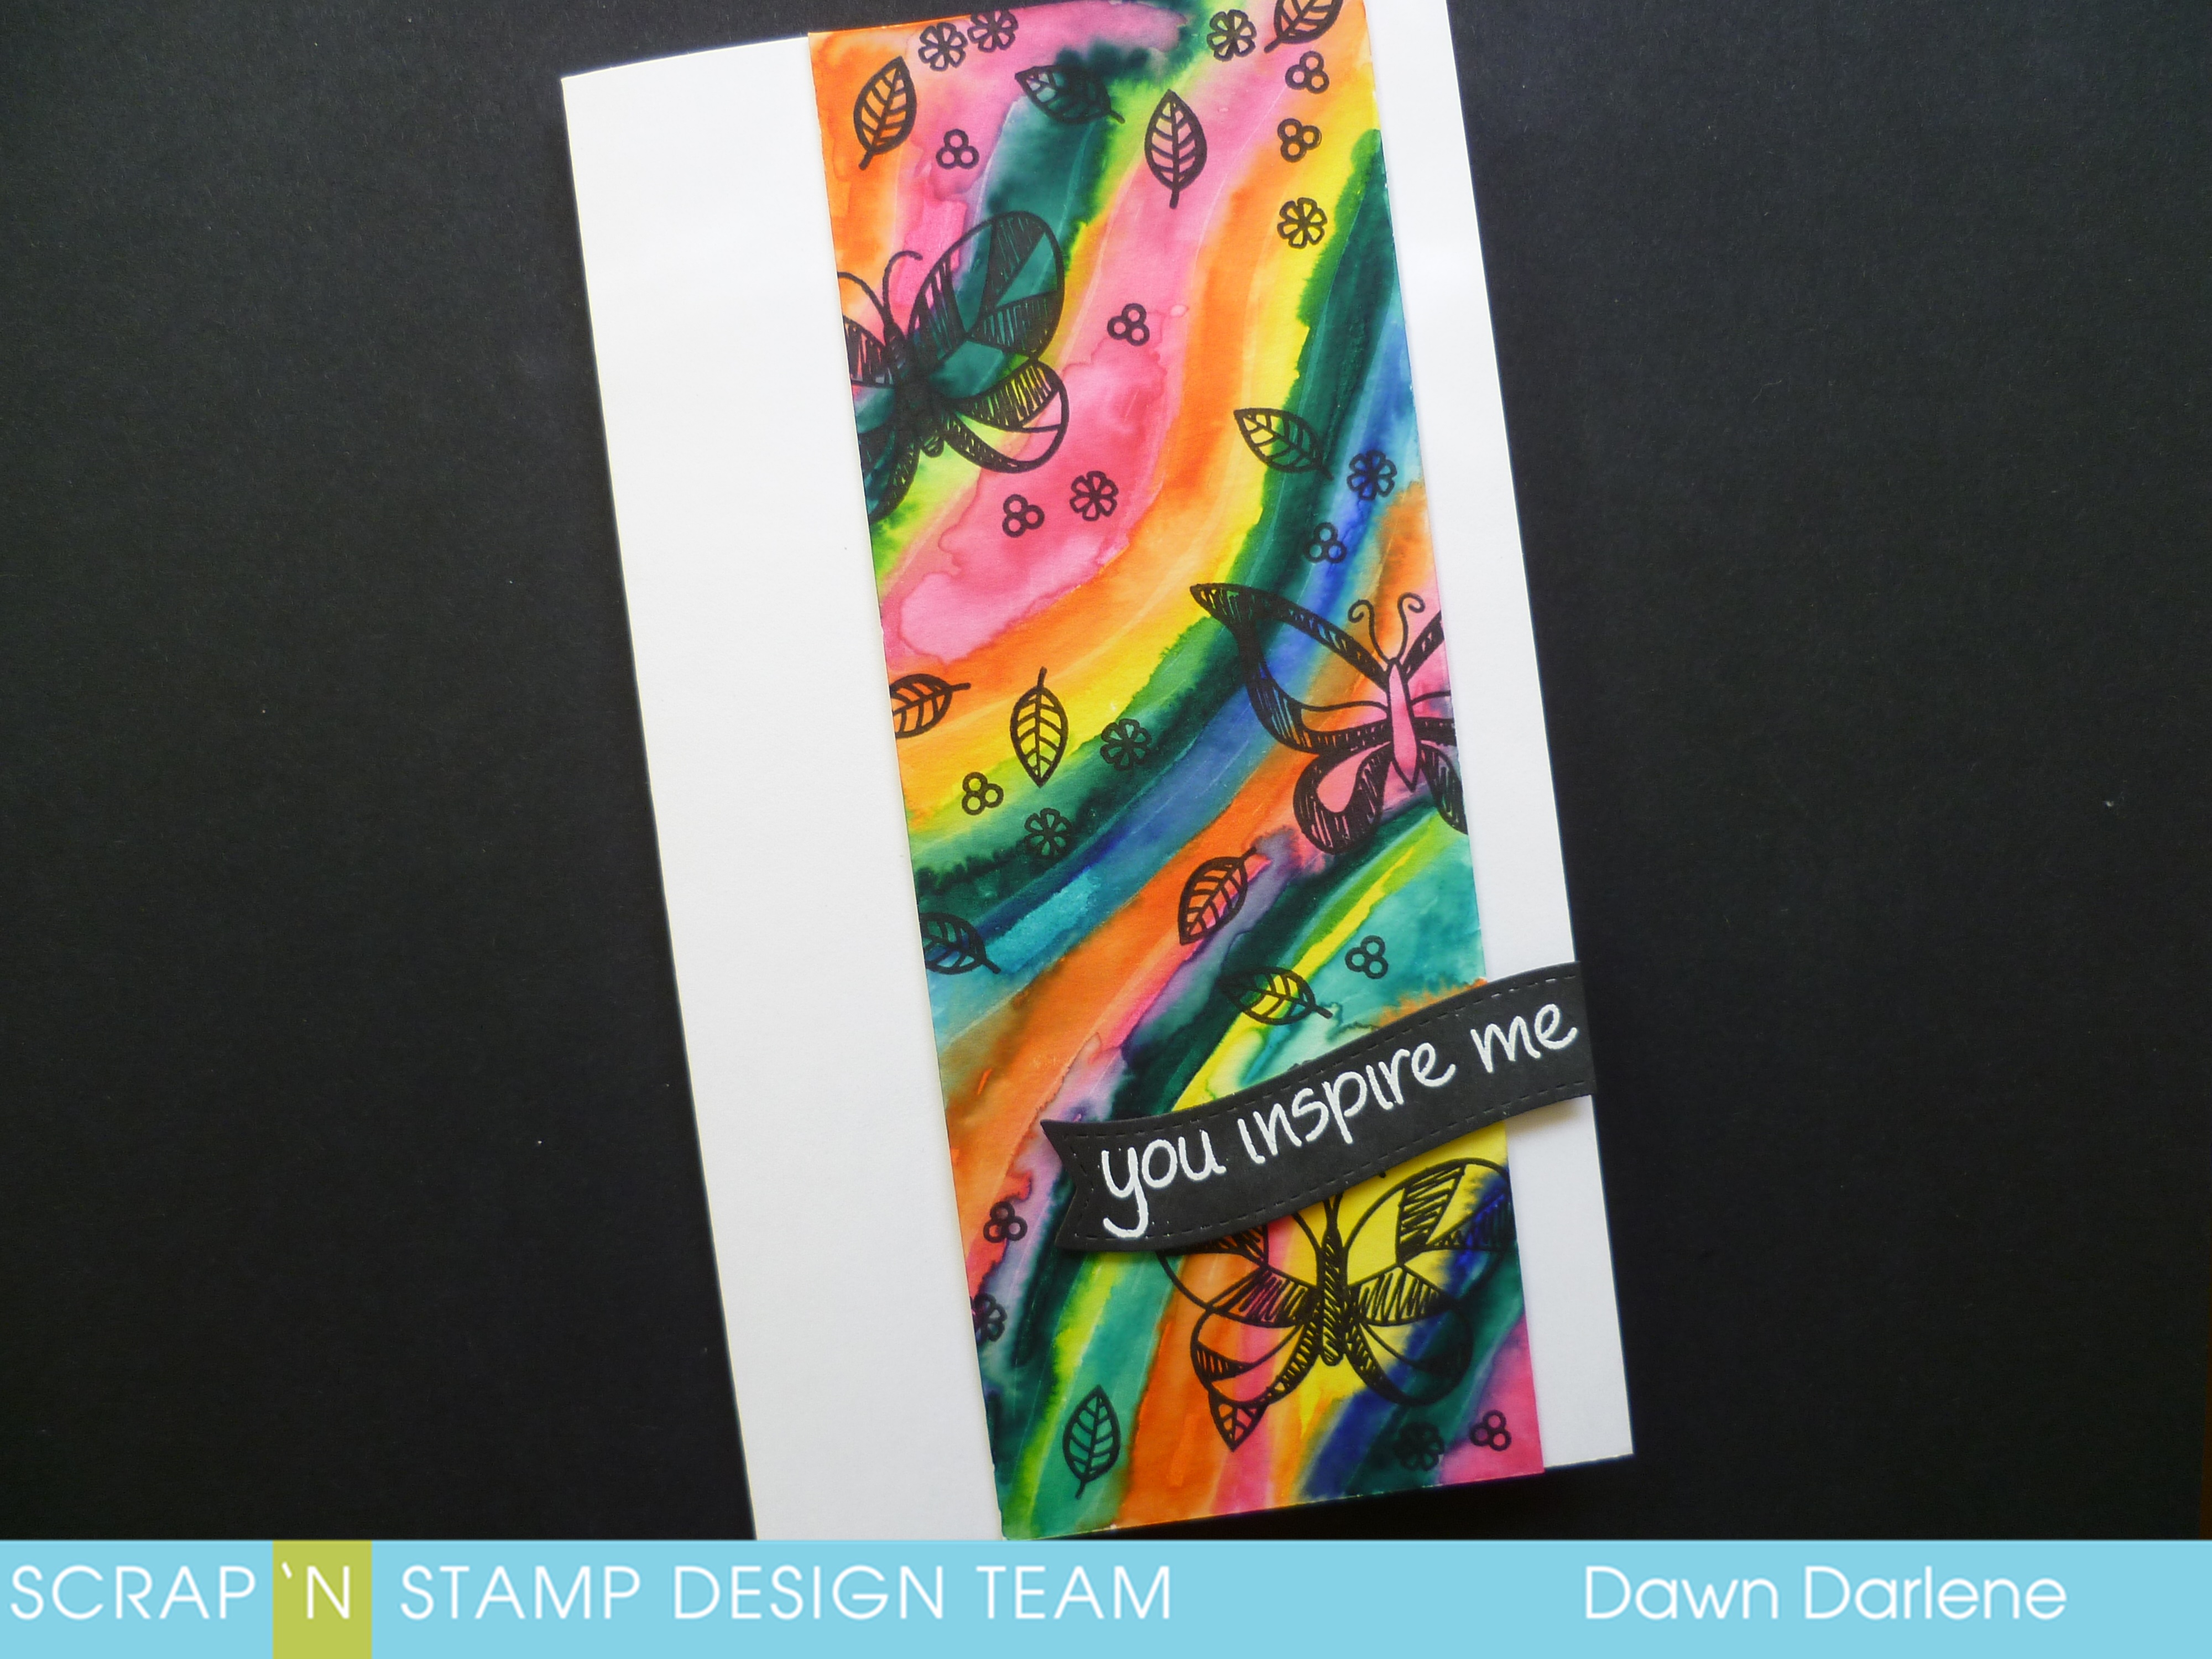
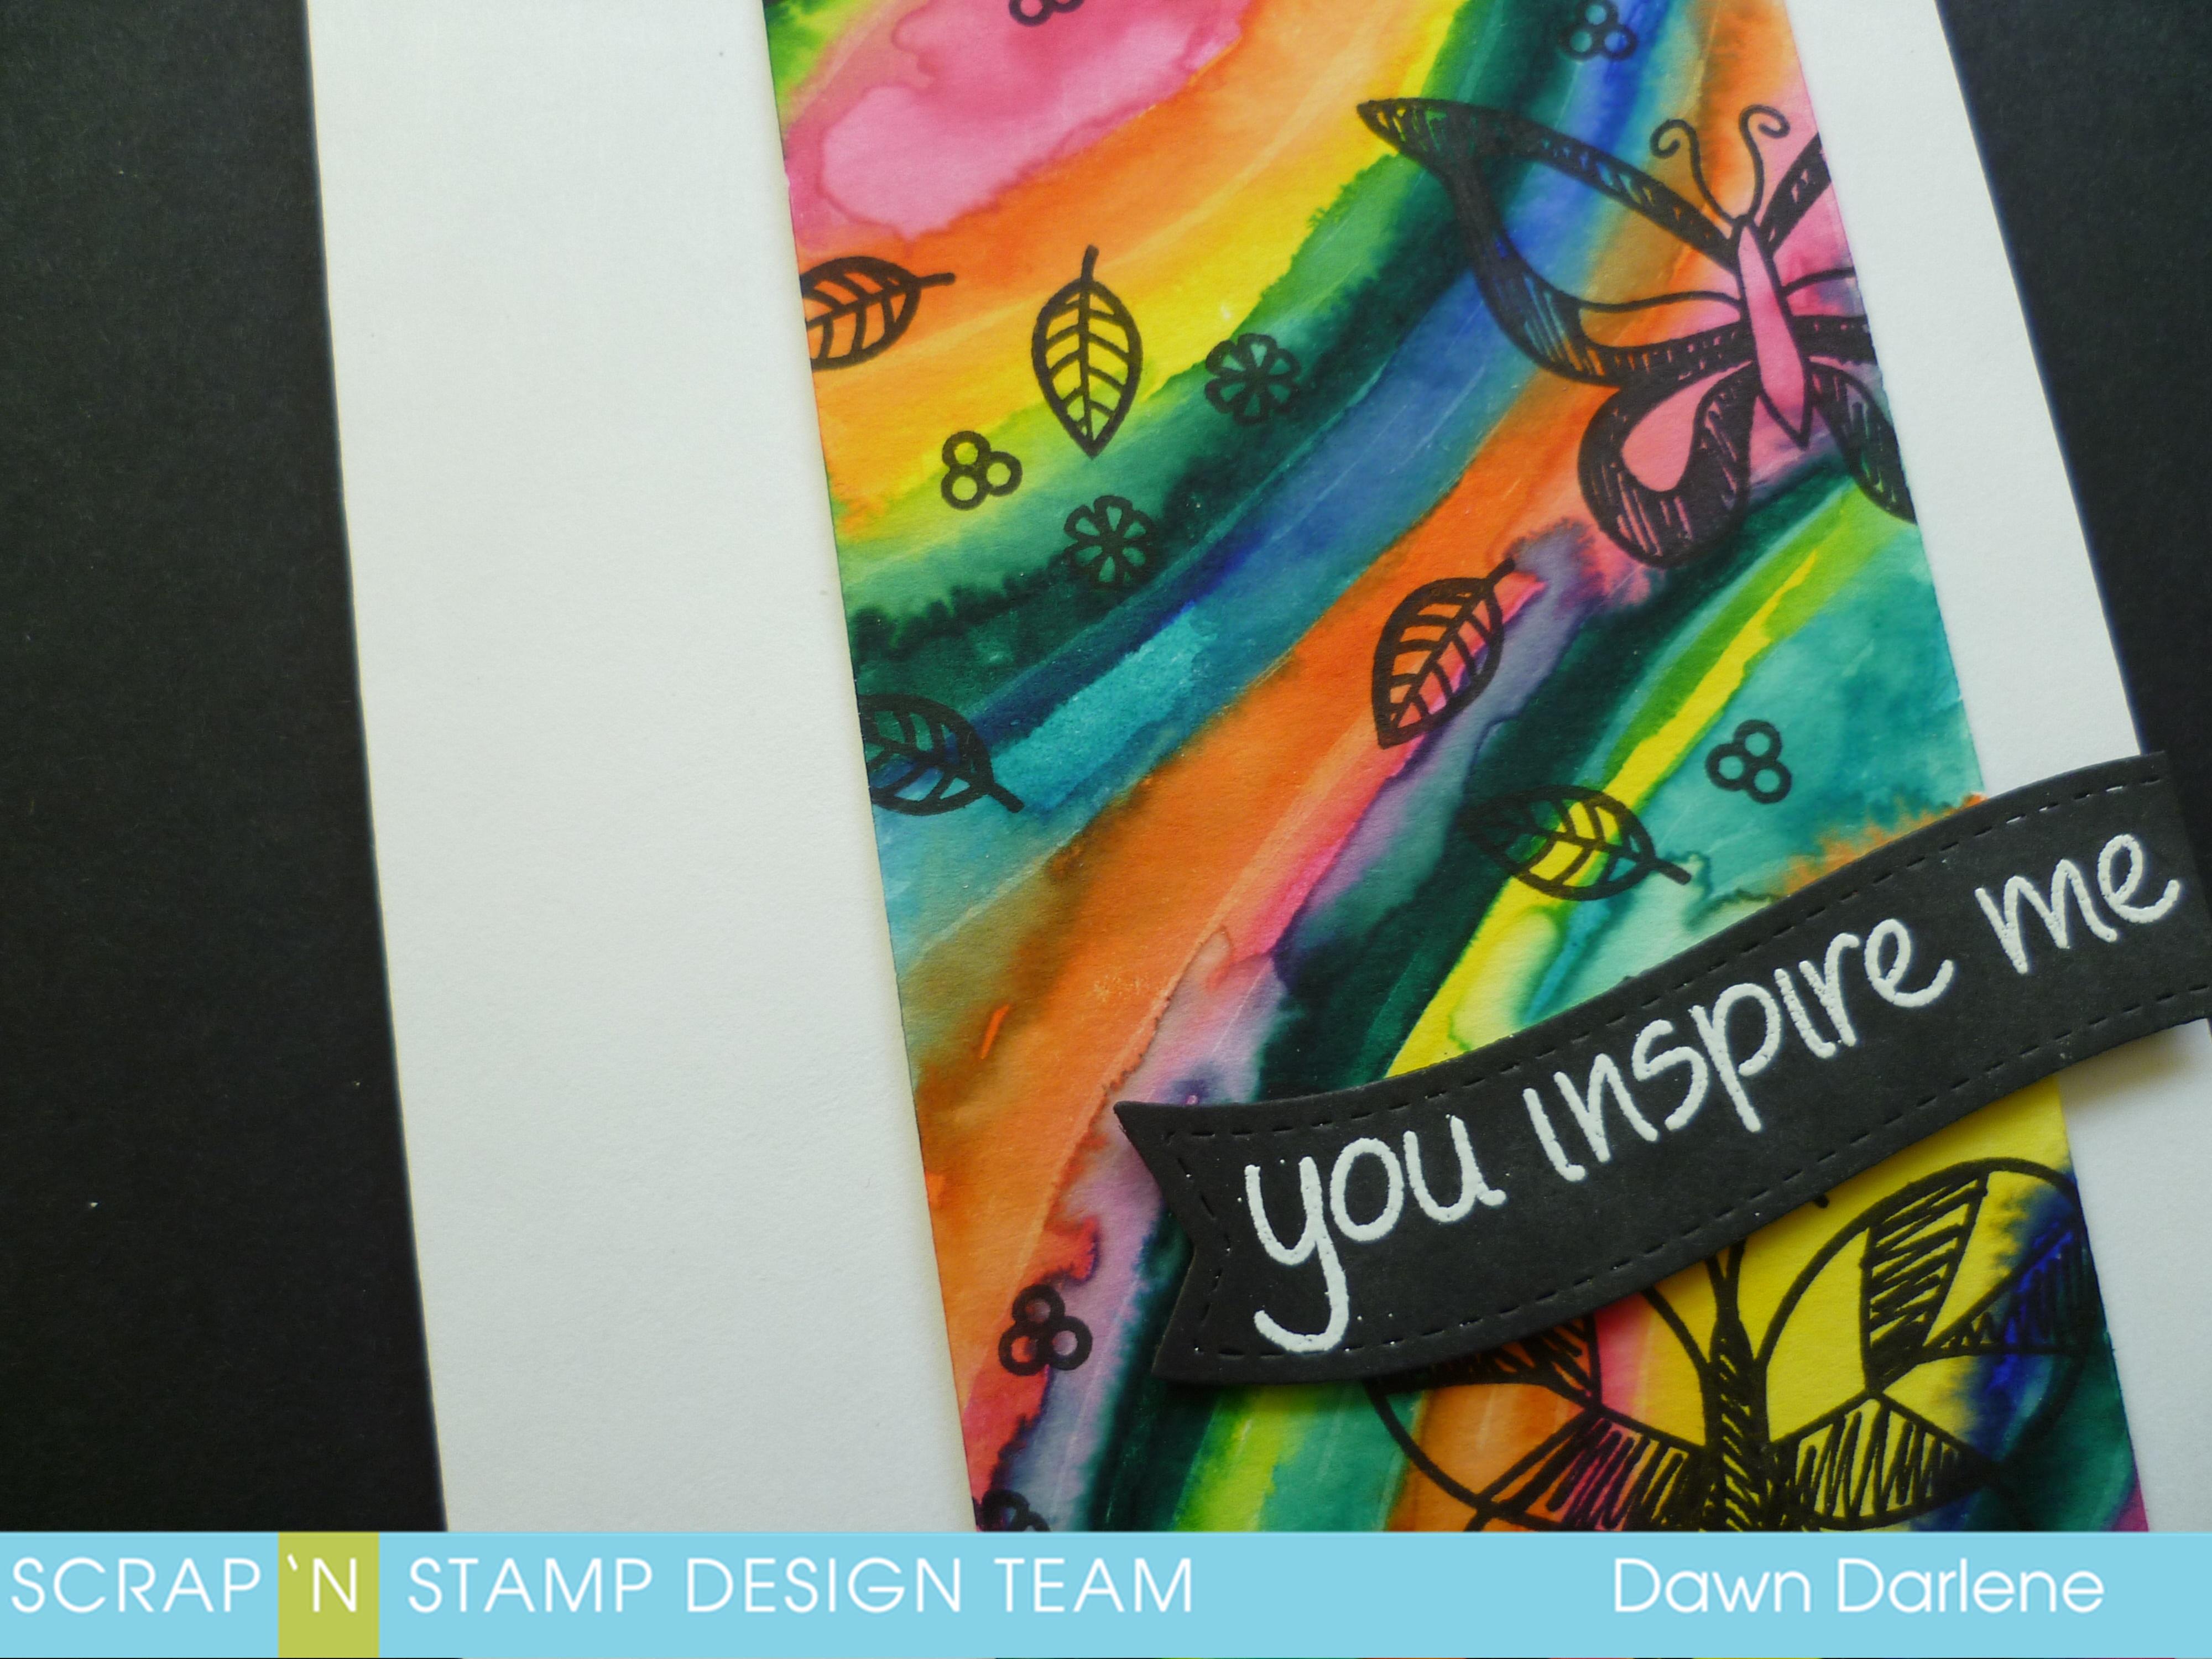
Dawn here from the little mennonite blog with a super easy/cheaper card for you today. This card is made by using Crayola markers as watercolour markers!
Directions:
Take a panel of watercolour paper and draw on it with Crayola markers. Add water with a paintbrush (I used an old acrylic paint brush) to blend. Let dry.
Stamp berries, leaves and butterflies with Lawn Fawn’s Flutter By stamp set. Fill in set areas with black pen.
Adhere watercolour panel to card front with dry adhesive. Add sentiment from Lawn Fawn’s Flutter By stamp set to Lawn Fawn Fancy Wavy Banner by heat setting with white embossing powder. Add Lawn Fawn Fancy Wavy Banner to card front with foam adhesive and cut off extra Lawn Fawn Fancy Wavy Banner extending over the side of the card.
You can also use Distress Markers for this technique. Distress Markers must be stored on their sides (it doesn’t matter how you store Crayolas). The advantage with Distress is that their colours are more sophisticated. (Although I like the black Crayola better myself!) You can also colour with Crayolas right onto the Ranger Craft mat or an old plate, add water, and wohoo you have watercolour!