Scratch-N-Stamp
Search

Checkout

Keep up with Sales, New Products and other events at Scrap `n Stamp. Sign up for our newsletter now!

What's New

Hot Deals


SNS Challenge

Whimsical Winter

Hello and Happy Sunday, I hope you all have had a wonderful weekend. It feels like forever since I have posted. Life sure gets in the way of crafty fun doesn’t it, lol.

I decided to play along with the monthly challenge that we featured over at the Scrap’n Stamp Challenge page on Facebook. This month’s challenge was Christmas in July. I also used our featured product of the month which is Concord and 9th.

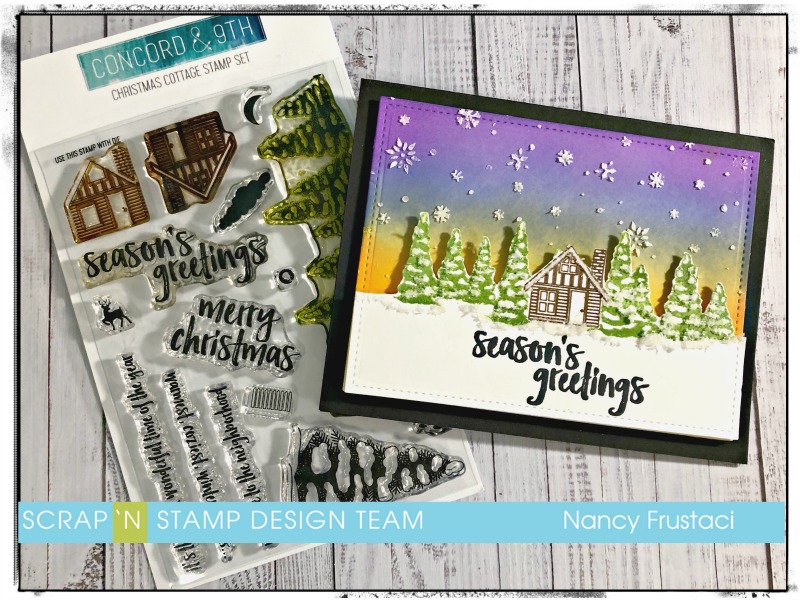
I pulled out The Christmas Cottage stamp set from Concord and 9th that I had purchased last year thinking I would create Christmas cards with it. Sadly I never touched it until this point, so yay for the challenge and product spotlight.

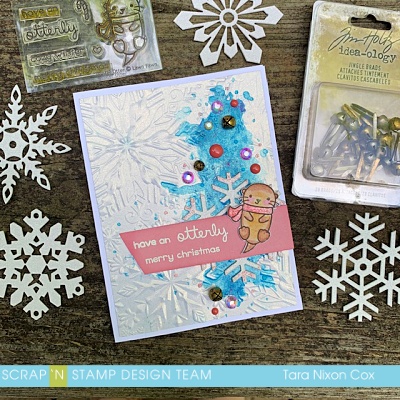
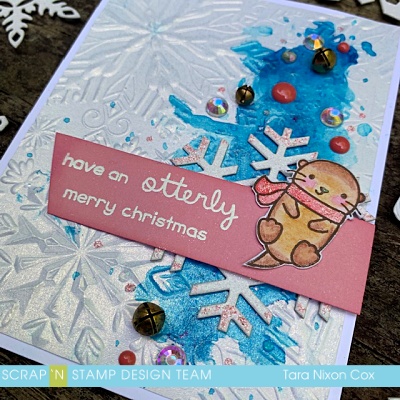
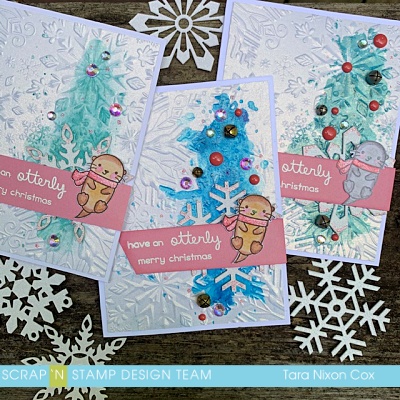
I began by die cutting some white card stock down to 5 1/4 x 4 using my Lawn Fawn stitched rectangle. From there, I pulled out my Misti, some inks and some masking paper to create the focal image for the card. I stamped the little cottage onto both the masking paper and the white diecut panels, using chocolate brown and black ink for the multiple layers. Once I had that done I fussy cut the little cottage mask and applied it to the stamped image, and went on to stamp the beautiful trees.

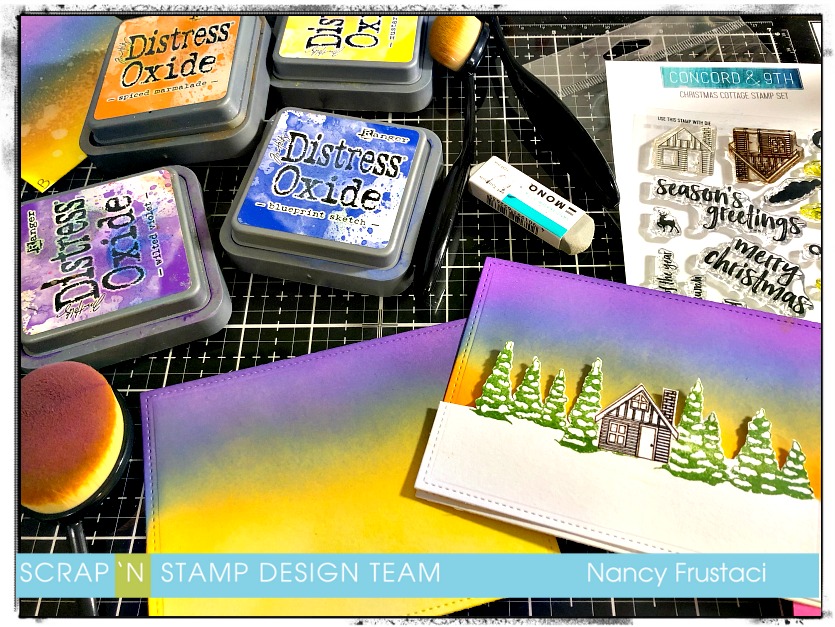
Once I was done with the stamping I actually fussy cut around the images, as I did not have the coordinating dies. At first I thought maybe I would do a shaker card but changed my mind. Instead, I decided to keep it clean and simple. I die cut a couple more panels using Bristol cardstock and the same stitched dies. I wanted everything to blend together once it was assembled. I decided to pull out my distress oxides and play around with a winter sunset, which actually turned out more like Northern lights so that’s what they are haha. Love “happy accidents” as Bob Ross would say. To create the background I did use my life-changing blending brushes from Picket Fences. I have to say I really love them, the blend is just so smooth.

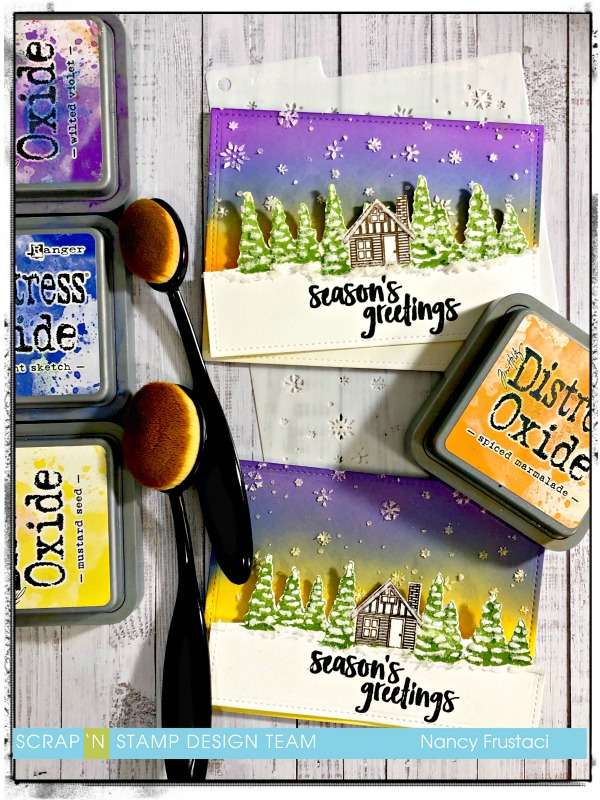
I allowed the distress oxide to settle and dry a little bit before moving on to adding the snowflake to the background. I used texture paste, some glitter and some of this Floral soft (fluffy-stuff) I had in my stash to add an extra dimension, sparkle, and interest to the scene. While I was waiting for the background to dry, I pulled out the Christmas cottage stamp set once more along with my Misti and Versa Clair nocturn ink to add the sentiment right onto the panel. Word of caution, heat set it as it takes a bit longer to dry and will smudge very easily. For one of the cards I had to cut down another panel and add a hill because I smudged the sentiment very badly.

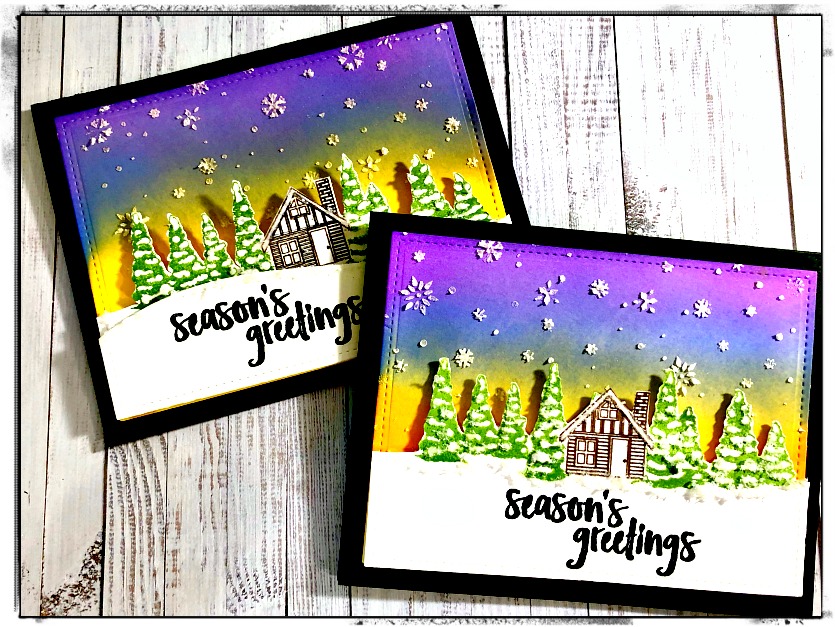
After I made sure everything was completely dry, I popped up the stamped image onto the background panel and used fun foam to adhere all of that to the black card base which measured 5 1/2 x 4 1/4 which is my typical go-to for cards. I hope you enjoyed this and found some inspiration, please come over and join the Christmas fun on our Scrap’n Stamp Challenge page, we love seeing what you create and there is a chance to win a prize as well. Share a photo of your card on our wall and get your name entered to win a $50 gift certificate to Scrap’n Stamp! You’ve got until July 31st to post. Make sure to hashtag it for another chance to win #SNSChristmasinJuly

Have a wonderful week a head

~Nancy F


Whimsical Winter Read More »

Tuesday with Tara {take 210}

Happy Tuesday! I’ve been inspired by our Facebook Challenge to create ‘Christmas in July’ cards and finally sat down to make a few over the weekend… this cute little winter otter by Lawn Fawn was a fun one to pair with a 3D snowflake embossing folder by Sizzix and some bling, including these fun jingle brads by Tim Holtz.

I started with stamping & coloring the otter with watercolor pencils & embossing the sentiment with white embossing powder on some pink cardstock. I have a stock pile of white pearly cardstock, so I embossed it with an embossing folder and added a ‘splash’ of color with Color Burst powder, which I misted with water and added a few splotches with a wet paintbrush, then I added the jingle brads (I like to cut slots for the prongs with an craft knife first so I don’t tear the paper) and attached it to a white card, cut down from Lawn Fawn’s White Cardstock.

It’s really a simple card, I added assorted jewels, enamel dots, Nuvo Glitter & Stickles to add texture, color & sparkle 🙂 The snowflake was pre-cut, but I added the pink tickles to the edges of it and to the otter’s scarf once everything was assembled. There’s lots of different shimmery elements, which is so fun for Christmas cards!

There was actually quite a bit of experimenting with this card and I made 3 variations… I tried several different mediums for my ‘splash’ of water behind the little otter, here’s a visual of the three together. On the right was my first attempt, alcohol inks with a grey otter and silver jingle brads. The paper, though it is coated, is more absorbant than I expected and didn’t give me the look I expected from the alcohol ink, though it still is pretty you can see spots where the ink soaked through. The card I shared above was my second experiment and on the left in the photo below you see a card with Distress Oxide Ink applied directly and smooshed for a more watery look. I’d used up some of my pink embellishments by the time I got to the third card (time to go shopping I guess!) so kept it very simple, even skipping the jingle brads, just using some bling & Stickles. I don’t do a lot of ‘mass production’ when I’m card making, so it’s hard for me to not change something on each of them 🙂

I hope you like my little Christmas in July cards- I’ve got another in process I’ll share with you next week, before July is over! I’d love to see what you create over in our Facebook Challenge Group, there’s a lot of inspiration there to get you going! Remember to share your project & add #SNSChristmasInJuly when you share on social media, there’s a $50 gc up for grabs!

Inky hugs,

Tara

Tuesday with Tara {take 210} Read More »

Warm & Feathered Hugs – Freezin’ Season

Helllllloooooo! Guess who’s back? It’s Chala! I am hoping to cheer up your mundane Monday by continuing to celebrate Christmas in July!

It’s funny to think about cold weather right now…only because we have really just started having summer weather here. None the less, I did manage to get in the spirit to make this sweet card using My Favorite Things – Warm & Feathered Hugs stamp set. I absolutely LOVE every single image in this set. Also, the sentiments are perfect for not only Christmas cards….but, Winter themed cards that I can send to my friends who don’t celebrate Christmas. Today’s card is a card that can be just that!

MFT – Warm & Feathered Hugs

To start I am going to stamp the little owl with the scarf with Memento Black Tuxedo ink onto some smooth Crafter’s Companion white cardstock. I have chosen this type of ink and cardstock because they both work well for Copic colouring. I will set this stamped image aside to give the ink some extra time to dry and to think about how I want to colour him.

I was searching through my stash of cardstock and found a piece that I must have stamped up the last time I was making Winter cards. I thought why not use use this on the card! (To make this panel I had cut a standard A2 size panel from some cardstock similar to Lawn Fawn’s Peacock colour and then I used a stamp called Mod Trees and my Versamark ink and silver embossing powder.)

I then picked some light blue cardstock similar to Lawn Fawn’s Mermaid cardstock secure it with some Thermo-Web Removable Purple Tape and die cut that with my Gemini Jr. using the 3rd largest size (2 3/8″ x 3 5/8″) MFT Wonky Stitched Rectangle Stax Die.

I also used this same die and cut a piece from some silver mirrored cardstock similar to Tonic – Mirror Cardstock in Frosted Silver and trimmed the outside edge to make a frame that would fit around the mermaid coloured piece.

I start to plan how I want the layout of these pieces to be on my card and I decide that I want the silver frame to be offset at an angle to the light blue cardstock.

Now that the layout is planned out I can move on to Copic colouring that cute little owl. The colours I use are: C0, C1, C2, C5,YR04, Y08, B18 & BG02. Once he is all coloured up I will fussy cut him out. (If you don’t like to fussy cut you can get the coordinating dies!) I am getting better at my Copic colouring! Practice, Practice, Practice! I am pretty happy with how he turned out!

Now it is time to assemble all the pieces. I start by using liquid adhesive to glue together the wonky stitched rectangle and the silver frame.

I then glued these pieces onto the tree card panel that I had found in my stash. I then adhere the owl onto the blue cardstock and add some snowflake sticker embellishments and adhered with my glossy accents. I also add two clear Sparkletz droplets.

I will let the embellishments dry for a bit and then come back and adhere that panel to my A2 card base with a tape runner.

I decided that I would keep the front as is and put my sentiment on the inside. I couldn’t resist using the “Happy Freezin’ Season” sentiment that comes with the stamp set. I pulled out my Stamp Perfect and my favourite sentiment ink VersaClaire Black Nocturne ink. I first stamp the sentiment down onto some clear packaging just to make sure that it is straight and looks good. The last thing you want to do is spend all that time on your card only to stamp your sentiment crooked!! 😫 Trust me, I have done it! The last thing I do is add some Clear Wink of Stella to the owl’s scarf and my Winter Freezin’ Season card is complete!

Share a photo of your card on the Scrap’N Stamp Facebook Challenge Page wall and get your name entered to win a $50 gift certificate to Scrap’n Stamp! You’ve got until July 31st to post. Make sure to hashtag it for another chance to win #SNSChristmasinJuly. Winner chosen by random draw. One entry per day.

I hope you enjoyed today’s card! Remember to head on over to check out my YouTube Video and hit the subscribe button and notification bell to catch all my crafty creations! Leave me a comment to let me know how you like my fun themed intro for this video!

https://youtu.be/TJXO6vY64HU


Happy Crafting!

~Chala, xoxox

Additional materials used:

Warm & Feathered Hugs – Freezin’ Season Read More »

Free Shipping Anywhere In Canada