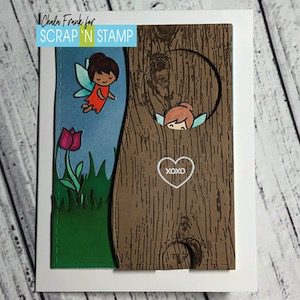
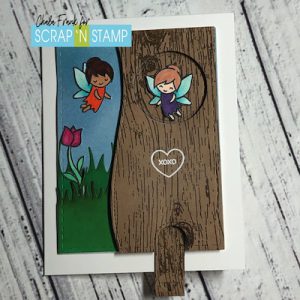
Lawn Fawn – Fairy Friends – Double Loop Slider Card
Welcome Back! I hope you have all had an opportunity to play along in the 30 day challenge that we have over at the Scrap’n Stamp Facebook Challenge Page! Today’s challenge is Lawn Fawn and I pulled out a bunch of my Lawn Fawn products to create this fun double loop slider card. This is a similar concept as to the Double Slider Surprise…..but created in just a little different way and using different dies.

It was when I was sorting through my pre-stamped and pre-cut pieces that I have that it reminded me of this technique that I saw a couple years ago done with MFT products. It was with a little woodland critter popping out of a tree. I thought it would be fun to recreate this idea but use the Fairy Friends stamp set from Lawn Fawn that I recently purchased. I was also able to use several other Lawn Fawn products and I will try to list all of them as I go.
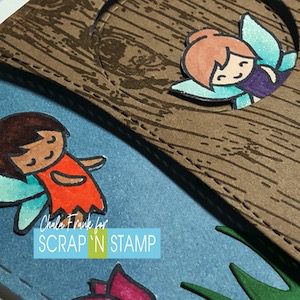
I already had the grassy pieces pre cut from the Grassy Hillside Border die from Lawn Fawn and added some distress ink on the edges in Mowed Lawn, Peeled Paint and Forest Moss. This gave the pieces more dimension. I then ink blended a standard A2 size white card panel with Broken China distress ink to create the sky background. This will be the main piece we will adhere all our pieces on to.
I already had a piece of brown cardstock with wood grain stamped on it. This is perfect to create the tree. I cut the piece down with he a stitched rectangle die and then created shape to the tree trunk using one of the Hillside Border dies.
I also used a circle stitched die to create the hole that my little fairy is going to pop out of. After die cutting the circle I place a piece of low tack tape on the front to hold the hole in place. I am going to turn it over and place some Gina K connect glue on the circle portion only. Having it temporarily taped to the original piece will insure that I get it place exactly where I want it. I will adhere that down onto the blue distress inked card base and then carefully remove the low tack tape and the rest of the die cut tree. Only the circle should be adhered down.
I stamped the images I wanted to use in Memento Tuxedo Black ink, copic coloured and then fussy cut them out. I adhered the grass border, flower and the one fairy on the left side of the card with some Gina K Connect adhesive. I trimmed the grass piece making sure I had enough that would show on the left side of the card when the tree was attached and so that it would not add bulk where I want the slider to go. I then began working on the slider mechanism.
I used some elements from the Let’s Toast Pull Tab add on (The pull tab and the directional arrow) and die cut them from the left over pieces of the wood grain paper from the tree. I ended up cutting the “T” portion off as it was too long.
Next I move onto die cutting two slots. These need to be far enough away from each other so that your element fits in between the slots. I cut down a piece of light plastic approximately an inch and a half wide. Yours will be as wide as what ever slot you will need or the size of the die cut you use. This is the track of your slider. You can also use a craft knife and a ruler to create these slots if you do not have a die cut that will work. Just make sure that your slots line up to each other both horizontally and vertically. If you are off it could cause your slider not to work properly. I also took the “notch” from the pull tab set and die cut on the bottom of both the card panel and the tree making sure that the notches can line up perfectly when I need to adhere them.
For the “belt” of the slider mechanism I used a piece of plastic tarp I had in my garbage from a painting project. It was fairly light but worked okay. I recommend maybe using something a little heavier. The consistency of a plastic sandwich bag or Ziploc baggie would work well. The length will be just long enough so that the two ends can over lap enough to secure together. You will feed the baggie ends from the front to the back, fold the ends over (trimming to overlap just enough to adhere). Make sure it is not too tight or it will not slide.
The next part is a bit tricky to explain…so, make sure you head over to watch the video for clarification.
I now want to adhere the pull tab to the “belt” or plastic slider we created on the back side of the panel. I am using some strong Be creative tape. Only adhere a strip horizontal to the top of your slider. I like to adhere it over top of the seam I made so that It does move through the track and hinder the slide of your element. I made the mistake the first time of using too much adhesive and my slider would not slide down very far. You will then turn your base over and work on adhering the image that you want to pop up. Again, this is a bit of fiddling and I place the tree trunk over to figure out where best to adhere the fairy so that she was partially hidden when the slider was in its original position and when the pull tab was pulled she rose up enough…but, not to high. I recommend pulling the slider tab all the way down and then line up the image you want to pop up in the exact place you want to see it, and adhere it it in that position. Due to the size of my image I also needed to use a piece of acetate to boost her up a bit. You won’t be able to see the acetate because it is clear.
I then turned the panel over to the back again and created a track for the slider to follow with foam tape. I then proceed to apply the foam tape to the rest of the back of the card ensuring not to place any that might impede on the slider. At this point I turned it over to the front and adhered the tree down with smaller pieces of foam tape and made sure everything was sliding properly.
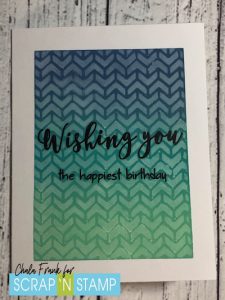
You can now remove the foam tape off the back and carefully adhere it down to your card base. I stamped the coordinating sentient from the Fairy Friends stamp set “have a magical day”. The last addition I made was to add some clear Wink of Stella to the fairy wings and then using a heart and “xoxo” from the How you Bean? Conversation Hearts add on from Lawn Fawn I stamped with Versamark and heat embossed with white embossing powder. I thought this made it look like someone carved it into the tree. I will warn you though it was a bit of a challenge to do, so, make sure you get all your stamping done before you adhere everything down!
I hope you enjoyed my vision for the “Lawn Fawn” challenge for today.
Take Care!
~Chala
Lawn Fawn – Fairy Friends – Double Loop Slider Card Read More »
 Hey Crafters!