… or the greens or the reds? Hi, it’s Lindsey here with you on this last day of May, with an inspiration card for today’s Random Acts of Cardness prompt: Monochromatic! As you can guess, I chose to work with blues, and created a little underwater scene:
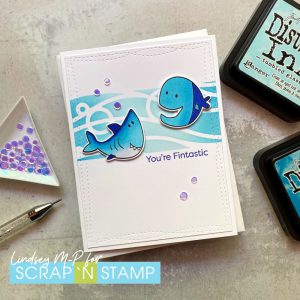
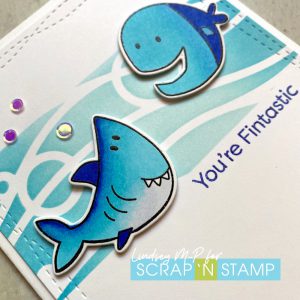
The background is made using the Bubble Wave stencil from Heffy Doodle. I masked and held the stencil in place with Heffy Doodle memo tape ( a great low-tack tape for masking) and blended tumbled glass and mermaid lagoon distress ink for an underwater panel. After die cutting it with a wonky stitched rectangle die, I set it aside while I stamped, heat embossed, coloured and die cut the two critters from My Favorite Things’ Beach Buds set. I also stamped and embossed the sentiment from the same set. After popping up the fishies with foam tape, I added a few bling bubbles and called it done!
Are you playing along with the Random Acts of Cardness challenge? Share your projects to the Scrap n Stamp Challenge page on Facebook, and don’t forget to label your creations with #snschallenge on the social media of your choosing! A lucky random winner each month will receive a $50 gift certificate to the store! Thanks for checking in today, and enjoy your week!
Hey guys! It’s Chala here for today’s Random Acts of Cardness word “Greetings”!
It looks like we will all be celebrating Christmas a lot differently than we all wanted to. So, I decided to take today’s challenge word and bring my handmade card to life with a digital greeting. This is a unique way to send a special video greeting to my loved ones far away.
It is a really simple process actually. All you need is a smart phone and/or a computer. I incorporated my Silhouette die cut machine, but you don’t need one to create this type of card.
I started out by searching for a *free* program that could convert a video into a QR code link. The best one I could find was a site called Mevie. It allowed me to upload a video I took with my iPhone. All you need to do is register for free, which I recommend. As a registered user you can store your videos indefinitely. Otherwise, your videos would only be available for 30 days.
The process to upload and create the code was very quick and easy, even with my old and slow Mac! Watch the video below to see how I created it.
After the QR code is created and saved you can then print it out and add it either to the front, inside or back of your card. Just make sure you let the recipient know there is a little something extra for them by scanning the code with their phone camera.
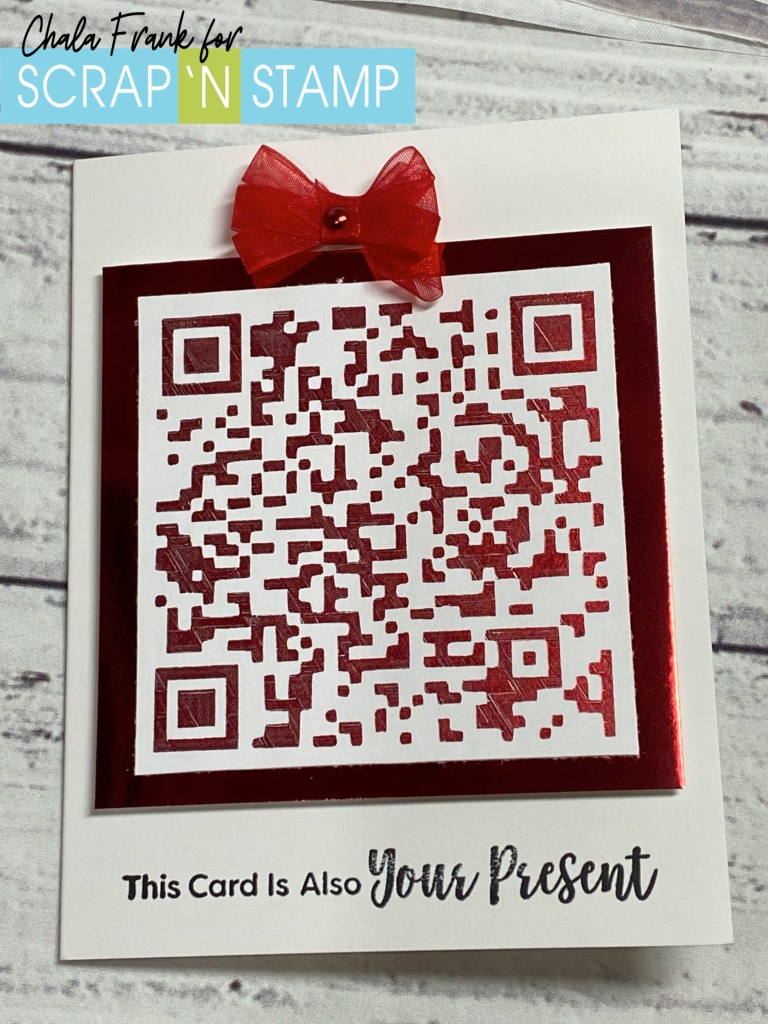
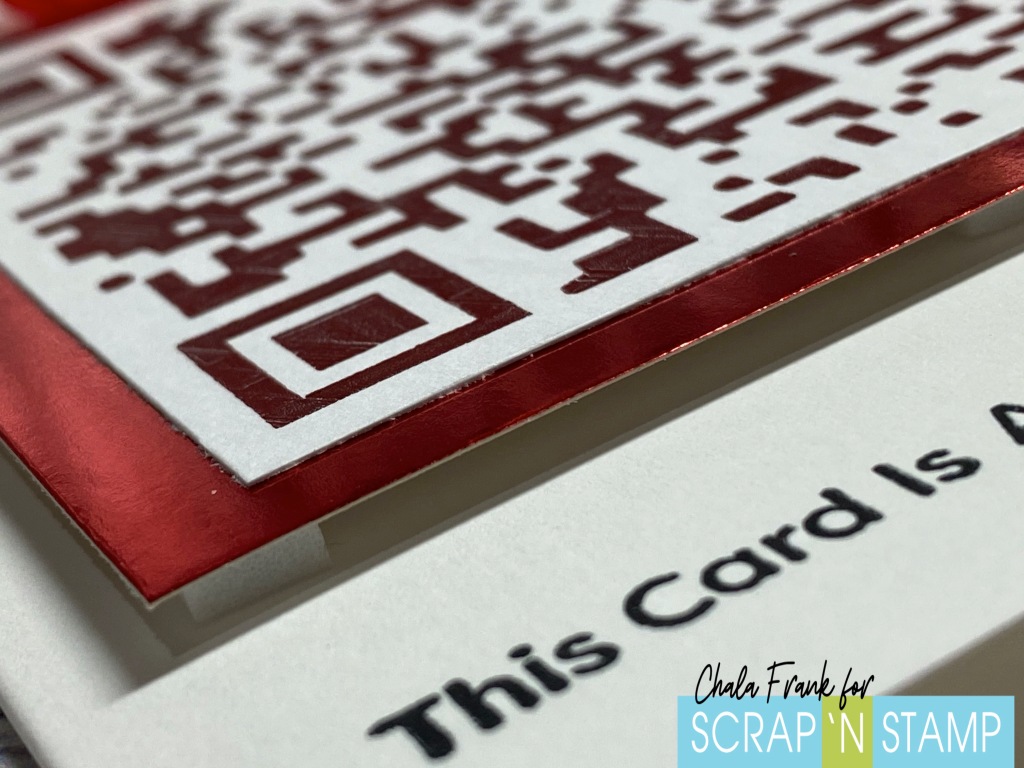
I made my code the main event of my card and wanted to make it look like it was the wrapping paper of a present. To step it up a bit, I pulled out my We R Memory Keepers All in one Foil Quill. The best part is as of the date of this posting it is part of the Black Frid’eh 50% off Sale over at Scrap’N Stamp! I won’t go into all the details of how I did the foiling as I have shown how this product works before and you can check out that video by clicking HERE. Basically, I imported the image, traced it and then instead of “cutting” I sketched the image with the Foil Quill using some Gemini Paper Craft Berry Foil and the cross hatch sketch feature ensuring that I decrease the spacing between the hatching to create a more solid sketched image.
I was a little worried about whether the QR code would work with the foiling or if the shine of it would cause issues. Luckily, it worked perfectly!! I then trimmed out the QR Code into a square for my “present”. I adhered it onto a standard A2 size folding card with some foam squares and created a ribbon bow and secured it with a brad. One very important thing to remember is to adhere the QR code the correct way up! Surprising, I got it right the first time (trust me, no one was more shocked than me! lol!). I then trimmed out the code and layered it onto a piece of red foil cardstock from the American Crafts 6×6 Holiday paper pack.
I kept the sentiment super fun and simple using the My Favorite Things Sassy Pants Holiday Too sentiment “The Card is Your Present” with VersaFine Claire Nocturne Ink in Nocturne. I thought this one was perfect! I then left the inside blank so that I could write to the recipient as well as to let them know to scan the present for a special “gift”.
I know that this card may seem really simple to look at, but if you have loved ones who would enjoy receiving a video greeting, it will be an incredibly special keepsake and something they will want to show others!
Remember, you don’t have to make it into a present, you can create your regular cards and simply print, cut out the code and adhere it on the inside or back of your card.
Digital Greetings
Digital Greetings
Digital Greetings
I thank you for so much for stopping by today and I hope this has given you a way to send a special greeting to those you can’t be with.
…it’s that My Favorite Things products are among my favorites to play with.
Always have been and always will be.
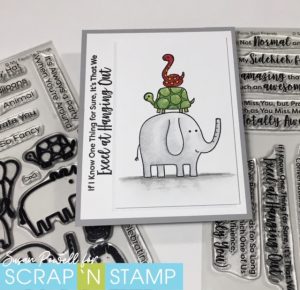
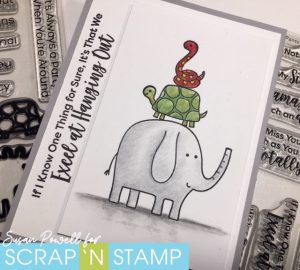
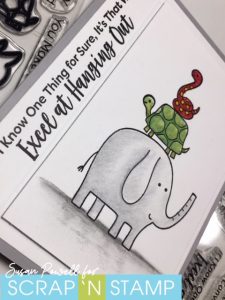
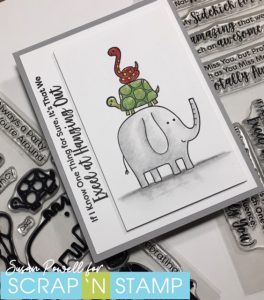
Hi Everyone! It’s Susan with today’s Random Act of Cardness prompt of My Favorite Things.
I chose two of my favorite sets to play with; Safari Party and Sassy Pants Best Friends. Those Safari Party animals are so cute and the Sassy sentiments make me smile.
I stacked the animals on top of each because that’s reality lol and colored them in with Prismacolor Pencils. I added some simple shading on the bottom to ground the images. I cut that panel to 3 x 4 3/4″ and using craft foam I layered it onto a panel that was cut to 4 x 5 1/4″ after I stamped the sentiment along the side using Versafine Claire Nocturne ink.
I layered it all onto a grey card base and called it done.
Now our challenge to you is to use your favorite MFT stamps & dies on a card and if MFT’s not your thing then use any of your favorite products. And be sure to share it with us on the Scrap’n Stamp Facebook Challenge Page.
Happy Stampin’
and thanks so much for visiting!
Stay safe everyone!!
Susan
Shopping list:
Below are links to all the goodies I used, just click on the icon to be taken to where you can purchase the product. If you use my affiliate links when shopping there is no additional cost to you, I want to say thank you and that I appreciate it and you very much.