Scratch-N-Stamp
Search

Checkout

Keep up with Sales, New Products and other events at Scrap `n Stamp. Sign up for our newsletter now!

What's New

Hot Deals


Hero Arts

Today’s Prompt is Shapes

Hi Everyone!

It’s Susan with today’s prompt for the Random Act of Cardness – shapes.

No photo description available.

I had a few different ideas for this but in the end I decided to do something quick and easy. That seems to be my go-to right now so that’s what I did.

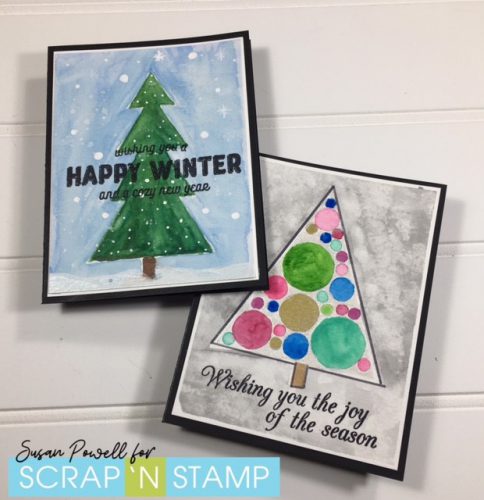
I decided to use shapes to make a couple of Holiday cards. If you’re still sending out cards then these could work for you because they don’t focus on Christmas, instead they are about the whole season.

If you’re playing along with us be sure to share over on the Scrap’n Stamp Facebook page.

I’ve got lots of pictures so lets get started.

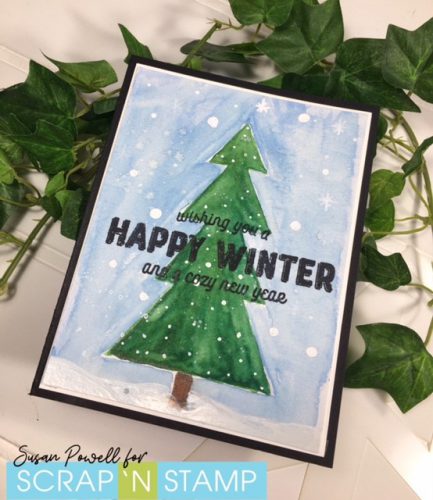
Here is the first card.

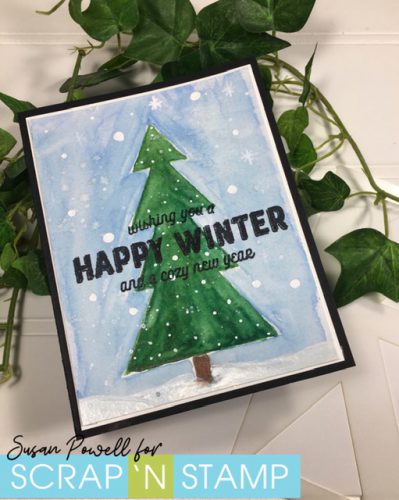
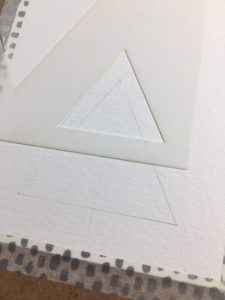
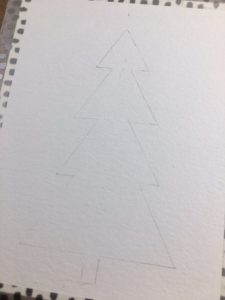
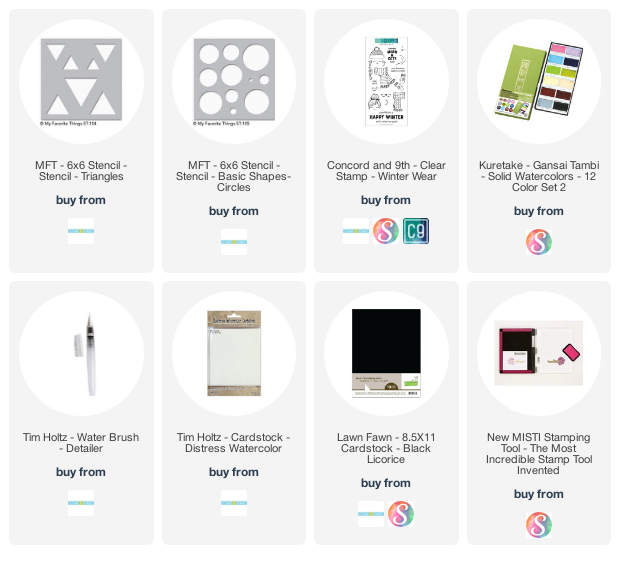
I started by securing a piece of watercolor paper to a board and drawing a very faint pencil line down the center of the paper. Then using the MFT’s Triangle stencil I started drawing out triangles starting with the largest at the bottom and working my way up the page with smaller triangles being sure to line the top point of each one to the center line.

Here you can see all the triangles.

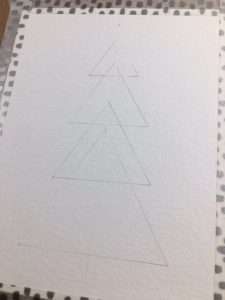
Be sure to erase all the lines in the middle because once you start adding color they are not always easy to get rid of and you probably don’t want to see them in your finished product.

As I’m typing this up I’m thinking this tree would look cute if I kept the top points of the triangles all lined up but made each triangle a little wonky. I’ll have to give that a try and maybe even do some non-traditional colors.

I’m not going to talk about the watercoloring because really I kept it so simple using just a couple shades of green and mixing it around on the cardstock. No fancy techniques or skills used here.  The sky is a wash of light blue. I splattered on some watered down white paint and then used a white paint pen to add some bigger snow. I decided to add the sentiment right across the middle.

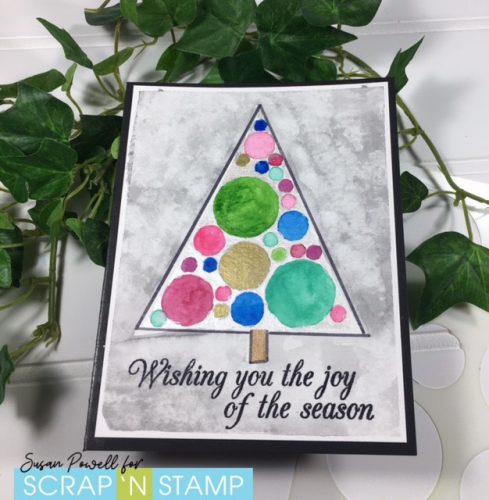
This next card is also a tree but made using the MFT’s Circle Stencil.

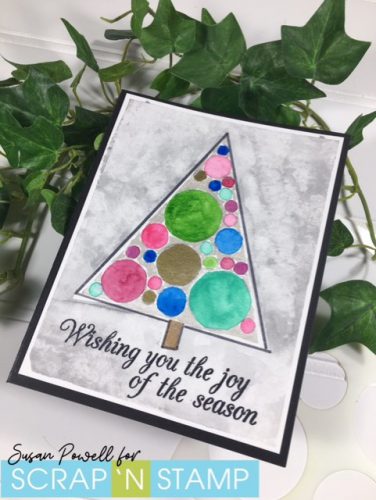
I started with another piece of watercolor cardstock taped to a board. This helps to keep the cardstock flatter when it’s finished and it also gives a nice white edge to the piece. I drew a large triangle very lightly with a pencil and then went about filling it with circles using the stencil. You could definitely free hand all of this for a more organic look but I’m really not good at drawing circles so I used the stencil.

I painted them in using a variety of non-traditional colors and then I used a silver to fill in all the gaps. This next picture shows it a little better. I finished the card by painting in a tree trunk and then adding the background. I started with a light grey but it wasn’t light enough so I dabbed some off with a paper towel and I really liked the mottled look so I filled in the whole background that way. It was a happy accident. I stamped the sentiment on the bottom this time instead of adding snow. I felt with all the circles in the tree that the splatters would just make it look really busy.

You could make a tree out of lots of small triangles or even rectangles and squares. Ohhhh that gives me an idea. Back to my craft room I go lol.

I used a MISTI to stamp my sentiments. If you stamp directly onto watercolor cardstock a stamp-positioning tool is a must. Doesn’t have to be a MISTI but I definitely recommend some kind of tool as it always takes stamping it a few times to get a good image because the paper is not smooth.

I used my Kuretake watercolors for these cards but you could do these with any paints at all. This would be fun to let your kids do too – they could use dollar store watercolors (if you don’t want them to use yours) and they could go crazy with stencils or drawing their own scenes to paint. Could be a fun activity for thank you cards to do over the Christmas break.

I hope you are all having a wonderful holiday season. I know it is not what we’re all used to and it’s difficult at times but I do hope you’re enjoying it.

I wanted to also let you know about a big sale over at the Scrap’n Stamp Store. Up to 50 % OFF

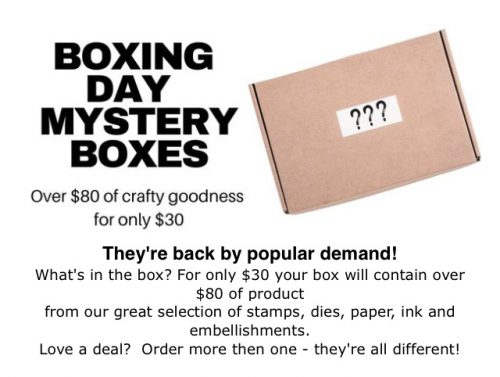
And if you like a bit of mystery and surprise why not treat yourself to one of these boxes.


See you all in 2021!

I want to wish you all the best for a HEALTHY and HAPPY NEW YEAR!!


Happy Stampin’
and thanks so much for visiting!
Stay safe everyone!!
Susan
Shopping list:
Below are links to all the goodies I used, just click on the icon to be taken to where you can purchase the product.
If you use my affiliate links when shopping there is no additional cost to you, I want to say thank you and that I appreciate it and you very much.


Today’s Prompt is Shapes Read More »

Do You Wanna Build a Snowman?

I hope everyone is doing well! It has been a beautiful weekend.   It was made better by all the snowfall we have recently gotten…almost 30cm!  The first thing that came to my mind when I saw all the snow was…..Do you wanna build a snowman?  So, that is exactly what we are going to do for today’s card!

I  want to make a car in which the snowman “came together” on the front like you were building it.  I didn’t think I had enough room on a standard A2 size card so I thought I would use a slimline style.  The base for this slimline card measure 7″ x 8 1/2″ and then is scored at 3 1/2″.  I made two bases and I will adhere them together with scor-tape to create a gatefold / trifold type of card.

To create a snowy background I ink blend the two flaps (gate folds) with some Distress Oxide Inks in Faded Jeans, Salty Ocean and I will bring in just a bit of Black Soot to deepen the Faded Jeans around the top.  I use two types of blending brushes.  The standard foam brushes and Picket Fence Blending Brushes.  I like how much ink the standard foam brushes lay down and I love the way the Picket Fence brushes blend the colours together so smoothly.

Once the ink blending is done I add some water droplets with a find mist sprayer and some sparkle with the Hero Arts White Iredescent Shimmer Spray.  This will give the look of snowfall in the background by the water pushing the pigment out.  You can create larger snowflakes by unscrewing the sprayer and tapping the water directly from the straw.

Make sure you let this dry or use a heat gun to speed up the process.  You want to make sure that the ink had dried and set before going on to the next step.

While I let the ink dry I die cut 3 circles in 3 different sizes to create the snowman’s body.  I also used my Silhouette machine and a cut file to create a hat, scarf and nose.  You can fussy cut your own accessories if you don’t have an electronic die cut machine.

Once my inked panels were dry I trim down each gate fold so that they measure 1 3/4″ and that they would close nicely against each other.  I then began to adhere the snowman parts to the card with some Gina K Connect liquid adhesive.  I encountered a bit of a snag in my plan and to find out what that is you will have to watch the video below.

http://youtu.be/QxAPyq7NUZw

The base and head of the snowman are adhered directly to the left panel of the card and the middle of the snowman is adhered down with foam squares to allow clearance for the snowman body to interlace into each other.

Now it’s time to decorate our snowman.  I adhere the hat and scarf with some more liquid adhesive and decided to use Nuvo Drops in Ebony Black for the eyes and buttons.

The card needed a bit of glitter so I used the Nuvo Glacier Paste in Winter White to create puffy snow on the bottom and the Nuvo Glitter Gloss to add some magic to the top hat.  The only thing left to do is to write a message on the inside.

I hope you enjoyed today’s Snowman card!  Remember to post the snowmen you build on the Scrap’N Stamp Facebook Page.


Do You Wanna Build a Snowman? Read More »

Christmas Town

I’ve been looking forward to using my newest die set, and today is the day! They are from Hero Arts, called Tri Fold Edge Village Fancy Dies. I saw a great video on the Hero Arts blog on how to create a unique fold with these dies, which is how I created my Christmas Town card.

CHRISTMAS TOWN

If you’re playing along with the Scrap ‘N Stamp Daily Challenge, you’ll know that today’s word prompt is ‘town’. Coincidence? No! First, let’s have a look at the front of the card.

Christmas Town

Looks like your standard slimline card, right? Except – wait for it!

Christmas Town

It opens up twice! The photo above shows the first, top-most layer opening to the left. The second layer, with the 3 line sentiment then opens to the right, leaving you the very middle to write your own message.

CREATE THE LAYERS

You could make your card so that it has the flat base, then the 3 front panels. I decided to make my card base a regular opening card base, because I like to write a lot in my cards to family! To do it this way, your card base measures 7″ x 8 1/2″, scored at 3 1/2″. Set this aside for now, while you create the layers.

Cut 3 pieces of white cardstock, one at 3 1/2″ x 8 1/2″, and 2 that measure 4″ x 8 1/2″.  Use your Big Shot with the die set, and die cut one of each.  If you like, you can use your markers to add colour to the evergreen trees and light the windows. Next, on the 1st die cut that is 4″ wide (this will be your middle piece) score it at 1/2″ on the right hand side. Now, take the final 4″ wide die cut piece, and score it at 1/2″ on the left hand side.  Fold back & burnish the score lines.  On the inside of the scored pieces, attach a strip of double sided adhesive tape.

CREATE BACKGROUND & ASSEMBLE

Now you need to create your background. On a piece of 3 1/2″ x 8 1/2″ white cardstock, blend on Distress Oxide inks for a night sky. I chose Broken China, Dusty Concord and Chipped Sapphire. Add some falling snow by flicking on watered-down white paint. Now, cut the length of your 1st die cut (the 3 1/2″ wide piece) down to about 6 1/2″ tall. Attach it to your ink blended background with liquid glue. Decide on how you want to layer the next 2 pieces, and trim them down as needed.

Next, remove the backing from the tape on your 2nd layer, and attach that to the right hand side of the card front. Repeat this with the final piece, attaching it to the left hand side.  You can now attach your card front to the card base.  Add sentiments to the front and middle layers, in a dark blue ink. I chose sentiments from the Penny Black Peaceful Season stamp set.

Christmas Town

The photo above shows how your card looks, with both front ‘flaps’ open.

CREATE YOUR OWN CHRISTMAS TOWN

Of course you can skip the double flap openings, and simply attach each layer on top of the other! However you choose to do it, have fun, and make it your own creation.   To play along with the Scrap ‘N Stamp Daily Challenge, share a picture of your card on the Facebook challenge page HERE. Be sure to use the hashtag #SNSchallenge there, and on your other social media sharing sites. At the end of the month, one lucky person is randomly chosen to WIN a $50 GIFT CARD to shop at Scrap ‘N Stamp!

SUPPLIES

Shop for supplies to re-create this card at the Scrap ‘N Stamp store.  Be sure to use my Design Team Discount Code 10DEB at checkout, for 10% OFF your purchase! (only on regular priced items).   If you choose to use my affiliate links, you’ll be helping to support my blog, and creative projects. Thanks in advance!

Christmas Town


Christmas Town Read More »

Free Shipping Anywhere In Canada