Scratch-N-Stamp
Search

Checkout

Keep up with Sales, New Products and other events at Scrap `n Stamp. Sign up for our newsletter now!

What's New

Hot Deals


Chala

Lawn Fawn & Chibitronics Light up Card

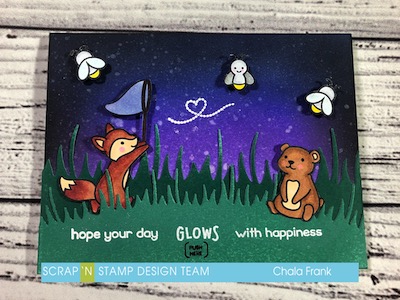
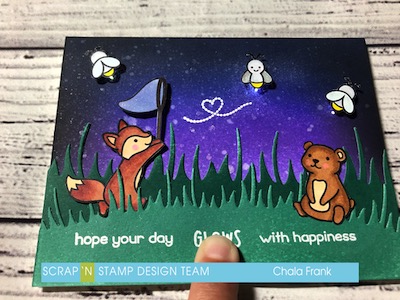
Welcome back to the blog! I cannot believe how fast summer has come and gone! I wanted to hang on to that “Ooooh oh…those summer nights” (Insert your best Olivia Newton John and Jon Travolta voices here) feeling by creating a fun light up card using the Lawn Fawn Butterfly Kisses and Little Fireflies stamps as well as showing you how you can add a new dimension to your cards with Chibitronic lights!

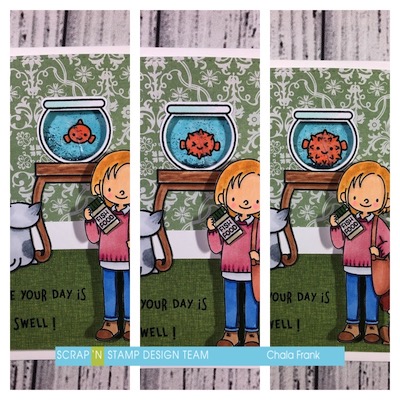
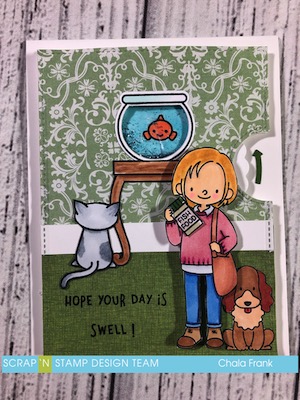
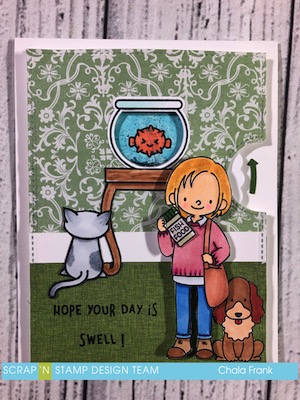
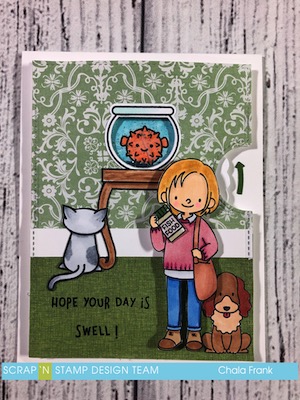
There is a lot going on in this card and I just can’t show you the cool light feature in pictures very well….so I am going to direct you to watch it all come together on the YouTube video below. I will have a list of materials and links on where you can find them at the end of this blog.

https://youtu.be/usfpKPRF4TU

If you liked today’s card please remember to leave a comment here on the blog or on my YouTube channel to let me know! We love to hear your comments and if you have any questions about the techniques we show we would love you help you as well!

Lawn Fawn Butterfly Kisses
Lawn Fawn Interactive Chibitronics Light Up Card

Remember to share your creations over at our Scrap’N Stamp Challenge Page! We love to see what you create!!

Enjoy these last summer days!

Chala, xoxoxo

Lawn Fawn & Chibitronics Light up Card Read More »

Lawn Fawn Keep Swimming Reveal Wheel Card

Hello Again! It’s Chala and I am here to share a cool technique to add extra dimension to your scene cards! We will be using some great products from Lawn Fawn including the Reveal Wheel die cut set, the Keep Swimming Reveal Wheel add-on and the Keep Swimming Stamp set. I will also be sneaking in some images from the Friends at First Sip stamp set from My Favourite Things. There are many stamps sets from Lawn Fawn that would work for this technique like the Loads of Fun or Fantastic Friends stamp sets just to name a few!

This post will be a bit different as I will only be sharing in writing the list of supplies I used and then directing you to the video to see how the card was made. I will list the materials with links below. I often find it difficult to explain in writing the process of making cards and today this has become even more difficult today with a migraine. 😔

So, without further ado….here is the link to the video and remember the list of materials will be listed below.

https://youtu.be/kDwcw7Yh5WU

I hope you enjoyed the video and that you are inspired to create your own 3D card and share it on the Scrap’N Stamp Facebook Challenge Page.

Here are some close -up pictures of the finished card and the materials used are listed below. Have a great day!

~Chala, xoxoxo

Materials:

Lawn Fawn Keep Swimming Reveal Wheel Card Read More »

Orange You Sweet

Hey Guys!  Chala here for today’s blog post.  It has been pretty cold where I am and I thought I would brighten things up with some sights and smells of summer.

I will be using the Orange You Sweet set from Concord & 9th.

(As of the time of this post it is currently on sale for 30% off)

ccd-10214_1380_general

I am going to be giving this card a twist!  It will be a scratch and sniff card.  This is actually a pretty easy technique with some great results!

The first thing I will do is prepare a piece of white card stock which measures 2 1/4″ x 5 1/2″ and I stamp out the circle or outside of the orange image across the panel.  My go-to ink for stamping is  Versafine ink. I then stamp the segment portion of the oranges.

I then will stamp the solid circle overtop of the segments with Distress Oxide ink in Spiced Marmalade.

The next steps are where things get fun!  In a container I combine orange Kool-Aid with some clear embossing powder.  The ratio is approximately 1:1.  I will then use the solid circle again and stamp over top of the stamped spiced marmalade with Versamark clear embossing ink.  I then sprinkle the kool-aid/embossing powder mixture overtop of the reined image and then set it with my heat tool.  You want to make sure your heat tool is good and hot and be sure to keep moving it so as not to scorch the kool-aid.

Image result for orange kool aid

I set that aside to cool.  The next step is to prepare my card base.  It is a standard A2 (5 1/2″ x 4 1/4″) side folding card.  I cut down a panel from some patterned paper and adhere that to the card base and then adhere the orange stamped panel on top.

For the sentiment I use some black card stock and treat it with my antistatic powder tool.  I chose the “orange you so” sentiment and stamped it with  Versamark clear embossing ink, apply white embossing powder and heat set.  I will trim the sentiment strip down and apply 3m Foam tape to the back.  Before I adhere the sentiment strip to the front I want to finish off the inside of the card.  I use my stamp platform stamped the outline of the “Sweet” with Versafine ink and the solid “Sweet” with Spiced Marmalade.  To give the inside sentiment a bit more interest I add some clear Wink of Stella to give it some sparkle.

I was a little off with the stamping of the Spiced Marmalade, but I am okay with that.  I also stamped the little splashes in the same orange colour.

I then move back to the front of the card to add the sentiment strip.

That completes the card!  Here is the finished look.

Here’s a look at a second card I created with the same stamp set.


Thank you so much for stopping by today!  If you would like a better idea of how this card came together, you can head on over to my YouTube channel and watch the video.

https://www.youtube.com/watch?v=__zq7DlZzPs

Stay warm and happy crafting!

~Chala

Orange You Sweet Read More »

Free Shipping Anywhere In Canada