Scratch-N-Stamp
Search

Checkout

Keep up with Sales, New Products and other events at Scrap `n Stamp. Sign up for our newsletter now!

What's New

Hot Deals


Chala

I Can’t Help Foiling in Love!
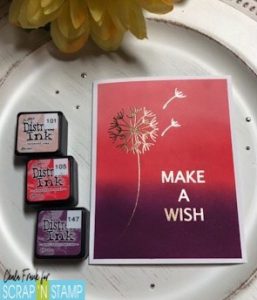
Hey There!  Today’s card is embracing the Random Act of Cardness Facebook Challenge word “foil”!  I can’t help foiling in love with foil!  I have been enjoying the We R Memory Keepers Foil Quill so much that I wanted to share another card with you!
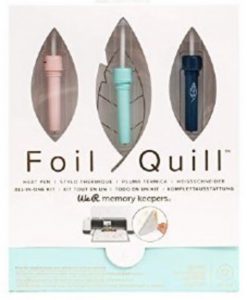
The Foil Quill can be used for a variety of different projects (not just cards) and it comes in a few different varieties.  There are the foil tip pens which you can buy in the bold, standard and fine tip as well as the calligraphy pen.  However, today I am going to be showing you the All in One Kit for an electronic die cutting machine like either the Silhouette or Cricut machine. I also have some FANTASTIC GIVEAWAY news!  One lucky blog follower will win their very own We R Memory Keepers All in One Foil Quill set for their electronic die cutting machine!  This is a prize value of $147.00 dollars!  WOW!  All you have to do is comment below and let us know what is the first thing you would make with the Foil Quill All in One set if you won!  The winner will be chosen randomly by the close of business on Friday, August 14, 2020 and will be announced over at the Facebook Challenge Page!

Now, let’s get to today’s card.  This one is fairly simple but has such an elegant look.  I will be using the Silhouette machine and Silhouette Design Studio (Business Edition) to create today’s card.  If you need a more detailed version of how this card was made I encourage you to head over to watch the YouTube video here:

https://youtu.be/6jycrOj3XHA

I started off ink blending a standard A2 size card panel with one of my favourite Distress Ink combinations:  Tattered Rose, Abandoned Coral and Seedless Preserves.  You can use either the regular Distress Inks like I did or the Distress Oxide inks.
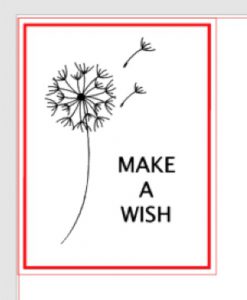
I then chose and elegant dandelion image and created a custom sentiment that says “Make a Wish”.  The wonderful thing about the Silhouette Design Studio is you can totally create your own design or choose one from the Design Store.  There is always a free file of the week and the images are a fairly reasonable price point.

There is a bit of fine tuning that you need to do with the image.  You will have to select the images and change the setting from cut to sketch and then choose your sketch lines.  I recommend you watch the video as I show this process as well as link to my Beginner Video that I made going into greater detail of how best to choose your settings.

Once you have your settings selected you can then get your project ready to foil.  Now, I again I embraced a few “learning opportunities”  (aka: mistakes”) and I feel it is important to share them with you in hopes that it helps you with your project.

I am using the We R Memory Keepers Magnetic Mat and I have to say I really like it!  If you are just using the regular adhesive mat you have to put down some scrap paper then tape your project to the scrap paper and then tape your foil over top.  If you do not do this and simply apply the foil straight onto the adhesive mat you the foil will come off onto the mat and you will ruin it (This surprisingly was not the mistake I made).

Silhouette has also come out with a new version of their adhesive mat which I like much better than the old one.  They have smaller grid lines and have made the mat so that there are arrows on both the top and bottom of the mat allowing you to feed the mat in either way.  This will extend the life of your mat as well.

With that said, you will want to place the magnetic mat onto the adhesive mat.  The magnetic mat comes with 4 magnets.  Two short ones and two long ones.  I had originally planned to do a foil border around my card so I did not end up using them this time.  However, I think they will be very handy on future projects.

Once my magnetic mat was adhered to the adhesive mat I placed my panel down (this is where my mistake came in).  I place my project so that it was not lined up with the top left side.  Rather, I chose to place it one inch to the right and once in down.  I used a small amount of Thermo Web Purple Tape on the corners to hold it in place and then layer the foil over top.  Again, using a small amount of the purple tape I began adhering the edges of the foil down ensuring that it was laying tight and smooth.  Then I loaded the mats into the machine.

Now I can go back to my computer.  Here is my mistake.  On the design window of Silhouette Studio I forgot to move my project down one inch and over one inch.  So, when I sent my project to the machine it was not foiling in the correct area.  I quickly stopped it and removed it from the machine.  I could see that it was going to foil beautifully (YAY!).  However, I now could not use this panel (BOO!).  I will trim off the little bit of foiling and save this for another card (YAY!).  This means I had to redo my ink blending panel (BOO! sort of….I find ink blending therapeutic).

After I had the new panel completed I repeated the process of securing it to the magnetic mat (ensuring everything was smooth) and then I changed the position of the project within the program.  I double check my settings and sent it to the machine.  SUCESS!
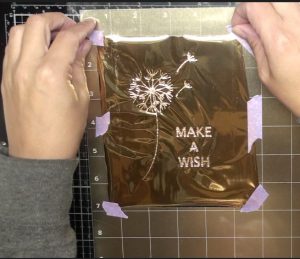
The process took a while as I chose to have it do two passes just to be sure everything foiled nicely.  I was not disappointment.  Once the project was complete, I removed the mat from the machine and then removed the foil from the project.  Again, the outcome was stunning!!  As I said before, I originally planned to have a foil border around it, but I really liked it without it so opted not to send it through again (I could have done it all at once, but wanted to see what it looked like first – glad I did that!).

I trimmed 1/8″ off each side and then adhered the panel to a standard A2 size side folding white card base.  You could add gems or other embellishments if you want, but I really liked the simplicity of this card.
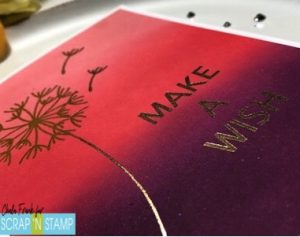
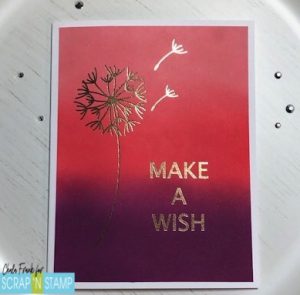
I really want to try doing this technique overtop of watercolour, as well as playing around to see if I can foil with alcohol inks and the Yupo Paper.  Stay tuned for a future post to see how this turned out!

I hope that you are inspired to add some foil to your cards!   If you don’t have an electronic die cutting machine you can always use the freestyle pens!  There are a ton of amazing foil colours to choose from and you can check out some of them here.

Remember to comment below for your chance to win the amazing We R Memory Keepers All in One Foil Quill  set for your electronic cutting machine!

Thanks for stopping by and have an amazing week!

~Chala

I Can’t Help Foiling in Love! Read More »

Snow Simple!

Happy Sunday Crafters!

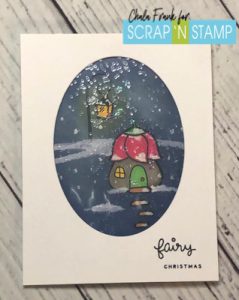
I feel like we just finally are getting into summer weather and here we are talking about Christmas again!?  Lol!  Today I am playing along with the Random Acts of Cardness Challenge and Christmas in July theme by showing  you a card that is “snow simple!”

I really want to show you how you can take a stamp set that you already have and make it feel like a Christmas/Winter card just by adding a bit of snow.

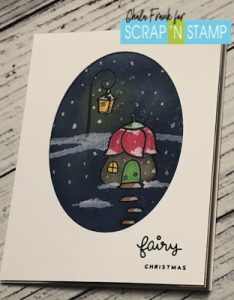
I will be using Lawn Fawn’s stamp set Fairy Friends however, another super cute set that you could use is the Frosty Fairy Friends.  I will be doing some ink blending and masking.

When I am creating a scene card I like to plan out on scrap paper where everything is going to go.  Basically, I stamp everything out and then plan my masking and in what order I need to stamp everything.  This saves me from making too many mistakes and ruining my good cardstock.

Once I have everything planned out I can go ahead and stamp the images that I want to appear in front first with Memento Tuxedo Black ink.  I will then stamp the images again onto a Gina K Masking Magic sheet.  I fussy cut out the images with my Cutter Bee Scissors and apply the masks overtop of the images.

I then ink blend with my foam ink blending tool in the colour Chipped Sapphire adding a nice dark solid layering of the ink to the background.  I then use my small Picket Fence Life Changing Blending Brush and blend Tsukineko Brilliance Moonlight White Ink around the light and fairy house to give the effect of light reflection.  I also take advantage of the circular shape of the foam blending tool and make a circular impression around the actual light in Squeezed Lemonade Distress Ink.  Adding this yellow colour gives another dimension to the glowing light feel.

I can then remove the masking paper with my Tim Holtz Craft Pick and colour the images with my Copic Markers.

To make this stamp set feel more “Wintery” or “Christmas” like I begin sketching out where I want the little piles of snow to be with a white gel pen and then I go over these areas with white acrylic paint with a  fine paint brush and also add a few dots here and there to look like falling snow.

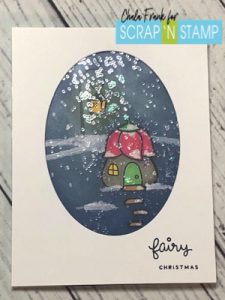
Now, you can totally leave your card just like this.  However, I took it a step further (because this girl likes a bit of sparkle on her cards) and I pulled out my laminator and some glitter embossing powder as well as some little iridescent stars that I sometimes use in my shaker cards.     I could have also actually made this a shaker card…but, I was feeling lazy and I also wanted the look of the snow falling without having to shake the card.

I let my laminator heat up and then I sprinkled the glitter embossing powder and iridescent stars in-between the laminator sheet and ran it through.  Using white heat embossing will also work depending on white kind of look you want.  I suggest you do a few test pieces to see how your embossing powders react as well as play around with how much powder to use.

I die cut an oval in another card panel piece and adhered the snowy laminated piece to the back with Be Creative Score-Tape, trimmed off the excess laminating piece.

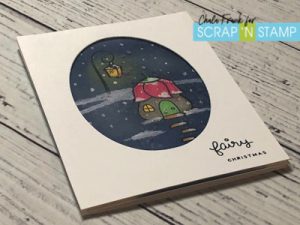
I then did a bit of stamp surgery using my Cutter Bee Scissors and altered one of the sentiment stamps so that I could just use the word “fairy”.  I then stamped “fairy” and “Christmas” on the lower right hand side of the oval card panel.  I then adhered this panel onto the stamped card piece using one layer of foam tape.  I think maybe two layers would have been better for more dimension.  The last thing to do was then to adhere all of this onto a side folding card, again I used the Be Creative Score-Tape for this.

I really wish that you could see this card in person as when you move it back and forth in the light the look of the snow between the laminated sheet is quite stunning against that ink blended background.

I hope this card has inspired you to look at the stamps sets you have and to see how simple it is to transform them into Winter/Christmas themed cards by adding a little snow.

Hoping you stay cool this week and I look forward to seeing what you create that is “snow” themed by posting your photos on the Scrap’N Stamp Facebook Challenge Page!

Take care!

~Chala


Snow Simple! Read More »

Food for Thought

Happy Monday!

Food for Thought

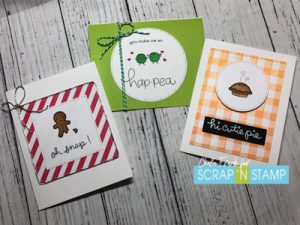
Today I am sharing my take (3 takes actually) on the Scrap’N Stamp Challenge word “Food”.

It was so hard to not make like 20 cards!  I blame Lawn Fawn for this because they have SO many cute stamp sets that incorporate food!  I am itching to get the Simply Celebrate Summer stamp set from their new Summer Release!

Today I am using 3 stamps sets from Lawn Fawn.  “Be Hap-pea“, “Oh Snap” and “Cutie Pie“.

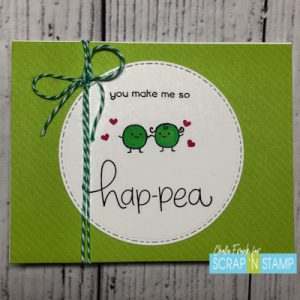
The first card I used the Be Hap-pea stamp and stamped the cute little peas and the sentiment with Memento Tuxedo Black ink onto a stitched die cut circle.  I coloured the peas with Copic markers (YG07 YG09 & R81).  The hearts I stamped with Umbrella Crafts Ruby Red dye ink.  I then adhered the stitched circle with a taper runner on to the green patterned paper from the Lawn Fawn Really Rainbow paper pack and then tied some green twine around and created a bow.  I secured this with some Glossy Accents and used some reversible tweezers to hold it in place until it dried.   The final step was to adhere the panel onto an A2 card turned to the landscape position and so that the card was top folding.  I added some hair to one of the little peas to make it look like a girl.  I am in love with these adorable peas!

Lawn Fawn - Be Hap-pea

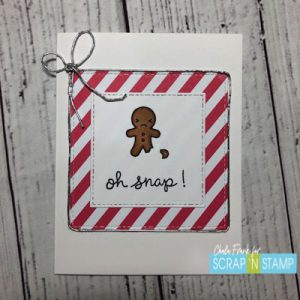
Card number two features Lawn-Fawn’s “Oh Snap” stamp set.  I am starting to gear my mind to beginning some Christmas cards and this one was a good way to dip my toes into it!  I again stamped everything using Memento Tuxedo Black ink but this time onto a square stitched die cut.  I then Copic coloured the little gingerbread with a broken leg using E55, E57 and R29.  I used a red and white striped pattern paper which I cut from the next size up of a stitched square die cut. Then I adhered these onto an A2 side folding card and trimmed with silver twine and secured again with Glossy Accents.  I left the inside blank.  I like that even though it is a bit “Christmas themed”, I can still use it for other occasions Ie:  missed birthday, etc.

Lawn Fawn - Oh Snap


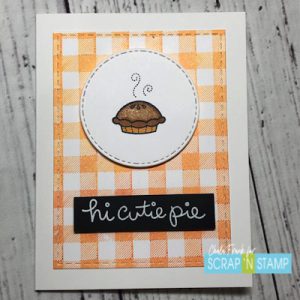
For my final card I stamped the pie from the “Cutie Pie” stamp onto a stitched.  Copic coloured with E31 and E35.  I found a gingham background stamp that I thought would look cute as a table cloth and stamped using Umbrella Ink’s Vanilla dye ink.    I die cut the background piece from a rectangle stitched die cut and adhered that to an A2 side folding card.  I then adhered the stitched circle with some foam tape to add dimension.  I wanted the sentiment to be a bit more bold on this one so I used Versamark Watermark ink and stamped the “Hi Cutie Pie” onto black cardstock and heat embossed with white embossing powder.  It trimmed that down into a rectangle with my Fiskar’s paper trimmer and mounted that onto the card base with foam tape.  I thought the card needed a little extra something so I added Wink of Stella Clear glitter on top of the pie.  It actually looks like granulated sugar!  I really like the colour combination on this one as it really differs from the colours that I usually gravitate towards!

Lawn Fawn - Cute Pie

I have a few more Lawn Fawn stamps sets sitting on my desk that I want to use which have ice cream, doughnuts, avocados, taco images, etc.   However, I can’t wait to see what you guys come up with!  Remember to share your “Food” cards on the Scrap’N Stamp Facebook Challenge Page!  And if you have not participated in this month’s hop celebrating Canada – you only have two more days to post your comments on the participating blog participants blogs for your chance to win this months’ prizes!

I hope you all have a creative week!

~Chala

Food for Thought Read More »

Free Shipping Anywhere In Canada