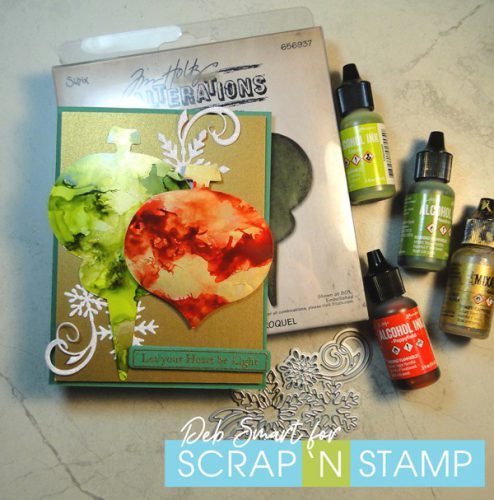
Scratch-N-Stamp
Search

Checkout

Keep up with Sales, New Products and other events at Scrap `n Stamp. Sign up for our newsletter now!

What's New

Hot Deals


Christmas cards

Winter Tree

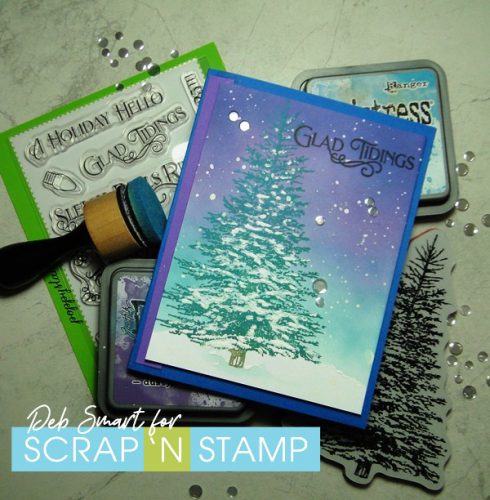
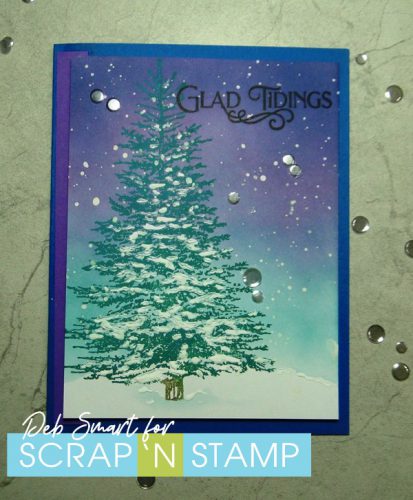
Happy Friday, my friend! It’s Deb here, from the Design Team. If you’re playing along with the Scrap ‘N Stamp daily challenge on Facebook, then you’ll know that today’s word prompt is ‘trees’.  So I pulled out one of my  favourites by Penny Black called Winter Tree.  I just love this lone tree image, and I’ve definitely gotten a lot of use from this stamp.

WINTER TREE

The tree image lends itself to doing a blended background, so that’s what I did. I went with a twilight sky, with gently falling snow.

Winter Tree

CARD DETAILS

Start with a piece of Tonic Ultra Smooth white cardstock. Decide on your background colours; I used my Distress Oxide inks, as they blend beautifully. First, mask off a bottom portion of the cardstock – this will be your snow covered ground. Now, apply Broken China to the entire piece. Next, blend on Dusty Concord to the top half, so the light blue is partially covered. Finally, blend Chipped Sapphire ink just in the top third of the piece.

To stamp the tree, first set up your blended cardstock in your stamp platform, and align the Winter Tree stamp. Cover the stamp with Pine Needles Distress Oxide ink, and stamp. Reapply the ink, and stamp again, to ensure proper ink coverage.  Now, line up the sentiment from the Poppystamps Christmas Fun stamp set, in the top right corner. Cover the stamp with Nocturne ink, and stamp. Repeat this for a nice dark, crisp sentiment.

To add the snow to the tree and ground, I used white gouache paint and a small brush. You could use white texture paste, instead.  Next, add snowflakes by thinning some gouache with water, loading a small brush, and flicking it onto the card front.  Finish off the card by adding some Gina K. Clear Quartz Solid Sequins, and layering it on a dark blue card base, with a strip of purple on the left side.

Winter Tree

You can see in the photo that I applied the gouache heavily, to add dimension to the snow areas. Although it seems like a lot of steps, this card comes together quite quickly. It would great for sending out lots for the holidays!

JOIN THE DAILY CHALLENGE!

You don’t have to post a project daily – you can join in for as many days as you can. Join the Facebook challenge page HERE. You’ll see the list of daily prompts. Once you create your project, share a photo of it on the page, plus your other social media site. Use the hashtag #SNSchallenge so it will be seen!  At the end of the month, one lucky person will be randomly chosen to WIN A $50 GIFT CERTIFICATE to shop at Scrap ‘N Stamp!

SUPPLIES

To shop for the products I used to create my card, you can click on the affiliate links at the bottom of this post. Be sure to use my Designer Discount Code of 10DEB at checkout for 10% Off (only good on regular priced items, and can’t be combined with other offers).  If you choose to use my links, you help support me in maintaining my blog. Thanks in advance!

Winter Tree


Winter Tree Read More »

Carved Ornaments Die

Hello, my friend! It’s Deb here, for the Design Team. Are you like me, and start stressing over your holiday cards as soon as the calendar flips to November? Maybe it’s because I have to mail to family overseas, but I always start to panic. Well, today I’m going to share a holiday card that you can easily ‘mass produce’, if you’re short on time. It uses the Tim Holtz Carved Ornaments Die for 2 fabulous ornament shapes.

CARVED ORNAMENTS DIE

This die is one of the Sizzix ‘Bigz’ dies, which means you can die cut 2-3 sheets of cardstock at a time, as well as being able to cut other heavier substrates, as well. So if you’re into stitching or sewing, you could die cut fabric or felt ornaments for your tree, or as gifts! I, however, stick to what I know – which is paper!

Carved Ornaments Die

I love the large size of these ornaments!

CARD DETAILS

I just HAD to decorate these ornaments with my alcohol inks! First, I die cut the ornaments from Yupo – the perfect substrate/base for alcohol inks. Next, I chose my colours. I decided to be ‘traditional’, and use red and greens. For the green ornament, I first dropped Citrus and Meadow alcohol inks, added some Alcohol Blending Solution, and then use the Tim Holtz Air Blower to move them around on the Yupo. Next, I added some Gold Mixative, with more Blending Solution, and moved it around. I continued to do this, until I was happy with the result. For the red ornament, I repeated the same steps, this time I used just Poppyfield aclohol ink with the Gold Mixative. It’s super easy to do this technique, and fun, too!

If you were going to mass produce the ornaments, I’d suggest doing a whole sheet of Yupo at once, and then doing the die cutting. You can even stack 2-3 sheets of Yupo on top of the die to cut at once. Your card making would go really fast!

Set aside your ornaments – they will be dry before you know it. Use the Big Shot again with the Hero Arts Snowflake Cluster die and Lawn Fawn sparkle paper.  Use a sentiment from the Poppystamps Christmas Quotes stamp set, and stamp in Versamark onto green cardstock. Cover it with gold embossing powder, and set with a heat tool.  Use the coordinating dies that come with the Christmas Quotes set to die cut the sentiment. Now you’re ready to put your card front together!

LAYER IT UP!

Snip the Snowflake Cluster die cut in half, placing it in the bottom left and top right corners of a piece of brushed gold cardstock. Next, glue the green ornament to the left side. Attach the red ornament with foam tape or squares to the right & overlapping the green ornament.  Next, attach the sentiment die cut at the bottom right, under the red ornament.  Finally, attach the card front to a green card base, using foam tape.

Carved Ornaments Die

The shine of the alcohol inks is so pretty in real life – hard to photograph without a glare, though.

JOIN THE DAILY CHALLENGE

Today’s prompt for the Scrap ‘N Stamp daily challenge is – you guessed it – ‘ornaments’! If you’re not playing along, you really should! All you need is a Facebook account, and the ability to share a photo of your project. You can find the group page HERE, Play along with as many days as you like, posting your project with the hashtag #SNSCHALLENGE there, and on your other social media accounts. At the end of the month, one lucky person is randomly drawn to WIN a $50 GIFT CARD to shop at Scrap ‘N Stamp!  A new list of daily prompts is posted at the beginning of each month, so you can keep playing along.

SUPPLIES

All you need to re-create my card, and create your own, is available in the Scrap ‘N Stamp online store. Have fun creating! I’ll be looking for your projects in the challenge group.

Carved Ornaments Die

Affiliate links are supplied, below. If you choose to use my links, you help support me in maintaining my blog. Thanks in advance!


Carved Ornaments Die Read More »

One Layer Winter Card with Concord & 9th

Concord and 9th happy winter 1

Hi Everyone!

I hope you are all well and staying safe in these trying times. Those of you dealing with kids back in school I wish you all the best for whatever situation you are faced with.

I have a one layer card for you today. These haven’t always been easy for me to do and sometimes I still struggle with them but today’s card came together pretty easy.

Concord and 9th happy winter 2

I started with stamping the image a little off to the right making sure to leave enough space on the left for my ‘patterned paper.’ I used the distress oxide minis to create my paper. I chose 6 colors – 3 blues and 3 greens – and pressed the cube onto the paper and dragged it off the edge. Once I filled up the side I stamped the little images on top.

Concord and 9th happy winter detail

Next I grabbed a blender pen and coloured in the image with the same colors in the ‘paper’ and a few more.
I chose to use a bigger sentiment because it balances well with the larger image on my card and to help ground the image.

Concord and 9th happy winter

A few tips for one layer cards:
– use one larger image
– if using smaller images cluster them together
– keep the colors simple (I did use quite a few but they were all shades of each other so that helps to keep it simple)
– larger sentiments work well with large images
– smaller sentiments work well with smaller images.

I hope this tips make sense and help you if you struggle with one layer cards.

Happy Stampin’

and thanks so much for visiting!

Stay safe everyone!!
Susan

Shopping list:
Below are links to all the goodies I used, just click on the icon to be taken to where you can purchase the product.
If you use my affiliate links when shopping there is no additional cost to you, I want to say thank you and that I appreciate it and you very much.


One Layer Winter Card with Concord & 9th Read More »

Free Shipping Anywhere In Canada