Scratch-N-Stamp
Search

Checkout

Keep up with Sales, New Products and other events at Scrap `n Stamp. Sign up for our newsletter now!

What's New

Hot Deals


Concord & 9th

Winter Tales by Penny Black

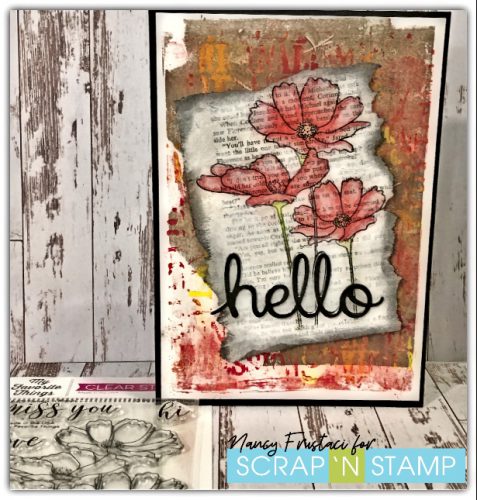
Happy Monday, my friend! I have a super cute card to share with you today, so grab your favourite beverage, and settle in for a bit. As soon as I saw the preview of the winter release, I knew that I would be ordering this Winter Tales stamp set by Penny Black. I just love scenic stamp images, and the little birds on this one are just too cute! Seeing this stamp brought to mind my wonderful Design Team member Kia – she loves birds, and probably has the most bird related stamps than anyone I know. And that’s okay, because she’s so talented, and always creates gorgeous projects with them. So, hopefully I’ll live up to her standard with my birds in today’s project.

WINTER TALES

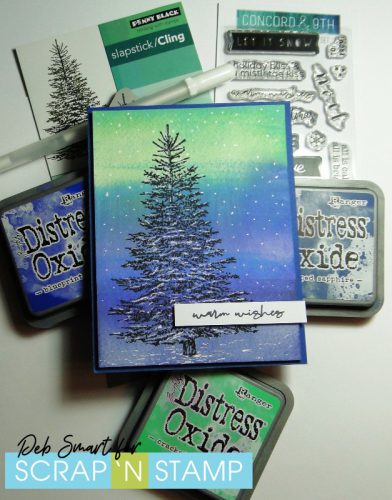
This Winter Tales stamp is a large one, but I trimmed it down to fit a standard A2 card.

Penny Black Winter Tales

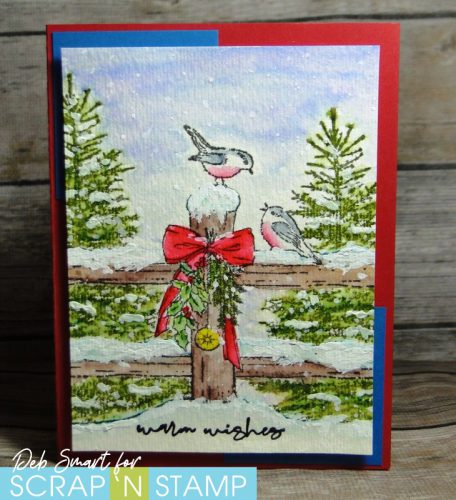
Well – was I right about these adorable birds?! They look like they’re having a very animated conversation – how fun would it be to understand bird talk?

IMAGE DETAILS

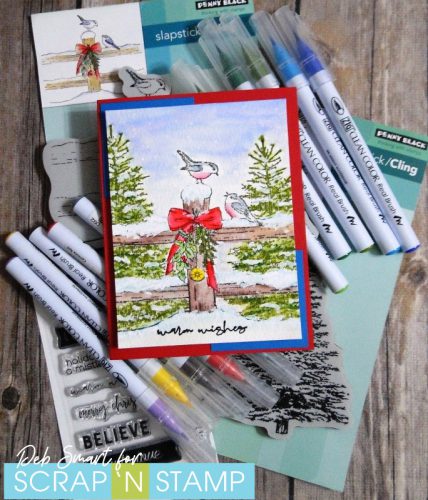
This image lends itself to colouring with your favourite medium. I chose to watercolour with my Zig Clean Color Real Brush Markers, and a water brush. To start, set up the stamp and your watercolour paper in your stamp platform. Because watercolour paper has a texture to it, you’ll want to be able to re-ink and stamp at least twice, for a clear impression. Use an archival ink to cover the entire stamp, and press onto your panel. Repeat at least once more, until the image is crisp & clear.  Now, stamp the image again onto a piece of masking or photo copy paper, and hand cut with scissors. This is your mask, so that you can stamp the trees behind the image.

Use the Winter Tree stamp, also from Penny Black, and stamp it in Gina K. Fresh Asparagus ink, with the mask in place. Stamp the tree on either side of the middle fence post; repeating the stamping for good ink coverage. With that done, you can remove the mask, and start colouring the image.  For colouring with the markers, first apply a bit of colour directly to the image, and then immediately blend it on with a damp water brush. Continue to do this until you’re happy with the depth of colour. Once the colours are dry, you may want to go back in to add more ink, to create depth and shadows.

CREATE SNOW AND BACKGROUND

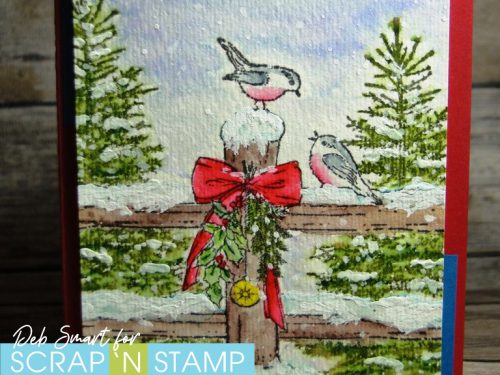
To create the snow, add white Gouache paint without thinning it, directly onto the areas where the snow should be. Those are the tops of the fence rails and post, on the ground, and on the trees. For the sky, use the Blue marker and lightly brush it across the sky. Do a small area at a time, immediately blending with the water brush, so it isn’t too dark, or blotchy. I love how the other colours within the blue start to show through, when it’s blended with the water.

When the sky and snow are dry, thin out the remaining gouache paint with a bit of water. Put your mask back in place, to cover the birds and fence. Pick up the thinned gouache with your paintbrush, and splatter it onto the panel, creating smaller snowflakes. Remove the mask, and add a few snowflakes by hand onto the fence and trees.

Here’s a close up photo, so you can see how the gouache, without water, creates dimension for the snow.

Penny Black Winter Tales

FINISH YOUR CARD

Now, stamp the small sentiment from the Concord & 9th Mistletoe Messages at the bottom, in Nocturne ink. Cover with clear embossing powder, and heat set.  Layer 2  blue squares in opposite corners of your red card base, and then attach your image panel with foam tape.

Penny Black Winter Tales

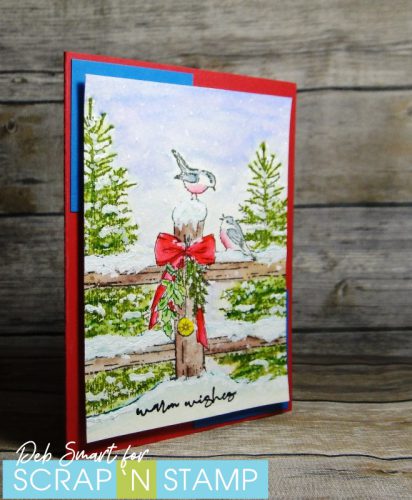
I coloured my birds to look similar to robins, but you can make them into your favourite bird!

Thanks for spending some time with me today! I  hope  you’ve been inspired to have fun creating your own winter or Christmas cards. Or, just change up the sentiment, don’t add the snow, and this would make a great anniversary or thank you card, too! If you haven’t already, be sure to leave comments on each blog in our White Christmas blog hop, for a chance to WIN a $50 Scrap ‘N Stamp Gift Card! You can start HERE at Tara’s post.

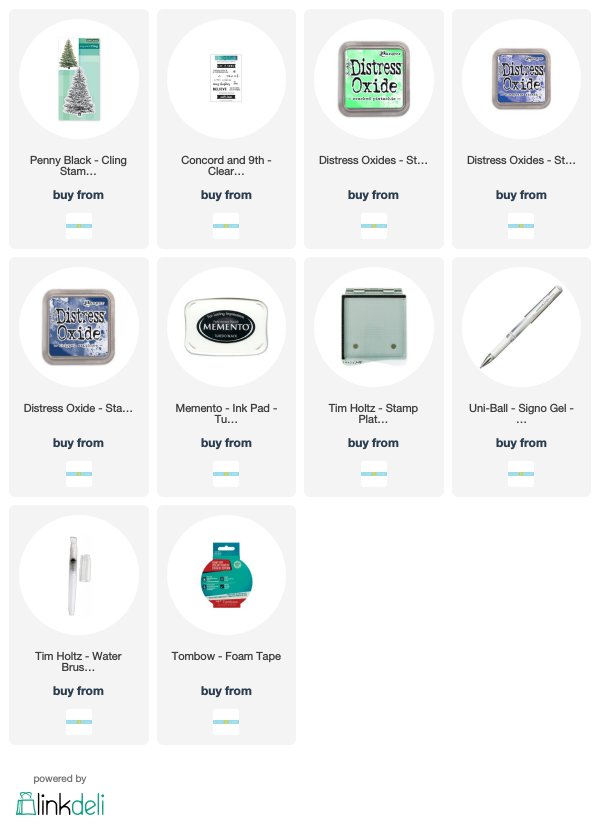
To order the products to make this card, links are included below.

Winter Tales Penny Black

Affiliate links are provided, at no cost to you.


Winter Tales by Penny Black Read More »

MFT Floral Blooms

Hello Crafty friends, Nancy F here today to share on the Scrap’n Stamp blog. I decided to do something a little different, yet still playing along with the monthly challenge. I am doing an all mixed media style card, from used books pages to gel pressing. So grab your favorite beverage and sit back and enjoy it.

mixed media pages, stamped the floral  blooms on to pages of an old book and heat set it with some embossing powder. I then added gesso around the flowers

I started by stamping out these beautiful Flowers in bloom set from My Favorite things on to the pages of the book using my stamping tool and Versa Clair nocturn ink .  Then I heat set with clear embossing powder to help the image stand out from the writing, then repeated this process four times. 

I also had too many ideas flowing through my head by this point, from art journaling layouts to more cards. So stay tuned for more projects.

adding colour to the flowers with distress crayons and Dina Wakley paints


Now that all the stamping and embossing was completed it was time for the fun messy part, getting in with the paints and gesso. This is always my favorite part. 

To bring the focus more to the flowers I decided to add Dina Wakley media white gesso to the book pages, carefully going around the flowers. This really helped to mute the print down some and allow the flowers to pop. I decided to actually add some gel medium to the petals of the flowers, I felt this would seal the paper and allow me to wipe any mistakes away easily.

finishing off the edges of the book page with some ground espresso, and black soot

 I created three styles of cards with three versions of the painting. 

For the above, I would add my paint in and then wipe it away allowing it to stain the paper and give it a night tinted look. Once I was happy with how it looked I decided to distress the edges of the paper, using distress oxides and regular inks.

adding the flowers too some previously created gel pressed backgrounds

The cards themselves were larger than normal, cards measured 5 ½ X 7 ¾. I used some of my previously created gel backgrounds and really did not want to trim much off of them, thus keeping as much of the detail as possible. I chose the background to match or enhance the flowers.

A close up of one of the finished cards,

  Each gel pressed backgrounds were added to the card flat using a liquid adhesive. For a little dimension popped up the painted flowers using some foam tape. To complete the card I used a simple hello die and layered a few of them together to create dimension also adding a mirror layer to the mix.

I hope you were able to get some inspiration from the above and welcome your comments. Please also make sure to use the links below for your crafting needs. 

Have a Great Week! 


MFT Floral Blooms Read More »

Create a Distress Oxide Watercolour Background

Happy Monday! I hope you’re all rested and ready to try something new today! At least, this technique was new to me; perhaps you’ve already tried it & love it. It’s Deb here today, and I’m continuing on with the Scrap ‘N Stamp blog hop theme of Distress Oxide inks for my card today.  I’m here to share with you how to create a Distress Oxide watercolour background.

WINTER TREE

This card is easily done, and doesn’t take long. That meets my criteria for a holiday card that I can mass produce!

The colours I used create an easy ‘northern lights’ effect. You can switch up the colours to create a ‘regular’ night sky, if you prefer.

CARD DETAILS

Start with a panel of watercolour paper. Next, apply the Distress Oxide inks directly to the paper – no blending tool needed! Start with Cracked Pistachio at the top, then Chipped Sapphire in the middle, and finally Blueprint Sketch at the bottom. Spray the entire panel with water, and then spread the colours across the panels, for full coverage. You just want to spread the colour – not work it into the paper. Now, prop your panel up against something, so that it’s at a slant. Allow the piece to dry, so that the water & colours move downwards as it’s drying.

Once your panel is dry, set it  up in your stamping platform, with the Penny Black Winter Tree stamp. Cover the stamp with Memento Tuxedo Black ink, and stamp onto the panel. Because of the texture of the watercolour paper, you’ll probably need to ink & stamp twice – that’s why you’re using your stamp platform!

After stamping, use a white gel pen to add snow to the tree, the ground and snowflakes. Stamp the sentiment from the Concord & 9th Mistletoe Messages stamp set in Tuxedo Black onto a strip of white cardstock, and trim to size.

Layer your stamped panel onto a dark blue card base with foam tape. Finally, attach the sentiment strip across the bottom third of the front, with more foam tape.

I hope that you’ve enjoyed our month of Distress Oxide projects, and are inspired to try out at least some of the different ways to use them. It’s not just stamping anymore! If you need some supplies, I’ve included links below for online shopping.

Have fun stamping – and getting creative!

Affiliate links are provided, at no extra cost to  you.


Create a Distress Oxide Watercolour Background Read More »

Free Shipping Anywhere In Canada